T2240/9 Operator’s Manual Bedienungsanleitung Manuel d’utilisation Istruzioni per l’uso Instrucciones de servicio Matrix Printer Matrixdrucker Imprimante matricielle Stampante a Matrice Impresora matricial T2240/24 T2340/9 T2340/24
Important Information This equipment generates and uses radio frequency energy and if not installed and used properly, that is, in accordance with the manufacturer’s instructions, may cause interference in radio and television reception. It has been type tested and found to comply with the limits for class B computing devices in accordance with the specification in subpart J of part 15 of FCC rules, which are designed to provide reasonable protection against such interference in a residential installation.
Quick start-up Operator’s Manual QUICK START-UP Introduction Symbols used in this manual Important safety instructions Using the online documentation Troubleshooting The printer at a glance Installation Unpacking the printer Positioning your printer Connecting the printer Switching the printer on and off Control panel Online mode Offline mode Setup mode Installing the ribbon cassette Loading paper Cut Sheet paper Printer in fanfold paper mode Changing the paper type Paper path quick selection Paper transp
Introduction Quick start-up Introduction Ah ha! ➤ Symbols used in this manual STOP This Operator’s Manual is intended as a quick introduction into working with the printer and is to enable also unexperienced users to handle the device properly. It describes the most important functions of the printer and contains the essential information for your everyday work with the printer.
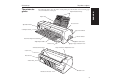
Quick start-up The printer at a glance The following figures show the name of each printer part, and the table on the following page shows the functions of each part.
The printer at a glance 4 Quick start-up Name Functions Operation Panel It indicates the printer status, and is used to change various settings. Paper Tray It is used as a paper support for cut sheet paper already printed when the option “F-Eject” is set to OFF in the Initial Setting. Paper Extension Trays They are used for extending of the Paper Tray.
Quick start-up Installation ➤ Unpacking the printer Please open the printer package and check that all the following items are included. Unpacking Instructions Operator’s Manual Printer If any item is missing or damaged, please contact the store where the product was purchased. Remove the transport protection elements as described in the unpacking instructions. The carton and the packing materials will be necessary for moving or transporting the printer. Please store them in a safe place.
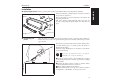
Installation Quick start-up ➤ Connecting the printer Make sure that the unit is set to the correct voltage (i.e. 230 V for Europe, 120 V for the USA). Refer to the type plate beside the power inlet on the rear side of the printer. If this is not the case, contact your dealer. Type Plate STOP Never switch on the printer when it is not set to the correct voltage since this could cause severe damage. Connect the power cable to the printer’s power inlet as shown in the figure.
Quick start-up Control panel Control panel The first line of the display informs you about whether the printer is in Online or in Offline mode and about the paper path selected (Trac.1 or Single). ➤ Online mode Online When switching on the printer, it automatically selects Online mode. It can receive data from the computer only in this mode. Trac.1 Tear Online ➀ Sets the printer to Offline mode. ➀ ➁ Setup Sets the printer to Setup mode.
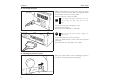
Installing the ribbon cassette Installing the ribbon cassette STOP Quick start-up Remove any paper loaded into the printer. Before opening the cover, make sure that the printer is switched off. Set the Paper Thickness Adjustment Lever to the “8” position. Paper Thickness Adjustment Lever Latch Lever Pull the Latch Levers near the right and left ends on the Access Cover to the front, and detach the entire Access Cover.
Ribbon Feed Knob Installing the ribbon cassette Align the part “A” on the left side of the Ink-ribbon Cartridge to the two hooks of the printer, push the cartridge all the way until it clicks. If there is resistance, push it while turning the Ribbon Feed Knob. Part “A” (left side) Hooks Ink-ribbon cartridge Detach the Ribbon Guide from the Ink-ribbon Cartridge. Do not detach the shield that has been attached to the Ribbon Guide; it is necessary to protect the ribbon.
Loading paper Quick start-up Access Cover When the Ink-ribbon Cartridge setting is complete, attach the Access Cover. Set the Paper Thickness Adjustment Lever in accordance with the thickness of the paper to be used. Refer to page 18 (Setting the print head gap). Loading paper Only use paper which is suitable for this printer. For more information, refer to the online documentation on the CD-ROM, Appendix C (Specification).
Loading paper Set the Paper Type Selection Lever to Cut Sheet Paper mode. Make sure that the printer is in Single Sheet mode. For how to select Single Sheet mode refer to page 14 (Paper path quick selection). Cut Sheet Insert Guide Paper Type Selection Lever Determine the left margin by moving the Left Paper Guide left or right. (The “[A” mark indicates the standard print start position.
Loading paper Quick start-up ➤ Printer in fanfold paper mode Front Cover Set the Paper Thickness Adjustment Lever according to the type of paper to be used. Refer to page 18 (Setting the print head gap). Set the Paper Type Selection Lever to Continuous Form Feed Paper mode. Open the Front Cover to its upright position until it snaps in. This prevents unexpected closing of the cover.
Loading paper With the printing side of the paper facing up, fit the feeding holes on the left edge of the paper over the Left Tractor pins and close the Paper Flap. Fit the feeding holes on the right edge of the paper over the Right Tractor pins, and close the Paper Flap. To avoid paper jams, ensure that the same left and right feeding holes are used, and placed over tractor pins of the same level.
Changing the paper type Quick start-up Changing the paper type You can change the paper type (the paper path) either using the paper path quick selection feature or via the Setup menu. ➤ Paper path quick First cut the fed-out portion of a Continuous Form Feed Paper at the perforated line. To do this, proceed as follows. selection Offline Park Trac.1 Load Online Setup Single Trac.1 Online Make sure that the printer is in Offline status; press the Online key, if necessary. Press the Park key.
Quick start-up Single Online Press the Online key to make the printer ready for operation. ENGLISH Online Paper transport Setup Paper transport Offline Park Trac.1 LF/FF Loaded paper (fanfold paper/single sheets) can be transported in the printer in different ways. Online Setup ➂ ➁ ➀ Make sure that the printer is in Offline status; press the Online key, if necessary.
Settings (I) Quick start-up Settings (I) ➤ Setting the tear If the tear position of the paper is not aligned with the tear edge of the printer, you can adjust it. position Offline Park Trac.1 LF/FF Online Press the Setup key. The printer changes to Setup mode. Setup Adjust Menu Paperway Char Online Press the Adjust key. Setup Online TOF Press the Tear key. Tear Setup TearAdj=00/72" * Set Exit Online Press the < or > key to move the perforation to the appropriate position.
Quick start-up Paperway Char Online Press the Adjust key. ENGLISH Adjust Menu Settings (I) Setup Online TOF Press the TOF key. Tear Setup The bottom edge of the currently valid first printing line A of the paper is transported to the tear edge B. The factory setting for the first printing position is 12/72". A B FormAdj=12/72" * Set Exit Online Setup Press the < or > key to move the first printing line to the appropriate position.
Settings (II) Quick start-up Settings (II) ➤ Setting the print head gap The printer has been provided with a Paper Thickness Adjustment Lever for adjusting the print head gap To obtain optimum print quality, the gap between the Print Head and the Platen needs to be adjusted according to the thickness of the paper to be used.
Quick start-up Settings (II) ➤ Changing paper in ➤ From fanfold paper to single sheet mode When fanfold paper was in use and you want to change over to single sheet mode, proceed as described below. You do not need to remove the fanfold paper. Online Adjust Menu Trac.1 Load Paperway Char Setup Cut the fed-out portion of the Continuous Form Feed Paper at the perforated line. To do this, proceed as follows. Press the Setup key. The printer changes to Setup mode. Online Press the Paperway key.
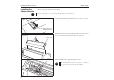
Settings (II) Quick start-up Turn paperlever Online Set the Paper Type Selection Lever to Cut Sheet Paper mode. Setup In the display appears… Load paper from Single Online Setup Online Single Online Stand the Paper Tray up and pull up the Paper Extension Trays (see page 10). Place a sheet of paper aligned to the Left Paper Guide, and adjust the Right Paper Guide to the right edge of the paper. Insert the paper between the Left and Right Paper Guides.
Quick start-up Settings (II) Exit Confirm the setting by pressing the Set key. An acoustic signal acknowledges the input. ENGLISH Online Tractor1 Set Setup Offline Park Trac.1 LF/FF Online The display toggles between… Setup and… Turn paperlever Online Setup ➤ Selecting a font Adjust Menu Paperway Char Shift the Paper Type Selection Lever to the position needed. The printer is now ready for printing fanfold paper. Press the Online key to make the printer ready for operation.
Settings (II) Quick start-up STOP ➤ Setting the The selection made will not be retained after printer power-off. For information on how to select a font permanently, refer to online documentation on the CD-ROM, chapter 1 (Menu description table). You can use the CPI key to set the character pitch in Setup mode. character pitch Adjust Menu Paperway Char Online Press the Setup key. Press the Char key. Setup Font CPI Online Press the CPI key.
Quick start-up Specifications Specifications Printing method serial printing with 9-pin matrix print head serial printing with 24-pin matrix print head Print width narrow printer 80 characters at 10 cpi wide printer 136 characters at 10 cpi narrow printer 80 characters at 10 cpi wide printer 136 characters at 10 cpi Print speed (bidirectional) LN-Draft Draft NLQ Draft 409 cps at 10 cpi Draft Copy 275 cps at 10 cpi NLQ/LQ 92 cps at 10 cpi Character densities 5, 6, 7.5, 8.6, 10, 12, 15, 17.
Accessories Quick start-up For more information on printer specifications and paper specifications, refer to the online documentation on the CD-ROM. Accessories Ribbon cassettes Narrow printer: Part No. 044 829 Wide printer: Part No. 044 830 Demo page The demo page contains information on the firmware version, serial number, needle check, fonts, font attributes and bar codes/LCP. Hold down button 4 while switching on the printer to print the demo page. To terminate printing, switch off the printer.
“All rights reserved. Translations, reprinting or copying by any means of this manual complete or in part or in any different form requires our explicit approval. We reserve the right to make changes to this manual without notice. All care has been taken to ensure accuracy of information contained in this manual. However, we cannot accept responsibility for any errors or damages resulting from errors or inaccuracies of information herein.” ,, Alle Rechte vorbehalten.
TALLY REPRESENTATIVES GERMANY Tally Computerdrucker GmbH Postfach 2969 D-89019 Ulm Deutschland Tel.: +49 7308 80 0 Fax: +49 7308 5903 http://www.Tally.de ITALY Tally S.R.L. Via Borsini 6 I-20094 Corsico (MI) Italia Tel.: +39 02 48608 1 Fax: +39 02 48601 141 http://www.Tally.it SPAIN Tally SRL Joaquin Lorenzo 4, Local 28033 Madrid España Phone: +34 902 196 183 Fax: +34 913 739 943 http://www.Tally.es SINGAPORE Tally AMT Printers Pte.