EPSON Advanced Printer Driver Ver.3.04 TM-C100 Driver Manual EPSON Rev.
TM-C100 Printer Driver Operation Manual Cautions ❏ No part of this document may be reproduced, stored in a retrieval system, or transmitted in any form or by any means, electronic, mechanical, photocopying, recording, or otherwise, without the prior written permission of Seiko Epson Corporation. ❏ The contents of this document are subject to change without notice. Please contact us for the latest information.
Manual Content This manual consists of the following chapters. Chapter 1 Outline of the TM-C100 Printer Driver Describes the environment of the printer driver. Chapter 2 Configuring Printer Driver Settings Explains how to configure the various printer driver settings. Chapter 3 Utilities Gives details on the use of the various utilities. Appendix-A Acquiring printer information by PRINTER_INFO_2 Explains printer information acquired by PRINTER_INFO_2.
TM-C100 Printer Driver Operation Manual Table of contents Manual Content . . . . . . . . . . . . . . . . . . . . . . . . . . . . . . . . . . . . . . . . . . . . . . . . . . . . . . . . . . . . . . . . . . . ii Conventions . . . . . . . . . . . . . . . . . . . . . . . . . . . . . . . . . . . . . . . . . . . . . . . . . . . . . . . . . . . . . . . . . . . . . . ii Table of contents . . . . . . . . . . . . . . . . . . . . . . . . . . . . . . . . . . . . . . . . . . . . . . . . . . . . . . . . . . . . . . . .
iv Table of contents Rev.
TM-C100 Printer Driver Operation Manual Chapter 1 Outline of the TM-C100 Printer Driver The TM-C100 Printer Driver is the Windows Driver that is included in the Epson Advanced Printer Driver (hereafter referred to as APD). This manual describes how to configure the setting of the TM-C100 Printer Driver and how to use the Utilities. Refer to the "Epson Advanced Printer Driver Installation Manual" for the Installation and the test printing of the TM-C100 Printer Driver.
TM-C100 Printer Driver Features ❏ Similarly to normal Windows drivers, allows you to print from commercial text editor or spreadsheet applications easily, without any programming. It also allows you to print from applications created using Visual Basic, Visual C++, etc. ❏ Allows you to print using Windows TrueType Fonts. The printer does not have embedded fonts. ❏ When using roll paper, the roll paper can be cut precisely with the autocutter.
TM-C100 Printer Driver Operation Manual Operating Environment Operating Environment of the Printer Driver The minimum requirements in hardware and system to use the printer driver are listed below. Operating system Microsoft Windows 2000 Professional SP4 or later Microsoft Windows XP Professional SP1 or later Operating system settings Screen resolution: 800 × 600 or higher Screen color: 16-bit color or higher (256 colors or lower not supported) Interface USB 1.
1-4 Outline of the TM-C100 Printer Driver Rev.
TM-C100 Printer Driver Operation Manual Chapter 2 Configuring Printer Driver Settings To print, you need to use the printer driver to configure printer settings. This chapter describes how to configure printer settings of the printer driver. Note: If you replace one TM-C100 with another TM-C100 when you have logged on to your computer as a user with administrative rights (a user belonging to the Administrators group), the printer may not operate correctly. In this case, restart your computer.
❏ Configuration tabs: The following tabs are available on the configuration screen: Main settings, Paper Settings, Layout Settings, Option Settings, Utility, and Version. You can select a tab and then modify its settings. ❏ Window pane: When you change the printer driver settings, the paper information and printer information in the window pane are also updated. You can use this pane to check the changes you have made to the settings.
TM-C100 Printer Driver Operation Manual Option Settings Use the [Option] tab to select a Paper Source Option and specify a Printer Color Specification for the printer. When configuring the printer settings, start from this tab. Paper Source Option For the paper source option, select from the following choices: Auto Sheet Feeder, Roll Paper Holder, or None. Note: ❏ Always select a paper source option according to the option installed on the printer.
Printer Color Specification Select “Color” or “Black,” whichever is appropriate for your printer model. ❏ For color model: Select “Color.” ❏ For monochrome model: Select “Black.” Note: ❏ Always select a color option according to the option specified for the printer. If the selected color option does not match the option specified for the printer, the printer does not print normally. ❏ When you have changed the printer color specification, the following message appears.
TM-C100 Printer Driver Operation Manual Main settings Use the [Main] tab to specify the Media Type, Color, Printing Mode, and Print Preview settings. Media Type The media type setting differs depending on the printer color specification setting on the [Option] tab. (See “Printer Color Specification” on page 2-4.) ❏ For color model: You can select the following media types: Plain Paper, Special Fine Paper, and Special Matte Paper.
Color Specify either “Color” or “Monochrome” for printing. ❏ For color model: You can select “Color” or “Monochrome.” ❏ For monochrome model: The color is set to “Monochrome” and cannot be changed. Note: If the correct color options for the printer color specification of your printer are not displayed, the printer color specification setting on the [Option settings] tab is incorrect. Set it correctly, referring to “Printer Color Specification” on page 2-4, and then select the color.
TM-C100 Printer Driver Operation Manual Paper Settings Use the [Paper] tab to specify the Paper Source, Auto Cut, Paper Size/Page Size, Copies, Orientation, and Printable Area or Roll Paper Option. Paper Source The paper source setting differs depending on the paper source option setting on the [Option] tab. (See “Paper Source Option” on page 2-3.) ❏ If the paper source option is set to “Auto Sheet Feeder” Specify either “Auto-Sheet Feeder” or “Manual Feed Slot.
❏ If the set paper size/page size (“Paper Size/Page Size” on page 2-8) is larger than the printable area of the paper source you have selected, the following message appears. Clicking [OK] displays the paper settings screen (see “Paper settings screen” on page 2-9). Auto Cut The auto sheet cutter setting is available for selection, as shown below, only when the paper source (see “Paper Source” on page 2-7) is set to “Roll Paper Holder.” • Full Cut: Cut paper from edge to edge after printing is finished.
TM-C100 Printer Driver Operation Manual Paper settings screen If the set paper size/page size is larger than the printable area of the paper source setting (see “Paper Source” on page 2-7), the following screen appears. Select the output paper size and click [OK] to enable the Fit to Page feature. (Fit to Page feature: Reduces the print result to fit the output paper size.) Specifying a user defined paper size When you select “User Defined Size” as the paper size, the following screen appears. 1.
Note: You can define up to 30 user-defined paper sizes. If you try to save more than 30 user-defined paper sizes, the following message appears and saving is not possible. In this case, you need to use [Delete] to delete some user-defined sizes before you can add more. 4. Select a paper size and then click [OK]. The selected paper size is enabled. Copies You can specify the number of copies to print, whether to collate, and whether to print in the reverse order.
TM-C100 Printer Driver Operation Manual Roll Paper Option This setting appears if the paper source (see “Paper Source” on page 2-7) is set to “Roll Paper Holder.” You can select either of the following options. ❏ Banner Mode: In this mode, no margins are set in the top and bottom of the page. If the autocutter is enabled, the roll paper is cut after all printing is finished. • Save roll paper: Select this check box if you want to save roll paper by removing the extra space at the bottom of a document.
Layout Settings Use the [Layout] tab to Reduce/Enlarge print data on a page. Reduce/Enlarge Note: If the Fit to Page feature (see “Paper settings screen” on page 2-9) is enabled, this check box is selected and cannot be changed. When this check box is selected, you can select either of the following options. ❏ Fit to Page: Select this option to automatically reduce or enlarge print data to fit to the page of the paper size selected from the combo box.
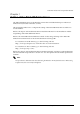
TM-C100 Printer Driver Operation Manual Using the Print Preview Screen If you have set up print preview, then the print preview screen appears before data is printed, so that you can check the print result of the current settings. For information on how to set up the print preview, see the “Print Preview” on page 2-6. 1 2 3 4 5 6 7 8 9 10 [View]→[Magnify] Rev.
Menu command selection Description — Select object. 1 [File] → [Print Document] Print the document. 8 [File] → [Cancel Print Job] Cancel the print job. 9 [View] → [Show Toolbars] → [Standard] Show or hide the standard toolbar (1 to 7). — [View] → [Show Toolbars] → [Print] Show or hide the print toolbar (8 and 9). — [View] → [Printable Area] Show or hide the printable area. 5 [View] → [Zoom] → [Fit To Screen] Enlarge or reduce the print preview to match the screen size.
TM-C100 Printer Driver Operation Manual Chapter 3 Utilities The TM-C100 printer driver provides a number of utilities, and this chapter describes how to use them, as listed below. To access the utilities, use the [Utility] tab of the printer driver. ❏ EPSON Status Viewer Utility: Use this utility to display error information and the level of ink remaining. ❏ Nozzle Check Utility: Use this utility to determine clogged nozzles on the print head.
EPSON Status Viewer Utility The EPSON Status Viewer monitors the state of the printer and then notifies you of error information or the level of ink remaining. The status display function (see “Status display” on page 3-2) and the resident icon function (see “Resident icon” on page 3-4) enable you to know the state of the printer. To set up notification, use the status viewer setting function (see “Setting up the status viewer” on page 3-5).
TM-C100 Printer Driver Operation Manual • When you click the resident icon on Task Tray • When you right-click the resident icon on Task Tray and then select [EPSON TM-C100] • When the status set for notification changes (with the display method set to “Dialog”; see “Setting up the status viewer” on page 3-5) ❏ Printing preparation state The printing preparation state displays changes according to the state of the printer, as described in the following table.
Balloon With the display method set to “Balloon”, a balloon appears when the status set for notification changes. (For information on the display method and how to set up notification, see “Setting up the status viewer” on page 3-5.) A balloon appears above the resident icon on Task Tray, as shown below. Resident icon When the printer and your computer are connected and then the power of the printer is turned on, the resident icon appears on Task Tray as shown below.
TM-C100 Printer Driver Operation Manual Setting up the status viewer You can use the status viewer dialog box to set up notification for each status (error, warning, and status). To display the status viewer dialog box, right-click the resident icon on Task Tray, and then select [Status Viewer setting] from the shortcut menu. The status viewer dialog box consists of three tabs: Error tab, Warning tab, and Status tab.
❏ Display settings • Display method: You can select “Dialog” or “Balloon” to display the status. • Display position: If “Dialog” is selected, you can further specify where on the screen to display the dialog box. You can select [Top], [Center], or [Bottom]. ❏ Display interval: Specify an interval from the range of 0 to 999, in seconds, to use to display the status again after it is displayed. If you set the interval to 0, the status is not displayed again until it changes.
TM-C100 Printer Driver Operation Manual Status tab Use the status tab to set up display of status and specify whether to send status notification. ❏ Notification items Select the check boxes of status notification items you want to display.
Starting and stopping the EPSON Status Viewer During the driver installation operation, if the startup type is set to “Automatic” on the startup type setting screen, the EPSON Status Viewer starts monitoring the printer as soon as the install operation is completed. If you want to stop or start the EPSON Status Viewer again, use the following procedure. Note: Before using StatusAPI, you need to stop the EPSON Status Viewer. For information on StatusAPI, refer to the “StatusAPI Reference Manual.” 1.
TM-C100 Printer Driver Operation Manual Nozzle Check Utility The Nozzle Check utility prints a nozzle check pattern. By examining the nozzle check pattern, you can detect whether the nozzles on the print head are clogged. Use the following procedure to check the nozzles on the print head. 1. Turn on the power of the printer. 2. Load paper. (For information on how to load paper, refer to the “TM-C100 User's Manual” supplied with the printer.
Head Cleaning Utility The Head Cleaning utility enables you to clean nozzles on the print head of the printer. To perform print head cleaning, use the following procedure. 1. Turn on the power of the printer. 2. From the [Utility] tab, click [Head Cleaning]. The following message appears. 3. Click [Next]. Print head cleaning starts. 4. When print head cleaning is finished, the following message appears.
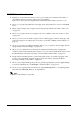
TM-C100 Printer Driver Operation Manual Top-Margin Correction Utility The Top-Margin Correction utility enables you to print a test page and correct any top margin misalignment problem. Use the following procedure to correct a top margin misalignment problem. 1. Remove the Roll Paper Holder if it is installed on the printer. 2. Turn on the power of the printer. 3. Manually load paper of A6 or larger size.
6. Check the print result. If correction is required, enter a new top margin position and then click [Retry]. Another test page is printed by using the new top margin position, and the same message appears. Repeat these steps until the correct top margin is obtained. Check the number appearing at the top of the fan object. Enter this number.
TM-C100 Printer Driver Operation Manual Right-Margin Correction Utility The Right-Margin Correction utility enables you to print a test page and correct a right margin misalignment problem. Use the following procedure to correct a right margin misalignment problem. 1. Remove the Roll Paper Holder if it is installed on the printer. 2. Turn on the power of the printer. 3. Manually load paper of A6 or larger size.
6. Check patterns #1 and #2 in the print result. If correction is required, enter the new position correction values and then click [Retry]. The two patterns are printed again, and the same message appears. Repeat these steps until the correct right margin is obtained. Check the number appearing at the right side of the fan object. Enter this number.
TM-C100 Printer Driver Operation Manual Adjust LR Utility The Adjust LR utility enables you to print a test page and then adjust any printing misalignment. Use the following procedure to correct a printing misalignment problem. 1. Turn on the power of the printer. 2. Load paper. (For information on how to load paper, refer to the “TM-C100 User's Manual” supplied with the printer. For information on how to set up the paper source, see “Paper Source” on page 2-7.) 3.
5. Check patterns #1 and #2 in the print result. If correction is required, enter the new LR correction values and then click [Retry]. The two patterns are printed again, and the same message appears. Repeat these steps until the correct LR correction value is obtained. Find the number of the upper and lower lines that form a straight line. Enter this number as the LR correction value.
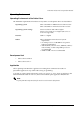
Advanced Printer Driver Printer Driver Specification Appendix-A Acquiring printer information by PRINTER_INFO_2 This chapter explains printer information acquired by PRINTER_INFO_2. APD allows you to acquire printer information by using PRINTER_INFO_2. TM PRINTER_INFO_2.Status Converting Table The PRINTER_INFO_2 structure specifies detailed printer information. In this member, you can acquire the following TM printer statuses. Rev.
Advanced Printer Driver Printer Driver Specification PRINTER_INFO_2 Status of TM-printer PRINTER_STATUS_USER_INTERVENTION An error has occurred. 1.Printing on the paper roll is not performed correctly due to a cover-open. 2.Print head temperature error 3.The autocutter does not work correctly. 4.The home position cannot be detected due to a paper jam. 5.The carriage is out of phase. 6.The cut sheet cannot be ejected even if a certain amount of feeding is tried. 7.
Seiko Epson Corporation