
Installation manual


3-16 Utilities Rev. F
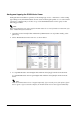
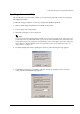
5. Check patterns #1 and #2 in the print result. If correction is required, enter the new LR
correction values and then click [Retry]. The two patterns are printed again, and the same
message appears. Repeat these steps until the correct LR correction value is obtained.
6. After the LR correction value are determined, click [Save and Exit]. The LR correction values
are saved and correction is completed.
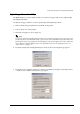
If roll paper is used, after the correction, paper is automatically transported and cut, and the
paper is advanced to the top margin position of the roll paper.
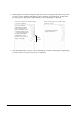
Printing
direction
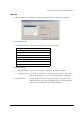
Find the number of the upper
and lower lines that form a
straight line. Enter this number
as the LR correction value. In
this example, entering 2 will
correct the problem and the LR
position will be printed
correctly, as shown in the figure
on the right.
<Print result example: where LR correction is required>
<Print result example: where LR position is correct>
Upper line 0 and lower line 0
become a straight line.