
Instruction manual


Rev. A Setup 2-5
TM-T70 Technical Reference Guide
For details on DIP SW2-1: BUSY conditions, also refer to “Busy State” (page 3-10).
Note:
Do not change DIP switch settings 2-2 and 2-6. Doing so may cause the printer to malfunction.
Note:
• Turn off the power before changing the DIP switch settings.
• DIP switch settings are enabled only when the power is turned on or the printer is reset via the
interface. If the settings are changed after that, the functions will not change.
• If the print density is set to More dark than standard or More dark, printing speed may slow down.
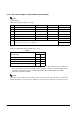
2.2.2.2 DIP switch settings for other interface specifications
The following DIP switch functions are for parallel interface/USB/Ethernet/Wireless LAN
model printers.
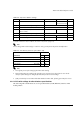
Table 2-4 Dip Switch bank 2 settings
SW Function ON OFF DEFAULT
2-1 Handshake (BUSY) conditions
• Receive buffer full • Offline
• Receive buffer full*
OFF
2-2 Reserved (do not change setting) Fixed to OFF OFF
2-3, 2-4 Print density selection/low-power mode (See separate table.) OFF
2-5 Reserved (Always use printer with these
switches to OFF.)
——OFF
2-6 Reserved (do not change setting) Fixed to OFF OFF
2-7 Pin # 6 reset signal Used Not used * OFF
2-8 Pin # 25 reset signal Used Not used * OFF
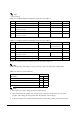
Table 2-5 Print density selection (DIP SW2-3, 2-4)
Print density
Switch No.
2-3 2-4
Print density Low power consumption mode ON ON
Print density Standard* OFF OFF
Print density More dark than standard ON OFF
Print density More dark OFF ON