English User’s Manual 412465402
English EMC and Safety Standards Applied The following standards are applied only to the printers that are so labeled. (EMC is tested using the Epson power supplies.) North America: FCC/ICES-003 Class A WARNING This is a Class A product. In a domestic environment this product may cause radio interference in which case the user may be required to take adequate measures. The connection of a non-shielded interface cable to this device will invalidate the EMC standards of this device.
English Precaution on MICROSOFT SOFTWARE LICENSE TERMS Be sure to read "MICROSOFT SOFTWAE LICENSE TERMS" at the back of this manual before you start using the product. If you do not accept any one of the terms, do not use the product. Important Safety Information This section presents important information intended to ensure safe and effective use of this product. Read this section carefully and store it in an accessible location.
English Handle the AC cable with care. Improper handling of the AC cable may cause fire hazard or electric shock. • Do not modify or attempt to repair the cable. • Do not place any heavy object on top of the cable. • Avoid excessive bending, twisting, and pulling of the cable. • Do not place the cable near heating equipment. • Check that the plug is clean before plugging it in. • Be sure to push the prongs all the way in. • Do not use a damaged cable.
English Be sure to use this product with the connector cover attached. If it is not attached, foreign objects may enter this product, causing fire or equipment damage. Do not use the product in locations subject to high humidity or dust levels. Excessive humidity and dust may cause paper jams and other problems, such as fire, or electric shock. Do not use the product where inflammable fumes of gasoline, benzine, thinner, or other inflammable liquids may be in the air.
English For California customers only The lithium batteries in this product contain Perchlorate Material - special handling may apply. See www.dtsc.ca.gov/hazardouswaste/perchlorate. Unpacking The following items are included with the standard specification printer. If any item is damaged, contact your dealer.
English Part Names Control panel Roll paper cover Power LED Cutter cover Error LED Storage access LED (Green) Paper LED Status LED (Orange) Status LED (Green) Feed button Printer reset button Connector cover Cover open button Power button Control Panel The control panel has the button. (power) LED, Error LED, Paper LED, and Feed LED Indicators The main body also has 3 LED indicators (Storage access LED (green), Status LED (orange), and Status LED (green)).
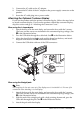
English Feed button This feeds the paper. Connecting External Devices and the AC Adapter Removing the Connector Cover CAUTION: Be sure to push the lower part of both sides of the connector cover inward when attaching/removing it, or the connector cover may become damaged. To connect external devices, first remove the connector cover, following the steps below: Push the connector cover down while pushing the lower part of the both sides of it inward to detach the hooks from the printer case.
English 3. Connect the AC cable to the AC adapter. 4. Connect the DC cable of the AC adapter to the power supply connector on the product. 5. Insert the AC cable plug into a power outlet. Attaching the Optional Customer Display If you use the product with the optional customer display, follow the steps below to attach customer display. If you use the product without the customer display, skip this section and go to “Attaching the Connector Cover.” When using the L-shaped pole 1.
English 4. Pass the USB cable through the cable hole. See ➌ in the illustration below. 5. Align the dowel hole inside the pole and the dowel on the base, and attach the pole with the base. See ❹ in the illustration below. 6. Connect the USB cable with one of the USB connectors. Hole Dowel Attaching the Connector Cover To protect the cables, attach the connector cover in the steps below. When the optional customer display unit is not installed, attach the connector cover with the U-shaped part.
English 1. Pass the interface cables through the wire saddle on the pole mounting plate. Wire saddle 2. Pass each cable through the cable exits at the bottom of the connector cover. 3. If you use the product with the optional customer display, remove the Ushaped part from the connector cover as shown in the illustration blow. If you use the product without the optional customer display, keep the U-shaped part attached. 4.
English Attaching the Power Button Cover Attach the power button cover that comes with the product onto the power button to prevent accidental operation of the power button. Follow the steps below to attach the power button cover. Note: It is recommended to clean the area around the power button with a cloth moistened with alcohol before you attach the cover. 1. Open the power button cover. 2. Peel off the backing paper. 3. Attach the power button cover as shown in the illustration below.
English Forced Termination If you cannot turn the TM-T88V-DT off using applications or the operating system, you can execute forced termination as a last resort by pressing the power button for approximately 4 seconds. Be careful; when forced termination is executed, all unsaved data is lost and recovery of the operating system may be required. Printer Reset Button Press this button (See the illustration below.) with a pointed object (such as a pen) to reset the printer unit.
English 3. Pull out some paper, and close the roll paper cover as shown in the illustration below. 4. Tear off the paper as shown in the illustration below. Feeding Paper Press the Feed button (See the illustration of “Part Names” on page 7.) to feed the paper. Changing the Paper Width If a roll paper guide is included with your printer, you can change the paper width from 80 mm to 58 mm by installing the roll paper guide. Follow the steps below to change the paper width.
English 1. Secure the roll paper guide to the hole with the enclosed screw as shown in the illustration below. Hole 2. Paste the enclosed 2 strips along the roll paper guide on the bottom of the roll paper holder. Make sure the space between the top edge of strip and the groove in the roll paper guide (indicated in the circle in the illustration below) is 0.5 mm or less. Strips 3. 4. Install the roll paper correctly. Close the roll paper cover.
English Removing the Jammed Paper When a paper jam occurs, never pull out the paper forcibly. Open the roll paper cover and remove the jammed paper. CAUTION: Do not touch the thermal head and the frame on its side (indicated in the circle in the illustration below) because it can be very hot after printing. If the roll paper cover does not open, follow the steps below. 1. Turn off the printer. 2. Slide the cutter cover toward the front to open it as shown in the illustration below. Cutter cover 3.
English 4. 5. Close the cutter cover. Open the roll paper cover and remove the jammed paper. Controlling the Speaker Volume You can control the speaker volume with the speaker volume control on the operating system on the computer. Changing the Orientation of the Optional Customer Display Hold the main body with your hand and move the optional customer display to change the direction or angle. Make sure to move it in their mobile range only.
English 5. Peel off the backing paper of each pair on the other side of the affixing tape, turn over the product back on its bottom, and place and secure it firmly to the installation surface. Positions to paste affixing tape Affixing tape positioning lines Affixing tape positioning lines Affixing tape positioning lines Affixing tape positioning lines Security Hook You can attach a commercially available security wire to the security hook.
English Cleaning the Display Wipe away the dirt with a cloth that is dry or slightly moistened with ethanol or isopropyl alcohol. Cleaning the Thermal Head CAUTION: After printing, the thermal head and the frame on its side (indicated in the circle in the illustration below) can be very hot. Be careful not to touch it and to let it cool before you clean it. Do not damage the thermal head by touching it with your fingers or any hard object.
English Specifications CPU Item Available CPU Memory Main memory BIOS ROM Chip set Video controller Backing storage Interface Ethernet USB Serial VGA DisplayPort (only for the high model) Drawer Audio functions Specification High model: Intel® Atom™ N2800 (1 MB Cache, 1.86 GHz) Low model: Intel® Atom™ N2600 (1 MB Cache, 1.
English Open Source Software License 1 ) This printer product includes open source software programs listed in Section 5) according to the license terms of each open source software program. 2 ) We provide the source code of the GPL Programs and LGPL Programs until five (5) years after the discontinuation of same model of this printer product. If you desire to receive the source code above, please contact the customer support for your region.
English MICROSOFT SOFTWARE LICENSE TERMS Be sure to read these terms before you start using the product. If you do not accept any one of the terms, do not use the product. MICROSOFT SOFTWARE LICENSE TERMS FOR: Windows Embedded POSReady7 These license terms are an agreement between you and SEIKO EPSON CORPORATION. Please read them. They apply to the software included on this device. The software also includes any separate media on which you received the software.
English 3. above, a license for the software may not be shared or used concurrently on different POS Systems. d. Device Connections. You may use terminal services protocols to connect the device to a server running business task or processes software such as email, word processing, scheduling or spreadsheets.
English 4. • Digital Certificates. The software uses digital certificates. These digital certificates confirm the identity of Internet users sending X.509 standard encrypted information. They also can be used to digitally sign files and macros to verify the integrity and origin of the file contents. The software retrieves certificates and updates certificate revocation lists using the Internet, when available. • IPv6 Network Address Translation (NAT) Traversal service (Teredo).
English 5. 6. 7. 8. 9. 10. 11. 12. 13. 14. MICROSOFT .NET FRAMEWORK BENCHMARK TESTING. The software includes one or more components of the .NET Framework (".NET Components"). You may conduct internal benchmark testing of those components. You may disclose the results of any benchmark test of those components, provided that you comply with the conditions set forth at go.microsoft.com/fwlink/?LinkID=66406.
English 15. 16. 17. 18. Microsoft exclude implied warranties of merchantability, fitness for a particular purpose and non-infringement. LIABILITY LIMITATIONS. You can recover from Microsoft and its affiliates only direct damages up to two hundred fifty U.S. Dollars (U.S. $250.00). You cannot recover any other damages, including consequential, lost profits, special, indirect or incidental damages.
English
Printed in China