User’s Manual Before Use . . . . . . . . . . . . . . . . . . . . . . . . . . . . . . . . . . 2 Part Names and Functions . . . . . . . . . . . . . . . . . . . 3 Setup . . . . . . . . . . . . . . . . . . . . . . . . . . . . . . . . . . . . . . . 6 Installing/Replacing the Roll Paper . . . . . . . . . . 12 Cleaning the Product . . . . . . . . . . . . . . . . . . . . . . . 14 Troubleshooting . . . . . . . . . . . . . . . . . . . . . . . . . . . 15 Product Specifications . . . . . . . . . . . . . . . . . . . . .
English Before Use Please read this manual carefully before using this product. Keep this manual at hand for immediate reference whenever necessary. For details about the functions and operation procedure of this product and software, refer to Technical Reference Guide. Key to Symbols The symbols shown below are used in this manual in order to ensure safety and proper use of this product and to prevent danger to customers and other persons, and property damage.
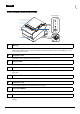
English Part Names and Functions Control panel 1 2 3 7 4 6 5 1 8 NFC Tag A mark is printed here to indicate the position of the NFC tag. To establish communication with an NFC device, bring the device close to this mark. For details on functions that use the NFC tag, see the Technical Reference Guide. 2 Roll paper cover Open this cover to install/replace the roll paper. 3 Manual cutter Use this cutter when you cut the roll paper manually.
English Control Panel 1 2 3 4 1 (Power) LED This LED is on when the printer is on. 2 (Error) LED This indicates an error. 3 (Paper) LED On indicates a paper near end or out. Flashing indicates standby. 4 Feed button Press this button once to feed the roll paper for one line. Hold down this button to continue feeding the roll paper.
English Interface All the ports and connectors are located on the back of the printer. 1 2 1 3 4 5 6 7 Drawer kick connector Connects the modular cable for the cash drawer. 2 Ethernet port Connects the 10 BASE-T/100 BASE-TX LAN cable. 3 Serial port Use only for connecting external devices. 4 USB Type A port Use only for connecting external devices. !CAUTION: It may be hard to disconnect some types of USB cable. Do not forcibly pull the cable, or the USB port and USB cable may be damaged.
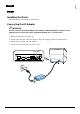
English Setup Installing the Printer Install the printer horizontally on a flat surface. Connecting the AC Adapter !WARNING: Be sure to use the specified AC adapter [AC adapter,V (Model: M344A)]. Connection to an improper power source may lead to equipment damage, fire, or electric shock. 1. Make sure the printer is turned off. 2. Connect the DC cable of the AC adapter to the power supply connector (stamped 24V). 3. Connect the AC cable to the AC adapter. 4. Connect the AC cable plug to a power outlet.
English Connecting External Devices If you connect external devices, connect each cable to the port/connector on the back of the printer. (U “Interface” on page 5) !CAUTION: ❏ When connecting external devices to the USB ports, follow the precautions below. • Confirm the rated current of the external devices by checking the descriptions on the devices or manuals. Connect the external devices only when those total rated current is less than 2.0 A. Do not use a device whose rated current is unclear.
English 3. Push the connector cover down to click onto the printer case. QNote: ❏ You can use the enclosed screw to fix the connector cover. ❏ To remove the connector cover, turn the printer over, remove the screw, and push the connector cover down while pushing both sides of the connector cover inward to detach the hooks from the printer case.
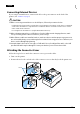
English Arranging the Cables Pass the cables through cable exits in the connector cover. Some cables can be routed out from the front by passing them through the notch in the printer bottom. QNote: ❏ When using cables without lock, use of the bundled cable lock band is recommended. Bundled cable lock band ❏ You can also attach bottom cover to hide connectors.
English After the cable arrangement, turn over the printer, and make sure the cables are not pinched. Attaching the Power Switch Cover By attaching the power switch cover, you can prevent accidental operations of the power switch. You can turn on and off the power switch by inserting a sharp-pointed object in the holes on the power switch cover. To detach the cover, use a sharp-pointed object. To use this cover, install it as shown in the illustration below.
English Changing the Paper Width You can change the paper width from 80 mm to 58 mm by installing the roll paper guide. Follow the steps below to change the paper width. 1. Turn off the printer. 2. Open the roll paper cover. 3. Install the roll paper guide so that the protrusion on the roll paper holder is aligned with the hole on the printer. Hole Protrusion QNote: You can use the enclosed screw to fix the roll paper guide. 4. Install the roll paper correctly. 5. Close the roll paper cover.
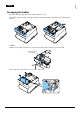
English Installing/Replacing the Roll Paper Follow the steps below to install and replace the roll paper. 1. Open the roll paper cover. 2. Remove the used roll paper core if any. 3. Install the roll paper in the correct direction.
English 4. Pull out some paper, and close the roll paper cover. 5. Tear off the paper.
English Cleaning the Product Cleaning the Printer Case Be sure to turn off the printer, and wipe the dirt off the printer case with a dry cloth or a damp cloth. !CAUTION: Never clean the product with alcohol, benzine, thinner, or other such solvents. Doing so may damage or break the parts made of plastic and rubber. Cleaning the Thermal Head and the Platen Roller Epson recommends cleaning the thermal head to maintain receipt print quality. We recommend cleaning periodically (about once every 3 months).
English Troubleshooting No lights on the control panel Check whether the power supply cable is correctly connected to the printer and the socket. (Error) LED on with no printing ❏ Check whether the roll paper cover is closed. If it is open, close the cover. ❏ If the (Paper) LED is on, check whether the roll paper is correctly installed and any roll paper remains. (Error) LED flashing with no printing ❏ Check whether a paper jam has occurred.
English 2. Slide the cutter cover toward the front to open it. 3. Turn the knob until you see a triangle in the opening. This returns the cutter blade to the normal position. There is a label near the cutter to assist you. a b a. knob b. triangle 4. Close the cutter cover. 5. Open the roll paper cover and remove the jammed paper.
English Product Specifications Printing method Roll paper Thermal line printing Paper width External diameter Core internal diameter Core external diameter Interface*1 Power supply Current consumption AC power consumption*2 (100 V to 230 V/50 to 60 Hz) Temperature Humidity Overall dimensions Weight (mass) 80 mm paper width setting: 79.5 mm ± 0.5 mm {3.13" ± 0.02"} 58 mm paper width setting: 57.5 mm ± 0.5 mm {2.26" ± 0.02"} Maximum 83 mm {3.27"} 12 mm {0.47"} 18 mm {0.71"} USB: USB 2.
English Appendix Downloading Software and Manuals The latest versions of SDK, drivers, utilities, and manuals can be downloaded from one of the following URLs. For customers in North America, go to the following web site: http://www.epson.com/support/ For customers in other countries, go to the following web site: https://download.epson-biz.com/?service=pos Open Source Software License This product uses open source software in addition to Epson proprietary software.
English Notes No part of this publication may be reproduced, stored in a retrieval system, or transmitted in any form or by any means, electronic, mechanical, photocopying, recording, or otherwise, without the prior written permission of Seiko Epson Corporation. No patent liability is assumed with respect to the use of the information contained herein. While every precaution has been taken in the preparation of this book, Seiko Epson Corporation assumes no responsibility for errors or omissions.