TM-U950 User’s Manual / Bedienungsanleitung Gebruikershandleiding / Manuel d’utilisation Manual do utilizador / Manual del usuario Manuale dell’utente 401406102
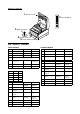
Printer Parts 1 printer cover POWER ERROR RECEIPT OUT 2 control panel JOURNAL OUT SLIP RECEIPT FEED JOURNAL/ SLIP FEED 3 take-up spool 14 1 25 8 1 2 6 3 1 1 13 4 power switch 5 cover open button DIP Switch Tables Serial interface Parallel interface SW Function ON OFF SW ON OFF 1-1 Data word length 7 bits 8 bits — — 1-2 Parity Enabled Disabled 1-1 ~ Undefined 1-5 1-3 Parity selection Even Odd 1-6 — Fixed 1-4 ~ 1-5 Transmission speed (see table below) 1-7 ~ Undefine
English All rights reserved. No part of this publication may be reproduced, stored in a retrieval system, or transmitted in any form or by any means, electronic, mechanical, photocopying, recording, or otherwise, without the prior written permission of Seiko Epson Corporation. No patent liability is assumed with respect to the use of the information contained herein.
English WARNING: Shut down your equipment immediately if it produces smoke, a strange odor, or unusual noise. Continued use may lead to fire. Immediately unplug the equipment and contact your dealer or a SEIKO EPSON service center for advice. Never attempt to repair this product yourself. Improper repair work can be dangerous. Never disassemble or modify this product. Tampering with this product may result in injury or fire. Be sure to use the specified power source.
English Unpacking The following items are included with the standard specification printer. If any item is damaged, contact your dealer. ❏ Printer ❏ Paper rolls (2) ❏ Ribbon cassette ❏ Power switch cover ❏ Take-up spool ❏ Caution label ❏ Hexagonal lock screws (2) (only for the serial interface) Downloading Drivers, Utilities, and Manuals Drivers, utilities, and manuals can be downloaded from one of the following URLs. For customers in North America, go to the following web site: http://www.epsonexpert.
English JOURNAL OUT LED Indicates a journal roll paper near end or out. SLIP LED Indicates slip mode. Flashes while waiting for a slip to be inserted or removed. Removing the Transportation Damper The printer is protected during shipping by a transportation damper that you must remove before turning on the printer. Pull the damper out, as shown in illustration 1. 1 Note: Before shipping the printer, reinstall the transportation damper.
English 1. Make sure the leading edge of the paper is straight. 2. Turn on the printer and open the printer cover. 3. Insert paper rolls on both the receipt and journal sides of the printer, as shown in illustration 3. (The journal roll is on the right in this illustration.) 4. For each roll, insert the tip of the paper into the paper inlet and push it in until it is automatically detected and fed into the printer. See illustration 4. 5. Tear off the receipt paper on the cutter.
English Inserting Slip Paper Notes: Do not use wrinkled, folded, or curled paper. Use only slip paper that matches the printer’s specifications. To prevent paper jams, install both paper rolls in the printer even if you plan to print only on slip paper. 1. When the SLIP LED flashes, 7 insert slip paper, using the right edge of the slip paper inlet as a guide. See illustration 7. 2. When the printer detects the paper, it automatically draws it in and begins printing.
English CAUTION: To prevent paper jams, be sure both paper rolls are installed. Do not insert checks with staples in them; do not insert wrinkled checks. 1. The SLIP light flashes. 2. Insert the check face down, with the MICR characters on the right-hand side. 9 3. Insert the check straight into the inlet, using the right edge of the inlet as a guide, as far as the check will go. See ② illustration 9. ① 4. The printer starts drawing the check in. Let go of the check immediately.
English 3. Press the JOURNAL/SLIP button 3 times. 4. Close the front cover (the SLIP LED flashes). 5. Follow the instructions on the cleaning sheet. You will insert the cleaning sheet the same way you insert a normal check. 6. When the sheet is ejected, remove it from the printer; then turn off the power. Troubleshooting LEDs on the control panel do not come on Check the power cable and power outlet. If the outlet is controlled by a switch or timer, use another outlet.
English 2. For a journal roll paper jam, cut with scissors or a knife, as shown in illustration 10, and remove the take-up spool. 3. Cut the paper from the paper rolls as shown in illustration 11. 4. If paper is caught in the automatic cutter, open the cutter blade by turning the gear in the direction shown in illustration 12. 10 ✄ ✄ 5. Move the OPEN ↔ LOCK lever on each side of the printer in the direction shown in illustration 13; the cutter opens automatically. 6. Pull the paper out gently.
English TM-U950 Specifications Printing method Serial impact dot matrix Head wire configuration 9-pin vertical line, wire pitch 0.353 mm {1/72"}, 0.29 mm {0.01"} wire diameter Printing direction Bidirectional, minimum distance printing Printing width Roll paper: 61.1 mm {2.41"}; slip paper: 135.6 mm {5.