
Operation Guide


Table Of Contents
- Contents
- Introduction to Epson iProjection
- Setting Up the Software for the First Time
- Installing the Software
- Selecting Projector Network Settings
- Connection Methods for Various Network Environments
- Recommended Wireless Environment for Multi PC Projection
- Setting Up a Projector to Connect in Quick Connection Mode
- Setting Up a Projector to Connect in Advanced Connection Mode (Wireless)
- Setting Up a Projector to Connect in Advanced Connection Mode (Wired)
- Connecting to the Projector and Projecting Images
- Using Additional Functions
- Searching for Network Projectors Using a Shortcut
- Connecting to Network Projector Using a USB Flash Drive (Windows Only)
- Connecting to Multiple Projectors (Mirroring)
- Outputting Audio from the Projector
- Projecting Your Screen
- Changing the Moderator
- Distributing the Projected Screen
- Selecting the Participant's Screen to Project Using Thumbnails
- Hiding the Projection Control Screen
- Prohibiting Participant Operations
- Controlling the Connection Bandwidth
- Solving Problems
- Solving Network Connection Problems
- Solving Problems During Projection
- Error Messages List
- Error Messages When Starting up Epson iProjection
- Error Messages When Using a USB Key
- Error Messages When Searching for and Selecting Projectors
- Error Messages When Projecting
- Error Messages When Operating a Profile
- Error Messages When Using the Moderator Function
- Error Messages When Distributing the Projected Screen
- Event ID List
- Screen Summary
- Appendix
24
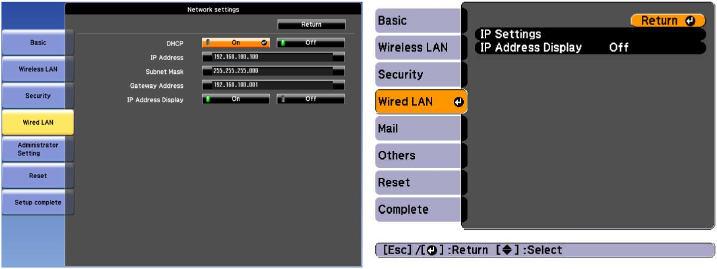
A screen like one of the following is displayed.
7. Select IP settings as necessary.
• DHCP is available: Set DHCP to On.
• DHCP is not available: Set DHCP to Off and enter the projector's IP Address, Subnet Mask, and
Gateway Address values as necessary.
8. When you have finished making settings, select Setup Complete or Complete, and follow the on-
screen instructions to save your settings and exit the menus.
Parent topic: Selecting Projector Network Settings
Related tasks
Connecting to the Projector from the Software over a Network System