
User's Guide


Table Of Contents
- Contents
- Scanner Basics
- Placing Originals on the Scanner
- Scanning
- Starting a Scan
- Selecting Epson Scan Settings
- Scanning Special Projects
- Scanning to Online Destinations Using Easy Photo Scan
- Scanning Using Easy Photo Scan
- Uploading Scanned Images to Facebook
- Uploading Scanned Images to Picasa
- Uploading Scanned Images to Evernote
- Uploading Scanned Images to SugarSync
- Uploading Scanned Images to a Web Folder
- Uploading Scanned Images to Email
- Saving Scanned Images to a Folder
- Epson JPEG File Settings
- Epson TIFF and Multi-TIFF File Settings
- Restoring Photo Colors as You Scan
- Scanning to a SharePoint Server or Cloud Service
- Scanning Multi-Page Originals as Separate Files - Windows
- Scanning Two Originals onto One Sheet (Stitching Images) (Windows)
- Scanning to a PDF File Using a Scanner Button
- Using the Scanner as a Copier - Copy Utility
- Scanning to Online Destinations Using Easy Photo Scan
- Cleaning and Transporting Your Scanner
- Solving Problems
- Scanner Light Status
- Solving Scanning Problems
- Solving Scanned Image Quality Problems
- Image Consists of a Few Dots Only
- Line of Dots Appears in All Scanned Images
- Straight Lines in an Image Appear Crooked
- Image is Distorted or Blurry
- Image Colors are Patchy at the Edges
- Image is Too Dark
- Back of Original Image Appears in Scanned Image
- Ripple Patterns Appear in an Image
- Image is Scanned Upside-Down
- Scanned Image Colors Do Not Match Original Colors
- Scan Area is Not Adjustable in Thumbnail Preview
- Scanned Image Edges are Cropped
- Characters are not Recognized During Conversion to Editable Text (OCR)
- When to Uninstall Your Scanner Software
- Where to Get Help
- Technical Specifications
- Notices
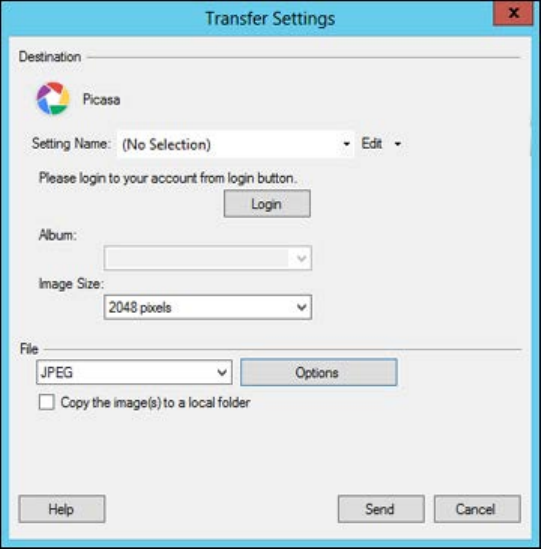
You see a window like this:
Note: If you have already configured a Picasa account in Easy Photo Scan, you can select the
Setting Name or Destination Name for the account, click Login if necessary, and click Send to
upload your images.
3. Click Login.
4. On the Application Authentication screen, log into your Google account.
5. Click Accept to allow Easy Photo Scan to upload images to your account.
An authentication code is generated.
6. Copy the authentication code into the Please enter authentication code field and click OK.
66