User’s Guide NPD5125-01 EN
AL-M8200/AL-M8100/AL-M7100 Series User's Guide Contents Contents Available paper types and weights. . . . . . . . . . Loading Paper. . . . . . . . . . . . . . . . . . . . . . . . . . . Paper cassette. . . . . . . . . . . . . . . . . . . . . . . . . MP tray. . . . . . . . . . . . . . . . . . . . . . . . . . . . . Paper output settings. . . . . . . . . . . . . . . . . . . . . . Output to the face-up tray. . . . . . . . . . . . . . . . Orientation to eject paper. . . . . . . . . . . . . . . .
AL-M8200/AL-M8100/AL-M7100 Series User's Guide Contents Installing the PCL printer driver (For Windows only). . . . . . . . . . . . . . . . . . . . . . . . . 59 Transporting the Printer. . . . . . . . . . . . . . . . . . . For short distances. . . . . . . . . . . . . . . . . . . . . For long distances. . . . . . . . . . . . . . . . . . . . . . Installing Options. . . . . . . . . . . . . . . . . . . . . . . . Optional printer stand. . . . . . . . . . . . . . . . . . . Optional paper cassette unit. . . . .
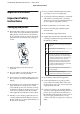
AL-M8200/AL-M8100/AL-M7100 Series User's Guide Introduction Introduction !Caution must be observed to avoid bodily injury. Where to Find Information Important c must be observed to avoid damage to your equipment. Note contains important information and useful tips on the operation of your printer. ❏ Setup Guide Provides you with information on assembling the printer and installing the printer software.
AL-M8200/AL-M8100/AL-M7100 Series User's Guide Introduction ® ® 2008 R2 ® ® 2008 ® ® 2003 Windows Server 2008 R2 Microsoft Windows Server Operating System Server 2008 Microsoft Windows Server Operating System Server 2003 Microsoft Windows Server Operating System Windows Generic name of operating systems above Mac OS X v10.9.x OS X Mavericks Mac OS X v10.8.x OS X Mountain Lion Mac OS X Generic name of Mac OS X v10.9.x, Mac OS X v10.8.x, Mac OS X v10.7.x, Mac OS X v10.6.
AL-M8200/AL-M8100/AL-M7100 Series User's Guide Important Instructions Important Instructions ❏ Use a grounded outlet that matches the printer’s power plug. Do not use an adapter plug. Important Safety Instructions ❏ Avoid using an electrical outlet that is controlled by wall switches or automatic timers. Accidental disruption of power can erase valuable information in your computer’s and printer’s memory. ❏ Make sure that there is no dust on the socket.
AL-M8200/AL-M8100/AL-M7100 Series User's Guide Important Instructions ❏ If you use an extension cord, make sure that the total of the ampere ratings on the products plugged into the extension cord does not exceed the extension cord ampere rating. ❏ Place the printer near an electrical outlet where you can easily plug in and unplug the power cord. ❏ Do not put your printer where the cord will be stepped on.
AL-M8200/AL-M8100/AL-M7100 Series User's Guide Important Instructions ❏ Never push objects of any kind through cabinet slots as they may touch dangerous voltage points or short out parts that could result in a risk of fire or electric shock. Handling the consumable products ❏ Do not sit or lean on the printer. Do not put heavy objects on the printer. ❏ Do not burn used consumable products because they might explode and injure someone. Dispose of them according to local regulations.
AL-M8200/AL-M8100/AL-M7100 Series User's Guide Important Instructions ❏ Operation in conditions of extremely low humidity Safety Information ❏ Poor room ventilation Laser safety labels ❏ Long, continuous printing together with any of the above !Warning: The performance of procedures and adjustments Printer location other than those specified in the printer’s documentation may result in hazardous radiation exposure. Your printer is a Class 1 laser product as defined in the IEC60825 specifications.
AL-M8200/AL-M8100/AL-M7100 Series User's Guide Important Instructions Responsible use of copyrighted materials The printer may be used mistakenly or improperly to illegally copy copyrighted materials. You must act responsibly when copying copyrighted materials; by acquiring the permission of the copyright holder or acting on the advice of a knowledgeable attorney.
AL-M8200/AL-M8100/AL-M7100 Series User's Guide Getting to Know Your Printer Getting to Know Your Printer 12. paper guide (back guide) 13. cassette cover * cassette 5 is not available for AL-M7100 Series. Inside the printer Printer Parts Front and right side view Inside the paper cassette 1. toner cartridge 2. lock lever 3. developer unit Rear and left side view 1. cover A 2. face-down tray (standard output tray) 3. MP tray 4. cassette 1 (standard paper cassette) 5.
AL-M8200/AL-M8100/AL-M7100 Series User's Guide Getting to Know Your Printer Data light Status light Network Status Yellow Green Ready (1000 M link) Yellow (Flashing) Green Receiving packets (1000 M link) Yellow Orange Ready (100 M link) Yellow (Flashing) Orange Receiving packets (100 M link) Yellow Off Ready (10 M link) Yellow (Flashing) Off Receiving packets (10 M link) Off Green Deep sleep mode* (1000 M link) Off Off Deep sleep mode* (100 M / 10 M link) Power off mode* * See “
AL-M8200/AL-M8100/AL-M7100 Series User's Guide Getting to Know Your Printer Control panel 1. Ready light On when the printer is ready, indicating that the printer is ready to receive and print data. Off when the printer is not ready, or in the sleep mode. 2. Error light (Orange) On or flashes when an error has occurred. Pressing the OK button or Auto Cont setting in the Setup Menu clears the errors that are flashing. 3. u Up button Press to scroll the items on the control panel menus. 4.
AL-M8200/AL-M8100/AL-M7100 Series User's Guide Getting to Know Your Printer 11. Data light On when print data is stored in the print buffer (the section of printer memory reserved for receiving data) but not yet printed. Flashes when the printer is processing data. Off when no data remains in the print buffer.
AL-M8200/AL-M8100/AL-M7100 Series User's Guide Getting to Know Your Printer E Using the Control Panel Accessing the control panel menus Use the u Up and d Down buttons to scroll through available settings, then press the r Right button to select a setting and return to the previous level. Press the l Left button to return to the previous level without changing the setting. When to make control panel settings In general, printer driver settings override settings made using the control panel.
AL-M8200/AL-M8100/AL-M7100 Series User's Guide Getting to Know Your Printer Language Item Explanation Language Specifies the language displayed on the LCD panel and that printed on the status sheet. Settings (default in bold): English, Français, Deutsch, Italiano, ESPAÑOL, Nederlands, Português, , System Information System Information Item Explanation Main Version Displays the version of the firmware installed on each printer. MCU Version Serial No Displays the serial number of each printer.
AL-M8200/AL-M8100/AL-M7100 Series User's Guide Getting to Know Your Printer Machine Status Item Explanation Toner The number of asterisks (*) between “E” and “F” indicates the remaining service lives of replacement parts. If a non-genuine replacement part is used, “?” is displayed instead of the indicator. Maintenance Unit Life (AL-M8200/AL-M8100 Series only) Total Pages Displays the total number of pages printed by the printer.
AL-M8200/AL-M8100/AL-M7100 Series User's Guide Getting to Know Your Printer Item Explanation Copies Designates the number of copies to be printed, from 1 through 999. Duplex Turns duplex printing on or off. This allows you to print on both sides of a page. For the paper sizes for which duplex printing is available, see “Available Paper and Capacities” on page 35. Settings (default in bold): Off, On Binding Specifies the binding direction of the printout.
AL-M8200/AL-M8100/AL-M7100 Series User's Guide Getting to Know Your Printer Item Explanation Page Protect Allocates additional printer memory for printing data, as opposed to receiving it. You may need to turn this setting on if you are printing a very complex page. If a Print Overrun error message appears on the LCD panel during printing, turn this setting on and reprint your data.
AL-M8200/AL-M8100/AL-M7100 Series User's Guide Getting to Know Your Printer Item Explanation Confirm Media Type Displays a message when the paper type in the tray selected for printing is different from that selected on Paper Type in the printer driver. Settings (default in bold): No, Yes Job Information Selects the pattern in which the job information is displayed on the control panel.
AL-M8200/AL-M8100/AL-M7100 Series User's Guide Getting to Know Your Printer Item Explanation Buffer Size Determines the amount of memory to be used for receiving data and printing data. Note: ❏ To activate Buffer Size settings, you must turn off the printer for more than five seconds then turn it back on. Or, you can perform a Reset All operation, as explained in Reset Menu. ❏ Resetting the printer erases all print jobs. Make sure the Ready light is not flashing when you reset the printer.
AL-M8200/AL-M8100/AL-M7100 Series User's Guide Getting to Know Your Printer Item Explanation Sleep Schedule Sets a start time and a sleep pattern for up to five time periods through the day. The Sleep Pattern options are as follows: ❏ On: Enters sleep mode according to the Time to Sleep(Auto) or Time to Sleep settings. ❏ Quick: Enters sleep mode as soon as possible.
AL-M8200/AL-M8100/AL-M7100 Series User's Guide Getting to Know Your Printer Item Explanation Time to Off (AL-M8100 Series only) Specifies the length of the time until the printer enters the power off mode if there are no button operations and no jobs to be printed. Note: You can adjust the time before power management is applied. Any increase will affect the product's energy efficiency. Please consider the environment before making any change.
AL-M8200/AL-M8100/AL-M7100 Series User's Guide Getting to Know Your Printer Item Explanation MP Tray Type Specifies the paper type loaded in the MP tray. For the types of paper that are available, refer to “Available Paper and Capacities” on page 35. Cassette1 Size Specifies the paper size loaded in the standard paper cassette. For the sizes of paper that are available, refer to “Available Paper and Capacities” on page 35.
AL-M8200/AL-M8100/AL-M7100 Series User's Guide Getting to Know Your Printer Item Explanation Page Side Specifies 2-sided printing manually. Select Back when printing on the back side of the paper. Settings (default in bold): Front, Back Paper Source Specifies whether paper feeds into the printer from the MP tray, the standard paper cassette (Cassette 1), or the optional paper cassette unit (Cassette 2/3/4/5).
AL-M8200/AL-M8100/AL-M7100 Series User's Guide Getting to Know Your Printer Item Explanation Left Offset Makes fine adjustments to the horizontal printing position of the page. Important: c Make sure that the printed image does not extend beyond the edge of the paper. Otherwise, you may damage the printer. Settings (default in bold): -150.0 ... 0.0 ... 150.0 mm in 0.5 mm increments T Offset B Adjusts the vertical printing position on the back of the paper when printing on both sides.
AL-M8200/AL-M8100/AL-M7100 Series User's Guide Getting to Know Your Printer Item Explanation Font Number Sets the default font number for the default font source. The available number depends on the settings you made. Settings (default in bold): 0… 65535 (depending on your settings) Pitch Specifies the default font pitch if the font is scalable and of fixed-pitch. This item may not appear depending on the FontSource or Font Number settings. Settings (default in bold): 0.44 … 10.00 … 99.99 cpi in 0.
AL-M8200/AL-M8100/AL-M7100 Series User's Guide Getting to Know Your Printer PS3 Menu Item Explanation Error Sheet When you select On, the printer prints out an error sheet when an error occurs in the PS3 mode or when the PDF file you tried to print is not a supported version. Settings (default in bold): Off, On Image Protect When On is selected, the print quality is not reduced even with insufficient memory. In that case, Memory Overflow is displayed and the printing is stopped.
AL-M8200/AL-M8100/AL-M7100 Series User's Guide Getting to Know Your Printer Item Explanation Condensed Turns condensed printing on or off. Settings (default in bold): Off, On T.Margin Sets the distance from the top of the page to the baseline of the first printable line. The distance is measured in inches. The smaller the value, the closer the printable line is to the top. Settings (default in bold): 0.40 ... 0.50 ... 1.50 inch in 0.05-inch increments Text Sets the page length in lines.
AL-M8200/AL-M8100/AL-M7100 Series User's Guide Getting to Know Your Printer Item Explanation Bit Image The printer is able to emulate the graphics densities set with the printer commands. If you select Dark, the bit image density is high, and if you select Light, the bit image density is low. If you select BarCode, the printer converts bit images to bar codes by automatically filling in any vertical gaps between dots. This produces unbroken vertical lines that can be read by a bar code reader.
AL-M8200/AL-M8100/AL-M7100 Series User's Guide Getting to Know Your Printer Item Explanation CGTable Use the character generator (CG) table option to select the graphics character table or the italics table. The graphics table contains graphic characters for printing lines, corners, shaded areas, international characters, Greek characters, and mathematical symbols. If you select Italic, the upper half of the character table is defined as italic characters.
AL-M8200/AL-M8100/AL-M7100 Series User's Guide Getting to Know Your Printer Item Explanation Pitch Selects the pitch (the horizontal spacing) of the font in fixed pitch, measured in cpi (characters per inch). You can also choose proportional spacing. Settings (default in bold): 10cpi, 12cpi, 15cpi, 17cpi, 20cpi, 24cpi, Prop. Code Page Selects the character tables. Character tables contain the characters and symbols used by different languages.
AL-M8200/AL-M8100/AL-M7100 Series User's Guide Getting to Know Your Printer Item Explanation ZeroChar Specifies whether the printer prints a slashed or unslashed zero. Settings (default in bold): 0, (or the zero character with a slash) CharacterSet Selects character table 1 or 2. Settings (default in bold): 1, 2 Admin Settings Note: ❏ To access the Admin Settings menu, enter the administrator password. ❏ The password is not set in default. Press the OK button when Admin Password is required.
AL-M8200/AL-M8100/AL-M7100 Series User's Guide Getting to Know Your Printer Bookmark Menu The bookmark menu appears by pressing the OK button while the LCD panel displays Ready. In the bookmark menu, the bookmarked setting items are listed and you can select one of them. The following menus are bookmarked by default. ❏ Reset Menu ❏ MP Tray Size ❏ System Information To add menus to the bookmark menu, display the menu you want to add and press the OK button for more than two seconds.
AL-M8200/AL-M8100/AL-M7100 Series User's Guide Loading Paper Loading Paper Available Paper and Capacities Since the quality of any particular brand or type of paper may be changed by the manufacturer at any time, Epson cannot guarantee the quality of any type of paper. Always test samples of paper stock before purchasing large quantities or printing large jobs.
AL-M8200/AL-M8100/AL-M7100 Series User's Guide Loading Paper Note: ❏ Paper cassette 5 is only for the AL-M8200/AL-M8100 Series. ❏ If you select Auto Select in Paper Source in the printer driver, the printer will search for a paper source containing the paper size specified in Document Size, and prints from the paper source until there is no more paper, then it prints from the next paper source automatically.
AL-M8200/AL-M8100/AL-M7100 Series User's Guide Loading Paper Important: c You cannot use the following paper in this printer.
AL-M8200/AL-M8100/AL-M7100 Series User's Guide Loading Paper Loading Paper Important: c To load paper that is longer than A4 portrait, pull the lever and extend the paper cassette. Note: This printer does not automatically detect paper sizes in the paper sources. Be sure to specify a paper size using the paper size setting dial on the paper cassette or the Tray Menu on the control panel. The factory default paper size for all of the paper sources is A4.
AL-M8200/AL-M8100/AL-M7100 Series User's Guide Loading Paper D Select the paper size on the paper size setting dial. If the size you want to select is not on the dial, select Panel. Note: Make sure that you do not load paper beyond the limit mark. See “Available Paper and Capacities” on page 35. F Close the cassette cover. G Push the paper cassette into the printer. H Extend the paper support according to the size of the paper to prevent the paper from slipping off the printer.
AL-M8200/AL-M8100/AL-M7100 Series User's Guide Loading Paper D MP tray Load a stack of the desired paper with the printable surface facing up. Note: To load envelopes, see “Envelopes” on page 42. A Open the MP tray. Note: Make sure that you do not load paper beyond the maximum limit guide. See “Available Paper and Capacities” on page 35. B Extend the paper support of the MP tray. C Slide the paper guides to accommodate the paper you are loading.
AL-M8200/AL-M8100/AL-M7100 Series User's Guide Loading Paper Setting from the printer driver A Access the Main tab, click Paper Output Settings, and select Face-up in the Output Tray listbox. B In the Main tab, select the Reverse Order checkbox to print in the document in the reverse page order.
AL-M8200/AL-M8100/AL-M7100 Series User's Guide Loading Paper Envelopes Note: ❏ Depending on the quality of envelopes, the printing environment, or the printing procedure, envelopes might be wrinkled. Make a trial print run before you print on a lot of envelopes. Available envelopes ❏ Envelopes that have no glue or no tape Important: c Do not use window envelopes. The plastic on most ❏ Duplex printing is not available for envelopes.
AL-M8200/AL-M8100/AL-M7100 Series User's Guide Loading Paper Available labels Note: ❏ Depending on the quality of the non-standard size paper, the printing environment, or the printing procedure, the paper might skew. Make a trial print run before you print on a lot of non-standard size paper.
AL-M8200/AL-M8100/AL-M7100 Series User's Guide Printing Tasks Printing Tasks Basics of Printing This section describes the basics of printing using the Windows printer driver (ESC/Page language) as an example. Printing can also be done by similar procedures using other supported operating systems or emulation languages. A Load a stack of paper. B Make the appropriate settings on the control panel. C Click Print from the File menu on the application you are using. D Select your printer.
AL-M8200/AL-M8100/AL-M7100 Series User's Guide Printing Tasks Item Explanation 4 Paper Type Selects the type of print media loaded in the paper source. 5 (printout image) Displays an image of the printout. Note: ❏ To show the help for each item, right-click the item and click Help on the printer driver. ❏ In the Main screen, you can also make settings for 2-sided printing and collating. ❏ In the More Options screen, you can make settings for reducing/enlarging the document or watermark feature.
AL-M8200/AL-M8100/AL-M7100 Series User's Guide Printing Tasks Item 2 Explanation 2-Sided Printing Prints on the front and back of the sheet. Combined with the Reduce/Enlarge function, a 2 page A3 document can be printed on one A4 size sheet. Click Settings to make Binding Edge, Binding Margin and folded booklet settings. See “Printing a booklet” on page 49. 3 Multi-Page Enables 2 pages or 4 pages per sheet printing on the same paper size as the original document.
AL-M8200/AL-M8100/AL-M7100 Series User's Guide Printing Tasks Item 2 Explanation Watermark Features Anti-Copy Pattern This function allows you to print a document as a copy-protected document. When you try to copy a copy-protected document, “Copy” is printed several times on the document. This function is useful to prevent unauthorized copying. Any text string can be registered. Note: ❏ Epson does not guarantee protection from information leakage or any other damages caused by using this function.
AL-M8200/AL-M8100/AL-M7100 Series User's Guide Printing Tasks Setting the Maintenance Screen This screen enables you to start Job Arranger Lite, enables settings, such as Notice Settings for EPSON Status Monitor. For details, see the help for each item.
AL-M8200/AL-M8100/AL-M7100 Series User's Guide Printing Tasks Set paper that is suitable for 2-sided printing (duplex printing). See “Available Paper and Capacities” on page 35. Setting Advanced Features Printing to fold a batch of pages in half The printer driver has useful functions such as 2-sided printing or multi-page printing to save paper and toner, or adding an anti-copy pattern to prevent unauthorized copying. This function prints a booklet ready for center binding.
AL-M8200/AL-M8100/AL-M7100 Series User's Guide Printing Tasks A Using Re-Print Job/Verify Job (Quick Print Job feature) Select Auto (Long-edge binding) or Auto (Short-edge binding) in the 2-sided Printing list box and click Settings. Sending the print job B Select the Booklet check box and select Side Binding. C Click OK to close setting dialog box. D Print the document, fold in half 5 sheets by 5 sheets, overlap all sheets, and then bind them.
AL-M8200/AL-M8100/AL-M7100 Series User's Guide Printing Tasks B Enter a four-digit number for Password. C Enter a user name and job name if necessary. G Printing with an overlay Note: The OK button becomes available after the password has been entered. D Press the r Right button to start printing or to delete the data. This function allows you to print documents onto form templates, which you register on your printer in advance. Click OK. Note: ❏ This function is for Windows only.
AL-M8200/AL-M8100/AL-M7100 Series User's Guide Printing Tasks D Type the form name in the Form data box and its description in the Description box. Improving the clarity of color documents Note: The following 9 characters cannot be used for form names: \ / : * ? " < > |. Printing text clearly in black When you print a color document, the quality of text can be made more legible by printing it in black.
AL-M8200/AL-M8100/AL-M7100 Series User's Guide Printing Tasks Example of one day sleep schedule: Entering the sleep mode automatically The printer is set to immediately enter the sleep mode during the time in shaded areas. Setting the time-to-sleep time Selecting a value from the time-to-sleep options in the Energy Saver Menu. Item Value Time to Sleep(Auto) Disable (default) Time to Sleep 1 minute by default, or you can select a value. For the values, see “Energy Saver Menu” on page 21.
AL-M8200/AL-M8100/AL-M7100 Series User's Guide Printing Tasks XXXXXX Changing the default settings Access the printer driver's properties from Start Devices and Printers. The settings you change becomes the new default values for printing from all applications. Detailed Status: However, if you access the properties from an application, the changed settings are only temporarily available in that application.
AL-M8200/AL-M8100/AL-M7100 Series User's Guide Printing Tasks Cancelling a Print Job Notice Settings This setting decides what states of the printer the utility sends you a notice. This section describes how to delete and cancel a print job in the computer or in a printer. Accessing from the taskbar: From the printer Follow the steps below to cancel a job. A Press the W Pause/Release button. B Press the d Down or u Up button to select the job that you want to cancel, then press the OK button.
AL-M8200/AL-M8100/AL-M7100 Series User's Guide Uninstalling and Installing Software Uninstalling and Installing Software Note: If you uninstall the printer driver, EPSON Status Monitor is also uninstalled. Note for Mac OS X users: ❏ To uninstall all drivers for Epson page printer at once, use the uninstaller. Download the uninstaller from the Epson website. http://www.epson.eu/Support (Europe) http://support.epson.
AL-M8200/AL-M8100/AL-M7100 Series User's Guide Uninstalling and Installing Software Installing the PostScript printer driver with Windows For Windows Server 2003, click Start, point to Settings, and click Printers. Then double-click the Add Printer icon. To print in the PostScript mode, you will have to install the printer driver. See the appropriate sections below for installation instructions according to the interface that you are using to print. The Add Printer Wizard appears.
AL-M8200/AL-M8100/AL-M7100 Series User's Guide Uninstalling and Installing Software A H Make sure that the printer is turned on. Insert the printer Software Disc into your CD/DVD drive. Note: If your computer does not have a CD/DVD drive, download the driver from the Epson website. http://www.epson.eu/Support (Europe) B Note: Change the drive letter as needed for your system. Select Devices and Printers, and click the Add a printer button. I Select the printer and click Next. For Windows 8.
AL-M8200/AL-M8100/AL-M7100 Series User's Guide Uninstalling and Installing Software C D Select the printer name that you are using from the printer name box. Note: If your printer is not listed, check that it is correctly connected to the computer and that the printer is on. D Click Add. E Confirm that your printer’s name is added to the Printers list. Then quit Print & Fax ("Print & Scan" for Mac OS X 10.7 or later).
AL-M8200/AL-M8100/AL-M7100 Series User's Guide Troubleshooting The printer is canceling the specified print job and the current print job. This message appears when Cancel Job is selected after you specify the file to be canceled on the control panel. Troubleshooting Checking Printer Status Can’t Print The print data is deleted because it is incorrect. Status and error messages on the control panel Make sure the appropriate paper size and printer driver are used.
AL-M8200/AL-M8100/AL-M7100 Series User's Guide Troubleshooting The paper size setting is different from the size of paper loaded in the printer. Check to see if the correct size of paper is loaded in the specified paper source. Feed Roller C1 Needed Soon, Feed Roller C2 Needed Soon, Feed Roller C3, Feed Roller C4, Feed Roller C5 (AL-M8200/AL-M8100 Series only) To clear this warning message, select Clear Warning from the control panel’s Reset Menu.
AL-M8200/AL-M8100/AL-M7100 Series User's Guide Troubleshooting The spool file on the driver is deleted while printing or the data is abnormal. Press the OK button to clear the error. Non-Genuine Toner Cartridge The installed toner cartridge is not a genuine Epson toner cartridge. Installing a genuine toner cartridge is recommended.
AL-M8200/AL-M8100/AL-M7100 Series User's Guide Troubleshooting A control panel menu setting was changed while the printer was printing. Press the OK button to clear this message. The setting will become effective after printing has finished. Alternatively you can clear this message by performing Reset All on the control panel. However, the print data will be deleted.
AL-M8200/AL-M8100/AL-M7100 Series User's Guide Troubleshooting This message appears in the following situations if A4/ LT Auto Switching in Setup Menu is set to A4->LT, LT->A4 or A4<->LT: Writing ROM P This message indicates that a ROM module in the slot is being written. Please wait until this message disappears. - When printing a job specified as A4 with the printer driver, there is no paper source that is set as A4 or as LT (alternate size for A4) in the Tray Menu.
AL-M8200/AL-M8100/AL-M7100 Series User's Guide Troubleshooting B ❏ If jammed paper is torn and remains in the printer, or if paper is jammed in a place not mentioned in this section, contact your dealer. Press the r Right button to access the control panel menus. ❏ Make sure that the paper type that is loaded is the same as the Paper Type setting in the printer driver. C Use the d Down button to select System Information, then press the r Right button.
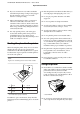
AL-M8200/AL-M8100/AL-M7100 Series User's Guide Troubleshooting D Pull handle D obliquely up to draw out the developer unit. B (Cover B) A E Remove jammed paper. Open cover B, which is on the back of the printer. !Caution: ❏ Unless specifically instructed in this guide, be careful not to touch the fuser, which is marked with a caution label, or the surrounding areas. If the printer has been in use, the fuser and the surrounding areas may be very hot.
AL-M8200/AL-M8100/AL-M7100 Series User's Guide Troubleshooting C1 DM (Cassette 1, DM lever) MP (MP tray) A A Remove jammed paper from the MP tray. B Open cover A and then close it to clear the error. C Confirm that the paper size and the orientation match the control panel settings. Slowly pull out cassette 1. B Remove jammed paper, if there is any. C Lower the lever of the duplex unit. D Remove jammed paper.
AL-M8200/AL-M8100/AL-M7100 Series User's Guide Troubleshooting Paper Does Not Feed Properly Cause What to do The paper guides are not set correctly. Make sure that the paper guides in all the paper cassettes and the MP tray are set to the correct paper size positions. The paper source setting may not be correct. Make sure that you have selected the correct paper source in your application. There may be no paper in the paper source. Load paper into the selected paper source.
AL-M8200/AL-M8100/AL-M7100 Series User's Guide Troubleshooting Cause What to do The printer is in the power off mode (the Wakeup/ Sleep button blinks). Press the Wakeup/Sleep button to return to the status available for printing. To not enter the power off mode, set Power Off Timer to Off in Energy Saver Menu on the control panel. The Printer does not turn off Cause What to do The printer is in the power off mode (Wakeup/Sleep button blinks) Wait for a while.
AL-M8200/AL-M8100/AL-M7100 Series User's Guide Troubleshooting Cause What to do Your computer system’s memory is too small to handle the volume of data in your document. Try reducing the image resolution of your document in the application software, or install more memory in your computer if you can. Printout Problems Print quality is poor Refer to the table below if your printouts are light, faint, uneven, dark, or dirty or if some areas are not printed.
AL-M8200/AL-M8100/AL-M7100 Series User's Guide Troubleshooting The printout is not what you expected Some part of the graphics or text looks different from what you see on the computer screen Cause What to do The printer emulation setting in your application may be incorrect. Make sure that your application is set for the printer emulation you are using. For example, if you are using the ESC/Page mode, make sure that your application is set to use an ESC/Page printer.
AL-M8200/AL-M8100/AL-M7100 Series User's Guide Troubleshooting Cause What to do You may not be using the correct interface cable. Use a cable that matches the specifications of the printer. Confirm that there are not breaks in the cable. If you are using the USB interface, use a cable that is compatible with Hi-Speed USB. The emulation setting for the port may not be correct. Specify the emulation mode by using the printer’s control panel menus. See “Emulation Menu” on page 26.
AL-M8200/AL-M8100/AL-M7100 Series User's Guide Troubleshooting The printer does not print Cause What to do An incorrect printer driver is selected. Make sure that the PostScript printer driver that you are using to print is selected. The Emulation Menu in the printer’s Control Panel is set to a mode other than Auto or PS3 for the interface that you are using. Change the mode setting to either Auto or PS3.
AL-M8200/AL-M8100/AL-M7100 Series User's Guide Troubleshooting Cause What to do For Mac OS users only The printer cannot print binary data when it is connected to the computer via the USB interface. Make sure that the print setting in the application is set to ASCII encoding. The print setting in the application is set to binary encoding.
AL-M8200/AL-M8100/AL-M7100 Series User's Guide Troubleshooting Correcting USB problems Cause What to do The printer is connected through one or more USB hubs. For best results, you should connect the printer directly to the computer’s USB port. If you must use multiple USB hubs, we recommend that you connect the printer to the first tier of a certified hub. Microsoft's universal driver is installed. To check if the universal driver has been installed, see the note below.
AL-M8200/AL-M8100/AL-M7100 Series User's Guide Troubleshooting Cause What to do Windows XP* Windows XP clients Intel Windows 2000 or XP Windows XP x64 clients x64 Windows XP Windows XP clients Windows XP and Windows Server 2003 Windows XP x64 clients x64 Windows XP and Windows Server 2003 Windows 8.1, Windows 8, Windows 7, Windows Vista, or Windows XP clients x86 Type 3 - User Mode Windows 8.
AL-M8200/AL-M8100/AL-M7100 Series User's Guide Troubleshooting Replacing Consumable Products Important: c Never use alcohol or paint thinner to clean the printer cover. These chemicals can damage the components and the case. Be careful not to get water onto the printer mechanism or any electrical components. Precautions during replacement Always observe the following handling precautions when replacing consumable products.
AL-M8200/AL-M8100/AL-M7100 Series User's Guide Troubleshooting E F Pull the handle D obliquely up to draw out the developer unit. Gently wipe the metallic roller inside with a soft and dry cloth to remove the grime and paper particles. H Close cover F, then cover A. I Open cover E, and wipe the vent holes with a soft, dry cloth to remove dust and dirt. J Close cover E. K Wipe the vent holes on the right side of the printer with a soft, dry cloth to remove dust and dirt.
AL-M8200/AL-M8100/AL-M7100 Series User's Guide Troubleshooting Pickup roller on the MP tray Transporting the Printer For short distances Before you move the printer, prepare the location where you are going to place it. See the following sections.
AL-M8200/AL-M8100/AL-M7100 Series User's Guide Troubleshooting For long distances Optional paper cassette unit Before you move the printer, prepare the location where you are going to place it. See the following sections. For details about the paper types and sizes that you can use with the optional paper cassette unit, see “Available Paper and Capacities” on page 35.
AL-M8200/AL-M8100/AL-M7100 Series User's Guide Troubleshooting Printer Installing the optional paper cassette unit A Turn the printer off and unplug the power cord and interface cable. c BeImportant: sure to unplug the power cord from the printer to prevent getting an electric shock. B Carefully take the optional paper cassette unit out from its carton and place it where you intend to set up the printer. C Shift the fasteners toward the back as far as possible.
AL-M8200/AL-M8100/AL-M7100 Series User's Guide Troubleshooting Optional Face-up tray Install the optional face-up tray on the back of the printer. To use the tray, open the tray and its paper support. To output paper to the face-up tray, see “Paper output settings” on page 40. Note: If you use both the printer stand and the face-up tray, you can install up to three optional paper cassette units.
AL-M8200/AL-M8100/AL-M7100 Series User's Guide Appendix Appendix Technical Specifications General Item AL-M8200DN Printing method Laser beam scanning and dry electrophotographic process Resolution 600 × 600 dpi, 1200 × 1200 dpi Continuous printing speed*1 A4 Landscape 45 ppm AL-M8100DN 40 ppm Paper feed Automatic or manual feed Paper feed alignment Center alignment for all sizes Dimensions (Width × Depth × Height) Printer 490 × 410 × 320 mm (19.3 × 16.1 × 12.6 in.
AL-M8200/AL-M8100/AL-M7100 Series User's Guide Appendix Item AL-M8200DN AL-M8100DN AL-M7100DN Resident fonts 84 scalable fonts, and 7 bitmap fonts for ESC/Page 95 scalable fonts, and 5 bitmap for PCL5 80 scalable fonts, and 1 bitmap for PCL6 136 scalable fonts for PostScript3 Printable area The assured printable area is an area 4 mm from all sides. * 4 mm Note: The printable area may be smaller depending on the application. Operating environment Storage environment Temperature 10 to 32.
AL-M8200/AL-M8100/AL-M7100 Series User's Guide Appendix Power consumption AL-M8200DN AL-M8100DN AL-M7100DN 695 W 675 W 600 W 1290 W 1220 W 1280 W Eco Fuser enabled 12 W 11 W 12 W Eco Fuser disabled 50 W 55 W 52 W In sleep mode* 5.9 W 3.1 W 6.0 W In deep sleep mode 4.4 W 1.2 W 4.4 W In power off mode 3.5 W 0.22 W 3.5 W Power off 3.5 W 0.22 W 3.
AL-M8200/AL-M8100/AL-M7100 Series User's Guide Appendix Windows Server 2003 Standard Edition, Windows Server 2003 x64 Standard Edition Windows Server 2003 Enterprise Edition, Windows Server 2003 x64 Enterprise Edition Mac OS X v10.6.8 - v10.9.x Support Mode Settings using the control panel You can make special settings by using the control panel. Normally you do not need to change the settings. Pressing the d Down button while turning the printer on, opens the SUPPORT MODE.
AL-M8200/AL-M8100/AL-M7100 Series User's Guide Appendix Item Explanation 020 Special Adjusts the print quality for special paper according to the paper type. Settings (default in bold): 0: Thin paper 1: Plain paper 2: Semi-thick paper 3: Letterhead 4: Thick paper 5: Extra-thick paper 6: Super-thick paper 051 Feed Offset Do this adjustment after you have eliminated the variation between the paper sources by 055/059/063/067/071/075 This function adjusts the vertical position at which to start printing.
AL-M8200/AL-M8100/AL-M7100 Series User's Guide Appendix Item Explanation 056 Scan Reg1 MP 060 Scan Reg1 C1 064 Scan Reg1 C2 068 Scan Reg1 C3 072 Scan Reg1 C4 076 Scan Reg1 C5* Adjusts the horizontal position at which to start printing and eliminate the variation between the paper sources. The position moves to the right of the sheet of paper as the value increases. This setting is used when feeding paper for single-sided printing or printing the back side of the sheet of paper for duplex printing.
AL-M8200/AL-M8100/AL-M7100 Series User's Guide Appendix Item Explanation 206 Drum heater Controls the drum heater. Selecting 1 prevents image quality from degrading while the printer is not used for a long time if it is located in a very humid environment. This increases power consumptions, but inhibits the printer's automatic drum refreshes. Drum heater control is enabled as long as power is being supplied.
AL-M8200/AL-M8100/AL-M7100 Series User's Guide Appendix Options Product name Part number Remark 500-Sheets Paper Cassette Unit C12C832811 This product complies with CE marking requirements in accordance with EMC Directive 2004/108/EC.
AL-M8200/AL-M8100/AL-M7100 Series User's Guide Appendix Clarendon, Helvetica, New Century Schoolbook, Optima, Palatino, Stempel Garamond, Times and Univers are registered trademarks of Heidelberger Druckmaschinen AG, which may be registered in certain jurisdictions, exclusively licensed through Linotype Library GmbH, a wholly owned subsidiary of Heidelberger Druckmaschinen AG. Copyright and Trademarks A part of the ICC Profile contained within this product was created by Gretag Macbeth ProfileMaker.
AL-M8200/AL-M8100/AL-M7100 Series User's Guide Appendix Standard and approvals European model: Low Voltage Directive 2006/95/EC EN 60950-1 EN 60825-1 EMC Directive 2004/108/EC EN 55022 Class B EN 55024 EN 61000-3-2 EN 61000-3-3 Software License Terms Open source software licenses This product contains a number of open-source software. The following table indicates the list of the open-source software which this product uses and these licenses.
AL-M8200/AL-M8100/AL-M7100 Series User's Guide Where To Get Help Where To Get Help Contacting Epson Support Before contacting Epson If your Epson product is not operating properly and you cannot solve the problem using the troubleshooting information in your product documentation, contact Epson support services for assistance. If Epson support for your area is not listed below, contact the dealer where you purchased your product.
AL-M8200/AL-M8100/AL-M7100 Series User's Guide Where To Get Help Repair service center: Telephone number Fax number Address 02-23416969 02-23417070 No.20, Beiping E. Rd., Zhongzheng Dist., Taipei City 100, Taiwan 02-27491234 02-27495955 1F., No.16, Sec. 5, Nanjing E. Rd., Songshan Dist., Taipei City 105, Taiwan 02-32340688 02-32340699 No.1, Ln. 359, Sec. 2, Zhongshan Rd., Zhonghe City, Taipei County 235, Taiwan 039-605007 039-600969 No.342-1, Guangrong Rd.
AL-M8200/AL-M8100/AL-M7100 Series User's Guide Where To Get Help ❏ Product usage questions or problems ❏ Enquiries on repair service and warranty Help for users in Thailand Contacts for information, support, and services are: World Wide Web (http://www.epson.co.th) Information on product specifications, drivers for download, Frequently Asked Questions (FAQ), and e-mail are available.
AL-M8200/AL-M8100/AL-M7100 Series User's Guide Where To Get Help ❏ Technical support Phone (62) 21-572 4350 Fax (62) 21-572 4357 Epson Service Center Jakarta Mangga Dua Mall 3rd floor No 3A/B Jl. Arteri Mangga Dua, Jakarta Phone/Fax: (62) 21-62301104 Bandung Lippo Center 8th floor Jl. Gatot Subroto No.2 Bandung Phone/Fax: (62) 22-7303766 Surabaya Hitech Mall lt IIB No. 12 Jl. Kusuma Bangsa 116 – 118 Surabaya Phone: (62) 31-5355035 Fax: (62)31-5477837 Yogyakarta Hotel Natour Garuda Jl.
AL-M8200/AL-M8100/AL-M7100 Series User's Guide Where To Get Help Internet Home Page Epson Hong Kong has established a local home page in both Chinese and English on the Internet to provide users with the following information: ❏ Product information ❏ Answers to Frequently Asked Questions (FAQs) ❏ Latest versions of Epson product drivers Users can access our World Wide Web home page at: http://www.epson.com.
AL-M8200/AL-M8100/AL-M7100 Series User's Guide Where To Get Help ❏ Enquiries on repair services & warranty, product usage and technical support (Techline) Phone: 603-56288333 Help for users in the Philippines To obtain technical support as well as other after sales services, users are welcome to contact the Epson Philippines Corporation at the telephone and fax numbers and e-mail address below: Trunk Line: (63-2) 706 2609 Fax: (63-2) 706 2665 Helpdesk Direct Line: (63-2) 706 2625 E-mail: epchelpd