Benutzerhandbuch NPD4893-03 DE
Benutzerhandbuch Copyright und Marken Copyright und Marken Copyright und Marken Kein Teil dieses Handbuchs darf in irgendeiner Form (Druck, Fotokopie, Mikrofilm oder ein anderes Verfahren) ohne die schriftliche Genehmigung der Seiko Epson Corporation reproduziert oder unter Verwendung elektronischer Systeme verarbeitet, vervielfältigt oder verbreitet werden. Es wird keine Patenthaftung in Bezug auf die in diesem Dokument enthaltenen Informationen übernommen.
Benutzerhandbuch Copyright und Marken Copyright © 1988-1997 Sam Leffler Copyright © 1991-1997 Silicon Graphics, Inc.
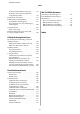
Benutzerhandbuch Inhalt Inhalt Einlegen von Papier in die Papierkassette. . . . . . . Einlegen von Umschlägen in die Papierkassette ..................................... Einlegen von Papier und Umschlägen in den hinteren Papiereinzug. . . . . . . . . . . . . . . . . . . . . Einlegen von Vorlagen. . . . . . . . . . . . . . . . . . . . Automatischer Vorlageneinzug (ADF). . . . . . . Vorlagenglas. . . . . . . . . . . . . . . . . . . . . . . . . . Einstecken einer Speicherkarte. . . . . . . . . . . . . .
Benutzerhandbuch Inhalt Scannen an einen Computer. . . . . . . . . . . . . . Menüliste für den Scan-Modus. . . . . . . . . . . . Scannen über Ihren Computer. . . . . . . . . . . . . . . Scannen im Office Mode (Büromodus). . . . . . Scannen im Professional Mode (Professioneller Modus). . . . . . . . . . . . . . . . . Bildkorrekturmerkmale. . . . . . . . . . . . . . . . . . Vorschau und Anpassen des Scanbereichs. . . . Softwareinformationen. . . . . . . . . . . . . . . . . . . .
Benutzerhandbuch Inhalt Verwenden des Utilitys Print Head Alignment (Druckkopf-Justage) für Mac OS X. . . . . . . . . 146 Verwenden des Bedienfelds. . . . . . . . . . . . . . . 146 Netzwerkdiensteinstellungen. . . . . . . . . . . . . . . . 148 Freigeben des Geräts für das Drucken. . . . . . . . . 149 Reinigung des Produkts. . . . . . . . . . . . . . . . . . . . 149 Äußere Reinigung des Gehäuses. . . . . . . . . . . . 149 Innere Reinigung des Geräts. . . . . . . . . . . . . . 150 Ersetzen der Wartungsbox. .
Benutzerhandbuch Inhalt Es werden mehrere Blätter eingezogen. . . . . . . 198 Das Papier staut sich im automatischen Vorlageneinzug (ADF) . . . . . . . . . . . . . . . . . . 198 Probleme mit der Scanzeit. . . . . . . . . . . . . . . . . . 198 Probleme mit gescannten Bildern. . . . . . . . . . . . . 199 Scanqualität ist unbefriedigend. . . . . . . . . . . . 199 Der Scanbereich oder die Scanrichtung ist unbefriedigend. . . . . . . . . . . . . . . . . . . . . . . . 200 Sonstige Probleme. . . . . . . . . . . .
Benutzerhandbuch Einleitung Einleitung Informationsquellen Die neuste Version der folgenden Handbücher sind von der Epson-Support-Website erhältlich. http://www.epson.eu/Support (Europa) http://support.epson.net/ (außerhalb Europas) ❏ Hier starten (Papierdokument): Enthält eine Einführung zum Produkt und den zugehörigen Services. ❏ Grundlagenhandbuch (Papierdokument): Vermittelt grundlegende Informationen über den Gebrauch des Produkts ohne Computer.
Benutzerhandbuch Einleitung WF-7610 WF-7620 WF-7621 WF-3620 WF-3621 WF-3640 ✓ ✓ ✓ ✓ ✓ ✓ ✓ ✓ ✓ Nur Australien und Neuseeland ✓ Nur Australien und Neuseeland LDAP* ✓ ✓ ✓ - - - Papierkassette 2 - ✓ ✓ - - ✓ An einen Computer scannen An ein Speichergerät scannen In Netzwerkordner scannen Scannen an eMail Fax an einen Netzwerkordner weiterleiten Fax an eine eMail weiterleiten * Weitere Informationen finden Sie im Online-Administratorhandbuch.
Benutzerhandbuch Einleitung ❏ Windows XP steht für Windows XP Home Edition, Windows XP Professional x64 Edition und Windows XP Professional. ❏ Windows Server 2012 bezieht sich auf Windows Server 2012 Essentials Edition und Server 2012 Standard Edition. ❏ Windows Server 2008 bezieht sich auf Windows Server 2008 Standard Edition, Windows Server 2008 Enterprise Edition, Windows Server 2008 x64 Standard Edition und Windows Server 2008 x64 Enterprise Edition.
Benutzerhandbuch Wichtige Anweisungen Wichtige Anweisungen Sicherheitsanweisungen Befolgen Sie diese Anweisungen, um den sicheren Gebrauch des Produkts zu gewährleisten. Achten Sie darauf, dieses Handbuch für den späteren Gebrauch aufzuheben. Befolgen Sie außerdem alle am Gerät angebrachten Warnungen und Hinweise. ❏ Verwenden Sie nur das mitgelieferte Netzkabel mit diesem Produkt und verwenden Sie das Kabel nicht mit anderen Geräten.
Benutzerhandbuch Wichtige Anweisungen ❏ Für die Serien WF-7610 und WF-7620: Das Produkt ist schwer und sollte von mindestens zwei Personen angehoben oder getragen werden. Beim Anheben des Produkts müssen die beiden Personen die korrekte Haltung einnehmen (siehe unten). Hinweis: Folgende Sicherheitsregeln gelten für den Umgang mit Tintenpatronen.
Benutzerhandbuch Wichtige Anweisungen ❏ Wenn Sie das Gerät über ein Verlängerungskabel anschließen, achten Sie darauf, dass die Gesamtstromaufnahme aller am Verlängerungskabel angeschlossenen Geräte die zulässige Strombelastbarkeit des Verlängerungskabels nicht überschreitet. Stellen Sie außerdem sicher, dass die Gesamtstromstärke aller an der Netzsteckdose angeschlossenen Geräte die zulässige Stromstärke dieser Steckdose nicht überschreitet.
Benutzerhandbuch Wichtige Anweisungen Verwenden des Geräts mit einer kabellosen Verbindung ❏ Benutzen Sie dieses Produkt nicht in medizinischen Einrichtungen oder in der Nähe von medizinischen Geräten. Die Funkwellen, die das Gerät aussendet, könnten den Betrieb der elektrischen, medizinischen Geräte nachteilig beeinflussen. ❏ Benutzen Sie das Gerät nicht in der Nähe von automatisch gesteuerten Einrichtungen, wie elektrischen Türen oder Brandmeldern.
Benutzerhandbuch Wichtige Anweisungen Einschränkungen beim Kopieren Beachten Sie die folgenden Einschränkungen, um das Gerät in einer verantwortlichen und gesetzlichen Weise zu verwenden.
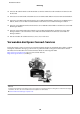
Benutzerhandbuch Allgemeine Informationen zum Gerät Allgemeine Informationen zum Gerät Hinweis: Die in diesem Handbuch verwendeten Abbildungen stammen von einem ähnlichen Produktmodell. Obwohl sie sich von Ihrem tatsächlichen Produkt unterscheiden könnten, sind die Bedienvorgänge gleich. Geräteteile Serien WF-7610 und WF-7620 a. ADF-Abdeckung b. ADF-Hebel c. Automatischer Vorlageneinzug (ADF) d. Papierführungsschiene e.
Benutzerhandbuch Allgemeine Informationen zum Gerät a. Papierführungsschienen b. Hinterer Papiereinzug c. Ausgabefach d. Ausgabefacherweiterung e. Anschlag f. Papierführungsschienen g. Papierkassette h. Papierkassettenabdeckung a. Vorlagenabdeckung b. Vorlagenglas c. Bedienfeld d. Speicherkartensteckplatz e. Speicherkarten-LED f.
Benutzerhandbuch Allgemeine Informationen zum Gerät a. Scannereinheit b. Tintenpatronenabdeckung c. Tintenpatronenhalter d. Druckkopf (unter dem Tintenpatronenhalter) a. Wartungsbox b. Hintere Abdeckung 1 c. Hintere Abdeckung 2 (Auto-Duplexer) d. Netzeingang e. LINE-Anschluss f. EXT.-Anschluss g. LAN-Anschluss h.
Benutzerhandbuch Allgemeine Informationen zum Gerät Serien WF-3620 und WF-3640 a. ADF-Abdeckung b. Automatischer Vorlageneinzug (ADF) c. Papierführungsschiene d. Zufuhrfach des automatischen Vorlageneinzugs (ADF, hier die zu kopierenden Originale einlegen) e. Ausgabefach des automatischen Vorlageneinzugs (ADF, Originale werden nach dem Kopieren hier ausgeworfen) f. Papierkassette 1 g. Papierkassette 2 * * Papierkassette 2 ist nur für die Serie WF-3640 verfügbar. a.
Benutzerhandbuch Allgemeine Informationen zum Gerät a. Vorlagenabdeckung b. Vorlagenglas c. Bedienfeld d. Speicherkartensteckplatz e. Speicherkarten-LED f. Externe USB-Schnittstelle a. Scannereinheit b. Tintenpatronenabdeckung c. Tintenpatronenhalter d.
Benutzerhandbuch Allgemeine Informationen zum Gerät a. Wartungsbox b. Hintere Abdeckung (Auto-Duplexer) c. Netzeingang d. LINE-Anschluss e. EXT.-Anschluss f. LAN-Anschluss g. USB-Anschluss Erläuterungen zum Bedienfeld Hinweis: ❏ Das Bedienfelddesign variiert je nach Position. ❏ Obwohl das Bedienfelddesign und die auf der LCD-Anzeige dargestellten Elemente wie Menü- und Optionsnamen vom tatsächlichen Produkt abweichen können, ist die Bedienung dieselbe.
Benutzerhandbuch Allgemeine Informationen zum Gerät Serien WF-3620 und WF-3640 Tasten/Anzeigen Funktion a Dient zum Ein- bzw. Ausschalten des Produkts. Die Betriebsanzeige leuchtet, wenn das Produkt eingeschaltet ist. Die Betriebsanzeige blinkt, wenn gedruckt/kopiert/gescannt/gefaxt, eine Tintenpatrone ausgewechselt, das Tintenzuleitungssystem befüllt oder der Druckkopf gereinigt wird. b Kehrt zum oberen Menü zurück. Im oberen Menü können Sie zwischen den Modi wechseln.
Benutzerhandbuch Allgemeine Informationen zum Gerät Tasten/Anzeigen l m n Funktion Startet das Drucken/Kopieren/Scannen/Faxen in Farbe. u, d *2 *2 Führt einen Bildlauf auf der Anzeige durch. Zeigt eine Liste der von Ihnen registrierten Voreinstellungen an. *1Diese Taste ist nur für die Serien WF-7610 und WF-7620 verfügbar. *2Diese Tasten sind nur für die Serie WF-3620 verfügbar. Statussymbole Die folgenden Symbole werden je nach Produktstatus auf dem Bedienfeld angezeigt.
Benutzerhandbuch Allgemeine Informationen zum Gerät Symbole Beschreibung Zeigt an, dass keine Ethernet-Verbindung vorhanden ist. Zeigt an, dass eine Ethernet-Verbindung hergestellt wurde. Zeigt an, dass keine Wi-Fi-Verbindung vorhanden ist. Zeigt an, dass ein Wi-Fi-Netzwerkfehler aufgetreten ist oder das Produkt nach einer Verbindung sucht. Zeigt an, dass eine Wi-Fi-Verbindung hergestellt wurde. Die Anzahl der Balken zeigt die Stärke des Verbindungssignals an.
Benutzerhandbuch Allgemeine Informationen zum Gerät Symbole Beschreibung *1 Öffnet den Bildschirm Voreinst.. Wechselt in den Modus Sp.Gerät. *2 Zeigt die registrierte Kontaktliste für das Scannen und Faxen an. & „Einstellungen der Kontaktliste“ auf Seite 106 Zeigt den Status des Epson Connect-Service an. & „Verwenden des Epson Connect-Services“ auf Seite 10 Öffnet den Einstellungsbildschirm Sparmodus. & „Einstellungen für Systemadministration “ auf Seite 116 Wechselt in den Modus Setup.
Benutzerhandbuch Allgemeine Informationen zum Gerät Hinweis: Verfügbare Symbole variieren je nach Einstellung. Symbole Beschreibung Umstellung zwischen Groß- und Kleinbuchstaben. Umstellung des Zeichentyps. 123#: Eingabe von Zahlen und Symbolen. ABC: Eingabe des Alphabets. ÁÄÂ: Eingabe von Sonderzeichen (z. B. Umlaute und Akzentzeichen). Umstellung der Tastaturbelegung. Leerzeichen. Tilgung des letzten Zeichens. Eingabe übernehmen.
Benutzerhandbuch Umgang mit Papier und Medien Umgang mit Papier und Medien Einführung zum Verwenden, Einlegen und Aufbewahren von Medien Mit den meisten Normalpapiersorten lassen sich gute Druckergebnisse erzielen. Beschichtetes Papier ergibt jedoch noch bessere Ausdrucke, weil es weniger Tinte absorbiert.
Benutzerhandbuch Umgang mit Papier und Medien Serien WF-7610 und WF-7620 Fassungskapazität (Blatt oder Höhe) Medium Format Papierkassette 2*1 Papierkassette 1 Randlos drucken Hinterer Papiereinzug 2-seitiges Drucken A3 27,5 mm*3 27,5 mm*3 1 - ✓ B4 27,5 mm*3 27,5 mm*3 1 - ✓ Legal 27,5 mm*3 27,5 mm*3 1 - ✓ Letter 27,5 mm*3 27,5 mm*3 1 - ✓ A4 27,5 mm*3 27,5 mm*3 1 - ✓ B5 27,5 mm*3 27,5 mm*3 1 - ✓ A5 27,5 mm*3 - 1 - ✓ A6 27,5 mm*3 - 1 - - Benutzerdefiniert
Benutzerhandbuch Umgang mit Papier und Medien Fassungskapazität (Blatt oder Höhe) Medium Epson Matte Paper - Heavyweight (Mattes Papier - schwer) Epson Premium Glossy Photo Paper (Premium-Hochglanz-Fotopapier) Epson Premium Semigloss Photo Paper (Premium-Seidenglanz-Fotopapier) Epson Ultra Glossy Photo Paper (Ultrahochglanz-Fotopapier) Epson Photo Paper Glossy (Hochglanz-Fotopapier) Format Papierkassette 2*1 Papierkassette 1 Randlos drucken Hinterer Papiereinzug 2-seitiges Drucken A3+ 20 - 1
Benutzerhandbuch Umgang mit Papier und Medien Serien WF-3620 und WF-3640 Fassungskapazität (Blatt oder Höhe) Medium Format Papierkassette 2*1 Papierkassette 1 Randlos drucken Hinterer Papiereinzug 2-seitiges Drucken Legal 30*3 30*3 1 - ✓*5 Letter 27,5 mm*4 27,5 mm*4 1 - ✓ A4 27,5 mm*4 27,5 mm*4 1 - ✓ B5 27,5 mm*4 27,5 mm*4 1 - ✓ A5 27,5 mm*4 - 1 - ✓*5 A6 27,5 mm*4 - - - - Benutzerdefiniert 1 1 1 - ✓ Legal - - 1 - - Letter - - 1 - - A4 - - 1 -
Benutzerhandbuch Umgang mit Papier und Medien Fassungskapazität (Blatt oder Höhe) Medium Epson Premium Glossy Photo Paper (Premium-Hochglanz-Fotopapier) Epson Premium Semigloss Photo Paper (Premium-Seidenglanz-Fotopapier) Epson Ultra Glossy Photo Paper (Ultrahochglanz-Fotopapier) Epson Photo Paper Glossy (Hochglanz-Fotopapier) Format Papierkassette 2*1 Papierkassette 1 Randlos drucken Hinterer Papiereinzug 2-seitiges Drucken A4 20 - 1 ✓ - 10 × 15 cm (4 × 6 Zoll) 20 - - ✓ - 13 × 18 cm
Benutzerhandbuch Umgang mit Papier und Medien Papiertypeinstellungen an der LCD-Anzeige Das Produkt stellt sich automatisch auf die in den Druckeinstellungen ausgewählte Papiersorte ein. Aus diesem Grund ist die Einstellung der richtigen Papiersorte besonders wichtig. So erkennt das Produkt, welches Papier gerade verwendet wird, und stellt die Tintendeckung entsprechend ein. In der Tabelle unten sind die Einstellungen für das Papier aufgelistet.
Benutzerhandbuch Umgang mit Papier und Medien Für dieses Papier Papiertyp im Druckertreiber Letterhead Letterhead Farbiges Papier Color (Farbe) Recyclingpapier Recycled (Recycling Papier) Epson Ultra Glossy Photo Paper (Ultrahochglanz-Fotopapier) Epson Ultra Glossy Epson Premium Glossy Photo Paper (Premium-Hochglanz-Fotopapier) Epson Premium Glossy Epson Premium Semigloss Photo Paper (Premium-Seidenglanz-Fotopapier) Epson Premium Semigloss Epson Photo Paper Glossy (Hochglanz-Fotopapier) Phot
Benutzerhandbuch Umgang mit Papier und Medien B Für Serien WF-7610 und WF-7620: Entfernen Sie die Abdeckung. C Drücken und schieben Sie die Papierführungsschienen an die Kanten der Papierkassette heran. Hinweis: Bei Verwendung von Papier, das größer als A4 ist, erweitern Sie die Papierkassette bis zum Symbol auf der Kassette. D Richten Sie die Papierführungsschiene am verwendeten Papierformat aus.
Benutzerhandbuch Umgang mit Papier und Medien E Legen Sie in Richtung der Papierführungsschiene mit der bedruckbaren Seite nach unten ein und stellen Sie sicher, dass das Papier nicht über das Ende der Kassette hinausragt. Hinweis: ❏ Papierkassette 2 unterstützt nur das Papierformat B5 oder größer. ❏ Das Papier vor dem Einlegen aufstoßen und die Papierkanten ausrichten.
Benutzerhandbuch Umgang mit Papier und Medien F Schieben Sie die Papierführungsschienen an die Papierkanten heran. Hinweis: Legen Sie Normalpapier nicht über die Pfeilmarkierung H innen an der Papierführungsschiene hinaus ein. Achten Sie Bei Epson-Spezialmedien darauf, dass die Blattanzahl unter dem für das Medium festgelegten Maximum liegt. & „Auswahl des Papiers“ auf Seite 27 G Für Serien WF-7610 und WF-7620: Bringen Sie die Papierkassettenabdeckung wieder an.
Benutzerhandbuch Umgang mit Papier und Medien H Halten Sie die Papierkassette waagerecht und setzen Sie sie langsam und vorsichtig wieder in das Produkt ein. Hinweis: Wenn Sie die Papierkassette einsetzen, wird der Bildschirm zum Vornehmen von Papierformat- und Papiertypeinstellungen automatisch angezeigt. Stellen Sie sicher, dass die Papiereinstellungen mit dem eingelegten Papier übereinstimmen. I Ziehen Sie das Ausgabefach heraus und stellen Sie den Anschlag auf.
Benutzerhandbuch Umgang mit Papier und Medien A Ziehen Sie die Papierkassette 1 ganz heraus. B Für Serien WF-7610 und WF-7620: Entfernen Sie die Abdeckung. C Drücken und schieben Sie die Papierführungsschienen an die Kanten der Papierkassette heran. D Legen Sie Umschläge der Länge nach mit der Umschlagklappe nach oben und nach rechts ein. Hinweis: Vergewissern Sie sich, dass die Anzahl der Umschläge den vorgesehenen Grenzwert nicht überschreitet.
Benutzerhandbuch Umgang mit Papier und Medien E Schieben Sie die Papierführungsschienen an die Umschlagkanten heran und stellen Sie sicher, dass die Umschläge nicht über das Ende der Kassette hinausragen. Hinweis: Schieben Sie die Papierführungsschienen auch dann an die Umschlagkanten heran, wenn Sie kein Klickgeräusch wahrnehmen. F Für Serien WF-7610 und WF-7620: Bringen Sie die Papierkassettenabdeckung wieder an.
Benutzerhandbuch Umgang mit Papier und Medien Hinweis: Wenn Sie die Papierkassette einsetzen, wird der Bildschirm zum Vornehmen von Papierformat- und Papiertypeinstellungen automatisch angezeigt. Stellen Sie sicher, dass die Papiereinstellungen mit dem eingelegten Papier übereinstimmen. H Ziehen Sie das Ausgabefach heraus und stellen Sie den Anschlag auf. Hinweis: ❏ Die Stärke der Umschläge und die Möglichkeit, sie zu falten, variieren erheblich.
Benutzerhandbuch Umgang mit Papier und Medien A Ziehen Sie das Ausgabefach heraus und stellen Sie den Anschlag auf. B Öffnen Sie den hinteren Papiereinzug. C Halten Sie ein Blatt Papier mit der bedruckbaren Seite nach oben in die Mitte des hinteren Papiereinzugs. Richten Sie die Papierschienen so aus, dass sie bündig an die Papierkanten anliegen. Hinweis: Die bedruckbare Seite ist oft weißer oder heller als die Rückseite. D Legen Sie das Papier in den hinteren Papiereinzug ein.
Benutzerhandbuch Umgang mit Papier und Medien Hinweis: ❏ Legen Sie beim Einlegen von Umschlägen die kurze Kante mit der Umschlagklappe nach unten zuerst ein. ❏ Verwenden Sie keine gewellten oder gefalteten Umschläge. ❏ Glätten Sie den Umschlag und die Umschlagklappen vor dem Einlegen. ❏ Glätten Sie die Vorderkante des Umschlags vor dem Einlegen. ❏ Verwenden Sie keine Umschläge, die zu dünn sind. Sie können im Drucker zerknittern.
Benutzerhandbuch Umgang mit Papier und Medien Einlegen von Vorlagen Automatischer Vorlageneinzug (ADF) Sie können Ihre Originale in den automatischen Vorlageneinzug (ADF) einlegen, um mehrere Seiten schnell kopieren, scannen oder faxen zu können. Der ADF kann Dokumente beidseitig scannen. Folgende Originale eignen sich für den ADF. Größe B5, A5*1, A4, Letter, Legal*1, B4*2, A3*2 Typ Normalpapier Gewicht 64 g/m2 bis 95 g/m2 Fassungsvermögen max.
Benutzerhandbuch Umgang mit Papier und Medien C Legen Sie die Vorlagen mit der kurzen Seite zuerst und der zu bedruckenden Seite nach oben in den automatischen Vorlageneinzug ein. Hinweis: Legen Sie keine Dokumente über die Pfeilmarkierung H innen an der Papierführungsschiene hinaus ein. D Richten Sie die Papierführungsschiene an den Vorlagen aus. Hinweis: Legen Sie beim Layout „2 hoch kopieren“ die Vorlage wie dargestellt auf.
Benutzerhandbuch Umgang mit Papier und Medien Vorlagenglas A Öffnen Sie die Dokumentenabdeckung und legen Sie die Vorlage mit der Schrift nach unten auf das Vorlagenglas. B Schieben Sie die Vorlage in die Ecke.
Benutzerhandbuch Umgang mit Papier und Medien SD, miniSD, microSD, SDHC, miniSDHC, microSDHC, SDXC, microSDXC, Memory Stick Duo, Memory Stick PRO Duo, Memory Stick PRO-HG Duo, Memory Stick Micro, MagicGate Memory Stick Duo Wichtig: c Für die folgenden Speicherkarten ist ein Adapter erforderlich: Schließen Sie den Adapter an, bevor Sie die Karte in den Steckplatz einstecken. Andernfalls kann die Karte stecken bleiben.
Benutzerhandbuch Umgang mit Papier und Medien c ❏Wichtig: Versuchen Sie nicht, gewaltsam die Karte vollständig in den Steckplatz zu stecken. Sie sollte nicht vollständig eingesteckt sein. ❏ Entfernen Sie die Speicherkarte nicht, wenn die LED blinkt. Ansonsten gehen die Daten auf der Speicherkarte möglicherweise verloren. Hinweis: Wenn die Einstellungen unter Speichergeräteschnitt. auf Deaktivieren eingestellt sind, wird die Speicherkarte nicht erkannt.
Benutzerhandbuch Kopieren Kopieren Kopieren von Dokumenten Einfaches Kopieren Befolgen Sie die nachfolgenden Schritte zum Kopieren von Dokumenten. A Legen Sie Papier in die Papierkassette ein. & „Einlegen von Papier in die Papierkassette“ auf Seite 33 Hinweis: Wenn Sie ein einzelnes Blatt dickeren oder vorgelochten Papiers kopieren möchten, legen Sie das Papier in den hinteren Papiereinzug ein, nachdem Sie den Auftrag gesendet haben (Schritt 7).
Benutzerhandbuch Drucken Drucken Drucken über das Bedienfeld Führen Sie die nachstehenden Schritte aus, um ohne Computer über das Bedienfeld zu drucken. Sie können Daten von einer Speicherkarte oder einem externen USB-Gerät drucken. Drucken einer JPEG-Datei A Legen Sie Papier ein. & „Einlegen von Papier in die Papierkassette“ auf Seite 33 & „Einlegen von Papier und Umschlägen in den hinteren Papiereinzug“ auf Seite 40 B Schließen Sie ein Speichergerät an.
Benutzerhandbuch Drucken Drucken einer TIFF-Datei A Legen Sie Papier ein. & „Einlegen von Papier in die Papierkassette“ auf Seite 33 & „Einlegen von Papier und Umschlägen in den hinteren Papiereinzug“ auf Seite 40 B Schließen Sie ein Speichergerät an. & „Einstecken einer Speicherkarte“ auf Seite 45 C Wählen Sie im Menü „Startseite“ die Option Sp.Gerät. D Wählen Sie TIFF. E Wählen Sie die Datei, die Sie drucken möchten. F Überprüfen Sie die Dateiinformationen und drücken Sie dann auf Fortf..
Benutzerhandbuch Drucken Hinweis für Windows-Anwender: ❏ Ihr Druckertreiber sucht und installiert automatisch die neueste Version des Druckertreibers auf der Epson-Website. Klicken Sie im Fenster Maintenance (Utility) des Druckertreibers auf die Schaltfläche Software Update (Softwareaktualisierung) und folgen Sie den Anweisungen am Bildschirm. Wenn die Schaltfläche nicht im Fenster Maintenance (Utility) angezeigt wird, zeigen Sie im Windows-Startmenü auf All Programs (Alle Programme) bzw.
Benutzerhandbuch Drucken ❏ Windows Vista und Server 2008: Klicken Sie auf die Start-Schaltfläche, wählen Sie Control Panel (Systemsteuerung) und anschließend den Eintrag Printer (Drucker) aus der Kategorie Hardware and Sound (Hardware und Sound). Wählen Sie anschließend den Drucker aus und klicken Sie auf Select printing preferences (Druckeigenschaften auswählen).
Benutzerhandbuch Drucken Epson Printer Utility 4 Klicken Sie unter Mac OS X 10.8 oder 10.7 auf System Preferences (Systemeinstellungen) im Apple-Menü und anschließend auf Print & Scan (Drucken & Scannen). Wählen Sie Ihr Produkt aus der Liste Printers (Drucker), klicken Sie auf Options & Supplies (Optionen & Zubehör), Utility (Sonstiges) und anschließend auf Open Printer Utility (Drucker-Dienstprogramm öffnen). Klicken Sie unter Mac OS X 10.
Benutzerhandbuch Drucken B Rufen Sie die Druckereinstellungen auf. & „Aufrufen des Druckertreibers unter Windows“ auf Seite 51 C Klicken Sie auf die Registerkarte Main (Haupteinstellungen). D Wählen Sie die geeignete Einstellung für Paper Source (Papierzufuhr). E Wählen Sie die geeignete Einstellung für Document Size (Dokumentgröße). Sie können auch ein eigenes Papierformat definieren. Weitere Informationen finden Sie in der Online-Hilfe.
Benutzerhandbuch Drucken H Wählen Sie die geeignete Einstellung für Paper Type (Druckmedium). & „Papiertypeinstellungen vom Druckertreiber“ auf Seite 32 Hinweis: Die Druckqualität wird automatisch entsprechend dem gewählten Paper Type (Druckmedium) angepasst. I Wählen Sie die geeignete Einstellung für Quality (Qualität). Hinweis: Wenn Sie Daten mit hoher Dichte auf Normalpapier, Letterhead-Papier oder vorgelochtes Papier drucken, wählen Sie Standard-Vivid, damit Ihr Ausdruck farbintensiv wird.
Benutzerhandbuch Drucken B Rufen Sie das Dialogfeld Print (Drucken) auf. & „Aufrufen des Druckertreibers unter Mac OS X“ auf Seite 52 Hinweis: Wenn das vereinfachte Dialogfeld angezeigt wird, klicken Sie auf die Schaltfläche Show Details (Details einblenden) (unter Mac OS X 10.8 oder 10.7) oder die Schaltfläche d (unter Mac OS X 10.6 oder 10.5.8), um das Dialogfeld zu erweitern. C Wählen Sie als Printer (Drucker) den verwendeten Drucker.
Benutzerhandbuch Drucken F Wählen Sie Print Settings (Druckereinstellungen) aus dem Popup-Menü. G Wählen Sie die geeignete Einstellung für Paper Source (Papierzufuhr). H Wählen Sie die geeignete Einstellung für Media Type (Medium). & „Papiertypeinstellungen vom Druckertreiber“ auf Seite 32 I Wählen Sie die geeignete Einstellung für Print Quality (Qualität).
Benutzerhandbuch Drucken Verwenden des Statusmenüs des Produkts Sie können den aktuellen Druckauftrag über das Statusmenü des Produkts abbrechen. A Drücken Sie auf B Wählen Sie Auftragsüberwachung und anschließend Druckauftrag. Aktuelle und anstehende Aufträge werden in der Liste angezeigt. C Wählen Sie den abzubrechenden Auftrag aus. D Drücken Sie auf Abbrechen. , um das Statusmenü anzuzeigen.
Benutzerhandbuch Drucken C Klicken Sie auf die Schaltfläche Delete (Löschen), um den Druckauftrag abzubrechen. Für Mac OS X 10.8: Klicken Sie auf die Schaltfläche , um den Druckauftrag abzubrechen. Weitere Optionen Drucken von Fotos leicht gemacht Mit Epson Easy Photo Print können Sie digitale Bilder anordnen und auf verschiedenen Papiersorten drucken.
Benutzerhandbuch Drucken Mit der Funktion Quick Print (Schnelldruck) können Sie Druckvorgänge durch einmaliges Klicken mit den ausgewählten Einstellungen starten. Starten von Epson Easy Photo Print Hinweis: Sie können Epson Easy Photo Print von der folgenden Epson-Website herunterladen. http://support.epson.net/ http://www.epson.eu/Support (Europa) Für Windows ❏ Doppelklicken Sie auf das Epson Easy Photo Print-Symbol auf dem Desktop.
Benutzerhandbuch Drucken 2-seitiges Drucken Verwenden Sie den Druckertreiber, um Vorder- und Rückseite des Papiers zu bedrucken. Hinweis: ❏ Diese Funktion ist in einigen Einstellungen möglicherweise nicht verfügbar. ❏ Die Fassungskapazität unterscheidet sich beim 2-seitigen Drucken. & „Auswahl des Papiers“ auf Seite 27 ❏ Verwenden Sie ausschließlich für 2-seitiges Drucken geeignetes Papier. Andernfalls kann die Druckqualität schlechter ausfallen.
Benutzerhandbuch Drucken Hinweis für Mac OS X ❏ Mac OS X unterstützt nur automatischen 2-seitigen Druck. ❏ Beim automatischen 2-seitigen Drucken kann sich der Druckvorgang je nach der Einstellung für Document Type (Vorlagenart) unter Two-sided Printing Settings (Duplexdruck-Einstellungen) verlangsamen. Geräteeinstellungen für Windows A Rufen Sie die Druckereinstellungen auf.
Benutzerhandbuch Drucken C Überprüfen Sie die anderen Einstellungen und drucken Sie. Hinweis: Beim Drucken von Daten mit hoher Dichte wie Fotos oder Grafiken empfiehlt es sich, die Einstellungen für Print Density (Druckdichte) und Increased Ink Drying Time (Erhöhte Tintentrocknungszeit) manuell anzupassen. Druckoption Passend auf Seite Sie können das Format des Bilds proportional skalieren, damit es auf das im Druckertreiber ausgewählte Papierformat passt.
Benutzerhandbuch Drucken B Wählen Sie im Fenster Paper Handling (Papierhandhabung) die Option Scale to fit paper size (An Papierformat anpassen) als Destination Paper Size (Papierformat des Ziels) sowie das gewünschte Papierformat aus dem Popup-Menü. C Überprüfen Sie die anderen Einstellungen und drucken Sie. Druckoption Pages per Sheet (Seiten pro Blatt) Mit dieser Funktion können Sie mithilfe des Druckertreibers zwei oder vier Seiten auf ein Blatt Papier drucken.
Benutzerhandbuch Drucken C Überprüfen Sie die anderen Einstellungen und drucken Sie. Drucken von Anti-Copy Pattern (Kopierschutzmuster) (nur Windows) Mit dieser Funktion können Sie ein Dokument als kopiergeschütztes Dokument drucken. Beim Versuch, ein kopiergeschütztes Dokument zu drucken, wird die von Ihnen als Kopierschutzmuster hinzugefügte Zeichenfolge mehrfach auf das Dokument gedruckt. Hinweis: Diese Funktion ist in einigen Einstellungen möglicherweise nicht verfügbar.
Benutzerhandbuch Drucken D Klicken Sie auf OK, um zum Fenster More Options (Weitere Optionen) zurückzukehren. E Klicken Sie auf OK, um das Dialogfeld „Printer Settings“ (Druckereinstellungen) zu schließen und zu drucken. Drucken von Watermark (Wasserzeichen) (nur Windows) Mit dieser Funktion können Sie ein text- oder bildbasiertes Wasserzeichen auf Ihr Dokument drucken. Hinweis: Diese Funktion ist in einigen Einstellungen möglicherweise nicht verfügbar. A Rufen Sie die Druckereinstellungen auf.
Benutzerhandbuch Drucken E Klicken Sie auf OK, um das Dialogfeld „Printer Settings“ (Druckereinstellungen) zu schließen und zu drucken. Drucken von Header/Footer (Kopfzeile/Fußzeile) (nur Windows) Mit dieser Funktion können Sie oben oder unten auf jeder Seite eines Dokuments den Benutzernamen, den Computernamen, das Datum, die Uhrzeit oder die Sortiernummer drucken. A Rufen Sie die Druckereinstellungen auf.
Benutzerhandbuch Drucken ❏ Waasserzeichen ❏ Kopfzeile/Fußzeile ❏ Farbe ❏ 2-seitiges Drucken ❏ Multi-Page Hinweis: Sie müssen sich unter Windows als Administrator anmelden. A Windows 8 und Server 2012: Wählen Sie Desktop, Settings (Einstellungen), Charm, Control Panel (Systemsteuerung) und anschließend Devices and Printers (Geräte und Drucker) aus der Kategorie Hardware and Sound (Hardware und Sound).
Benutzerhandbuch Scannen Scannen Scannen über das Bedienfeld Sie können Vorlagen scannen und das gescannte Bild vom Produkt an einen angeschlossenen Computer, ein Speichergerät, einen Netzwerkordner oder per eMail-Anhang senden. Hinweis: ❏ Je nach Produkt werden die Funktionen In Netz-ordner/FTP scannen und An eMail scannen möglicherweise nicht unterstützt. & „Verfügbare Funktionen“ auf Seite 8 ❏ Sie können die Scaneinstellungen als eine Voreinstellung speichern. & „Voreinst.
Benutzerhandbuch Scannen Scannen in einen Ordner Mit der Funktion In Netz-ordner/FTP scannen können Sie gescannte Bilder in einem Ordner auf einem Server speichern. Sie können einen Speicherordner angeben, indem Sie direkt einen Ordnerpfad eingeben. Es ist jedoch möglicherweise einfacher, wenn Sie einen Speicherordner registrieren und die Ordnereinstellungen unter „Kontakte“ konfigurieren, bevor Sie diese Funktion verwenden. & „Einstellungen der Kontaktliste“ auf Seite 106 A Legen Sie die Vorlage auf.
Benutzerhandbuch Scannen C Wählen Sie eMail. D Wenn Sie eMail-Adressen direkt angeben möchten, drücken Sie auf das Feld eMail-Adresse eingeben und geben Sie dann eine eMail-Adresse ein. E Wenn Sie eMail-Adressen über Kontakte angeben möchten, drücken Sie auf Kontakte, um die Liste anzuzeigen, und wählen Sie dann einen Kontakt aus, indem Sie auf das entsprechende Kontrollkästchen in der Liste drücken. Drücken Sie anschließend auf Fortf..
Benutzerhandbuch Scannen C Wählen Sie Computer oder Computer (WSD). D Wählen Sie einen Computer aus. Hinweis: Wenn Sie Computer auswählen, fahren Sie mit dem nächsten Schritt fort. Wenn Sie Computer (WSD) auswählen, fahren Sie mit Schritt 7 fort. E Drücken Sie auf Format und wählen Sie das Dateiformat zum Speichern des gescannten Bilds. F Nehmen Sie die geeigneten Scaneinstellungen vor. G Drücken Sie eine der x-Tasten und starten Sie den Scanvorgang. Ihr gescanntes Bild wird gespeichert.
Benutzerhandbuch Scannen C Wählen Sie Office Mode (Büromodus) aus der Liste Mode (Modus). D Wählen Sie die geeignete Einstellung für Document Source (Dokumentenquelle). E Wählen Sie die Größe der Vorlage als Einstellung für Size (Größe). F Wählen Sie die geeignete Einstellung für Image Type (Bildtyp). G Wählen Sie eine für Ihre Vorlagen geeignete Einstellung für die Resolution (Auflösung). H Klicken Sie auf Scan (Scannen).
Benutzerhandbuch Scannen I Wählen Sie im Fenster File Save Settings (Einstellungen zum Speichern von Dateien) die geeignete Einstellung für Type (Typ) und klicken Sie auf OK. Hinweis: ❏ Wenn das Kontrollkästchen Show this dialog box before next scan (Dieses Dialogfeld vor dem nächsten Scanvorgang anzeigen) deaktiviert ist, beginnt Epson Scan direkt mit dem Scanvorgang, ohne das Fenster File Save Settings (Einstellungen zum Speichern von Dateien) anzuzeigen.
Benutzerhandbuch Scannen C Wählen Sie Professional Mode (Professioneller Modus) aus der Liste Mode (Modus). D Wählen Sie die geeignete Einstellung für Document Source (Dokumentenquelle). E Wählen Sie Photo (Foto) oder Document (Vorlage) als Einstellung für Auto Exposure Type (Automatische Belichtung) aus. F Wählen Sie die geeignete Einstellung für Image Type (Bildtyp).
Benutzerhandbuch Scannen G Wählen Sie eine für Ihre Vorlagen geeignete Einstellung für die Resolution (Auflösung). H Klicken Sie auf Preview (Vorschau), um eine Bildvorschau anzuzeigen. Das Fenster Preview (Vorschau) wird mit einer Vorschau des Bilds geöffnet. & „Vorschau und Anpassen des Scanbereichs“ auf Seite 79 Hinweis zum automatischen Vorlageneinzug (Automatic Document Feeder/ADF): ❏ Der ADF lädt Ihre erste Dokumentenseite.
Benutzerhandbuch Scannen In der Hilfe finden Sie weitere Informationen zu Epson Scan. Histogram Adjustment (Histogrammanpassung) Bietet eine grafische Oberfläche, um Helligkeits-, Schatten- und Gamma-Werte einzeln einzustellen. Tone Correction (Tonwertkorrektur) Bietet eine grafische Oberfläche, um die Tonwerte einzeln anzupassen. Image Adjustment (Bildkorrektur) Passt die Helligkeit und den Kontrast sowie die Balance von roten, grünen und blauen Farbanteilen im Gesamtbild an.
Benutzerhandbuch Scannen Descreening (Entrasterung) Entfernt wellige Muster (als Moiré bekannté), das in hell schattierten Bildbereichen, z. B. in Hauttönen, auftreten kann. Color Restoration (Farbwiederherstellung) Stellt die Farben in verblichenen Fotos automatisch wieder her. Backlight Correction (Hintergrundbeleuchtung-Korrektur) Hellt Fotos auf, die im Gegenlicht aufgenommen wurden. Dust Removal (Staubentfernung) Entfernt automatisch Staubspuren von Vorlagen.
Benutzerhandbuch Scannen Color Enhance (Farboptimierung) Ermöglicht Ihnen die Verbesserung einer Farbe. Zur Auswahl stehen Rot, Blau oder Grün. Vorschau und Anpassen des Scanbereichs Auswählen eines Vorschaumodus Nachdem Sie die Grundeinstellungen und die Auflösung ausgewählt haben, können Sie eine Vorschau Ihres Bilds anzeigen und den Bildbereich in einem Preview (Vorschau)-Fenster auswählen bzw. anpassen. Es gibt zwei Vorschauarten.
Benutzerhandbuch Scannen ❏ Um einen Laufrahmen manuell zu zeichnen, positionieren Sie den Zeiger in dem Bereich, in dem die Ecke des Laufrahmens platziert werden soll, und klicken Sie. Ziehen Sie das Fadenkreuz durch das Bild zu der gegenüberliegenden Ecke des gewünschten Scanbereichs. ❏ Zum automatischen Zeichnen des Laufrahmens klicken Sie auf das Symbol zum automatischen Lokalisieren.
Benutzerhandbuch Scannen Hinweis: ❏ Um nur eine senkrechte oder waagerechte Verschiebung des Laufrahmens zuzulassen, halten Sie während des Ziehens die Shift (Umschalt)-Taste gedrückt. ❏ Um die Größe des Laufrahmens unter Einhaltung der aktuellen Proportionen zu ändern, halten Sie während der Größenänderung die Shift (Umschalt)-Taste gedrückt. ❏ Zum Ziehen mehrerer Laufrahmen müssen Sie vor dem Scanvorgang im Fenster Preview (Vorschau) auf die Schaltfläche All (Alle) klicken.
Benutzerhandbuch Scannen Startanleitung ❏ Windows 8: Klicken Sie mit der rechten Maustaste auf die Start (Startseite) oder streifen Sie vom unteren oder oberen Rand der Start (Startseite) und wählen Sie All apps (Alle Apps) > Epson Software > Event Manager. ❏ Windows 7, Vista und XP: Klicken Sie auf die Start-Schaltfläche oder wählen Sie Start (Startseite) > All Programs (Alle Programme) bzw. Programs (Programme) > Epson Software > Event Manager (Ereignis-Manager).
Benutzerhandbuch Faxen Faxen Anschluss an eine Telefonleitung Kompatible Telefonleitungen und Telefonkabel Telefonleitung Die Faxfunktionen dieses Produkts sind für den Betrieb über standardmäßige analoge Telefonleitungen (PSTN = Public Switched Telephone Network) und Nebenstellenanlagen (PBX = Private Branch Exchange) ausgelegt. (Je nach Umgebung werden manche Nebenstellenanlagen möglicherweise nicht unterstützt.
Benutzerhandbuch Faxen c ❏Wichtig: Wenn Sie eine PBX-Konsole im selben Raum haben, schließen Sie das Kabel von der Konsole an den LINE-Anschluss an. ❏ Entfernen Sie nicht die Abdeckung vom EXT-Anschluss des Produkts, wenn Sie Ihr Telefon nicht anschließen. DSL oder ISDN Schließen Sie ein Telefonkabel von Ihrem DSL-Modem, Terminaladapter oder ISDN-Router an den LINE-Anschluss auf der Rückseite des Produkts an.
Benutzerhandbuch Faxen Einzelne Telefonleitung A Entfernen Sie die Abdeckung vom EXT-Anschluss am Produkt. B Schließen Sie ein zweites Telefonkabel an Ihr Telefon oder Ihren Anrufbeantworter und den EXT-Anschluss an. c ❏Wichtig: Wenn eine einzelne Telefonleitung von Telefon und Produkt gemeinsam genutzt wird, vergewissern Sie sich, dass Sie das Telefon an den EXT-Anschluss des Produkts anschließen. Andernfalls funktionieren das Telefon und das Produkt möglicherweise nicht ordnungsgemäß.
Benutzerhandbuch Faxen Einrichten zum Senden von Faxen Grundeinstellungen In diesem Abschnitt werden die erforderlichen Mindesteinstellungen zum Verwenden der Faxfunktionen beschrieben. Hinweis: Mit der Funktion Sperreinstellung im Menü Admin-Einstellungen kann ein Administrator die Einstellungen zum Schutz vor Änderungen mit einem Kennwort schützen. & „Einstellungen für Systemadministration “ auf Seite 116 Verwenden des Fax-Einstellungsassistenten Das Menü Fax-Einstellungsassist.
Benutzerhandbuch Faxen E Geben Sie auf dem Bildschirm Fax-Header den Namen des Absenders ein (bis zu 40 Zeichen). F Geben Sie auf dem Bildschirm Ihre Telefonnummer Ihre Telefonnummer ein (bis zu 20 Ziffern). Hinweis: ❏ Sie sollten vor dem Senden von Faxen Ihren Namen und Ihre Telefonnummer in die Faxkopfzeile eingeben, damit die Empfänger die Herkunft des Faxes erkennen können. ❏ G Sie können die Informationen in der Kopfzeile später ändern. Rufen Sie das nachstehend gezeigte Menü auf.
Benutzerhandbuch Faxen I Wählen Sie auf dem nächsten Empfangsmoduseinst.-Bildschirm Ja, um Faxe automatisch zu empfangen. Wählen Sie Nein, um Faxe manuell zu empfangen. Hinweis: ❏ Wenn Sie einen externen Anrufbeantworter angeschlossen haben und die Option für den automatischen Faxempfang auswählen, müssen Sie sicherstellen, dass die Einstellung für Klingeln bis Antwort korrekt ist.
Benutzerhandbuch Faxen D Wählen Sie Grundeinstellungen. E Wählen Sie Leitungstyp. F Wählen Sie PBX. G Wählen Sie auf dem Bildschirm Zugangscode die Option Verwenden oder Nicht verwenden. Wenn Sie Verwenden auswählen, fahren Sie mit dem nächsten Schritt fort. H Geben Sie einen externen Zugangscode in das Feld Zugangscode ein. Hinweis: Beim Anschließen an eine Nebenstellenanlage wird empfohlen, die Einstellung für den Zugangscode zuerst vorzunehmen.
Benutzerhandbuch Faxen Hinweis: Der Anrufbeantworter nimmt jeden Anruf schneller an als das Produkt, aber das Produkt kann Faxtöne erkennen und mit dem Empfang von Faxen beginnen. Wenn Sie ein Gespräch entgegennehmen und einen Faxton hören, stellen Sie sicher, dass das Produkt mit dem Empfangen des Faxes begonnen hat, und legen Sie dann den Hörer auf. Erweiterte Einstellungen In diesem Abschnitt werden erweiterte Faxeinstellungen erläutert. Greifen Sie auf die Menüs so zu wie unter jedem Thema angegeben.
Benutzerhandbuch Faxen Installieren von FAX Utility für das Faxen von einem Computer Mit Epson FAX Utility können Sie Faxe von einem Computer aus senden und in einem bestimmten Ordner empfangen. Gehen Sie wie folgt vor, um FAX Utility zu installieren. PC-FAX Driver wird gleichzeitig installiert. Dies ist erforderlich für das Senden von Faxen. Wichtig: c Installieren Sie den Druckertreiber, bevor Sie FAX Utility installieren.
Benutzerhandbuch Faxen Senden von Faxen Grundlegende Bedienung Führen Sie die nachstehenden Schritte aus, um ein schwarzweißes oder farbiges Fax zu senden. Beim Senden eines schwarzweißen Faxes wird das gescannte Dokument temporär im Gerätespeicher gespeichert, und Sie können vor dem Senden eine Vorschau auf dem LCD-Bildschirm anzeigen. Hinweis: Das Produkt kann bis zu 50 Aufträge für schwarzweiße Faxe annehmen. Sie können den reservierten Faxauftrag über das Statusmenü prüfen oder abbrechen.
Benutzerhandbuch Faxen Hinweis: ❏ Drücken Sie zum Löschen der eingegebenen Empfänger auf das Feld zur Eingabe der Faxnummer und wählen Sie den Empfänger, den Sie aus der Zielliste löschen möchten. Drücken Sie dann auf Aus der Liste löschen. D ❏ Wenn die Option Direktwahlbeschränkungen in den Sicherheitseinstellungen aktiviert ist, können Sie nur Faxempfänger aus der Kontaktliste oder dem Verlauf der gesendeten Faxe auswählen. Sie können keine Faxnummer manuell eingeben.
Benutzerhandbuch Faxen Weitere Optionen Praktische Faxfunktionen Dieser Abschnitt beschreibt praktische Faxfunktionen zur Steigerung Ihrer Produktivität. Hinweis: Mit der Funktion Sperreinstellung im Menü Admin-Einstellungen kann ein Administrator die Einstellungen zum Schutz vor Änderungen mit einem Kennwort schützen.
Benutzerhandbuch Faxen ❏ Senden von Dokumenten unterschiedlicher Größe über den automatischen Vorlageneinzug (Kont. Scan vom ADE) Wenn Sie Dokumente unterschiedlicher Größe gleichzeitig in den automatischen Vorlageneinzug (ADF) eingelegt haben, werden Sie möglicherweise nicht in ihrer jeweiligen Originalgröße gesendet. Zum Senden von Dokumenten unterschiedlicher Größe mithilfe des automatischen Vorlageneinzugs (ADF) müssen Sie zunächst im Menü Fax-Sendeeinstellungen die Option Kont.
Benutzerhandbuch Faxen B Wechseln Sie über das Menü „Startseite“ in den Modus Fax. C Drücken Sie auf Menü, wählen Sie Abrufsenden und dann Ein. D Drücken Sie auf Menü und wählen Sie dann Fax-Sendeeinstellungen, um bei Bedarf die Faxübertragungseinstellungen wie z. B. die Auflösung zu ändern. Eine Erläuterung der Einstellungen finden Sie in der Menüliste. & „Modus Fax“ auf Seite 112 E Drücken Sie auf x (B&W), um mit dem Scannen des Dokuments zu beginnen.
Benutzerhandbuch Faxen Senden eines Faxes von einem angeschlossenen Telefon Wenn die Telefon- und Faxnummer des Empfängers dieselbe ist, können Sie nach dem Telefongespräch mit dem Empfänger ein Fax senden. A Legen Sie die Vorlage auf. & „Einlegen von Vorlagen“ auf Seite 43 B Wählen Sie die Rufnummer über das Telefon, das an das Produkt angeschlossen ist. Sie können bei Bedarf mit dem Empfänger telefonieren. C Drücken Sie auf dem LCD-Bildschirm des Produkts auf Fax starten. D Wählen Sie Senden.
Benutzerhandbuch Faxen D Windows: Klicken Sie auf Properties (Eigenschaften), ändern Sie die Faxübertragungseinstellungen nach Bedarf und klicken Sie dann auf OK. Mac OS X: Wählen Sie Fax Settings (Faxeinstellungen) und ändern Sie die Faxübertragungseinstellungen nach Bedarf. E Windows: Klicken Sie auf OK. Der Bildschirm Recipient Settings (Empfängereinstellungen) wird angezeigt. Wählen Sie mindestens einen Empfänger aus und klicken Sie auf Next (Weiter).
Benutzerhandbuch Faxen Hinweis: Mit der Funktion Sperreinstellung im Menü Admin-Einstellungen kann ein Administrator die Einstellungen zum Schutz vor Änderungen mit einem Kennwort schützen. & „Einstellungen für Systemadministration “ auf Seite 116 A Wechseln Sie über das Menü „Startseite“ in den Modus Setup. B Wählen Sie Systemadministration. C Wählen Sie Fax-Einstellungen. D Wählen Sie Ausgabeeinstellungen. E Wählen Sie Fax-Ausgabe.
Benutzerhandbuch Faxen ❏ Auf Sp.-Gerät speichern Aktivieren Sie diese Option, um empfangene Faxe auf einer an das Produkt angeschlossenen Speicherkarte oder einem externen USB-Speichergerät zu speichern. Wählen Sie Ja und drucken, um empfangene Faxe automatisch zu drucken und sie zugleich auf dem externen Speichergerät zu speichern. Vor der Verwendung dieser Funktion müssen Sie auf dem jeweiligen Speichergerät einen Speicherordner erstellen. Wählen Sie im Menü Sonstige Einst. die Option Ordner zum Speich.
Benutzerhandbuch Faxen Zieltyp Erläuterung Ordner auf einem Server* Wählen Sie Ordnereinträge aus der Kontaktliste. * Je nach Produkt wird die Funktion zum Weiterleiten von Faxen an eMail und Ordner möglicherweise nicht unterstützt. Weitere Informationen finden Sie im folgenden Abschnitt. & „Verfügbare Funktionen“ auf Seite 8 Mit dem Menü Opt., wenn Wtl. fehlg. können Sie wählen, ob das Fax im Gerätespeicher (Posteingang) gedruckt oder gespeichert werden soll, wenn die Weiterleitung fehlschlägt.
Benutzerhandbuch Faxen Wichtig: c Löschen Sie Faxe, nachdem Sie sie gedruckt oder angezeigt haben, um einen zu vollen Speicher zu vermeiden. Wenn der Speicher voll ist, kann das Produkt keine Faxe empfangen oder senden. Hinweis zum Drucken: Wenn das eingehende Fax mehr Papier erfordert, als das in der Kassette für die Faxfunktion vorhandene Papier, wird es entsprechend verkleinert oder es werden mehrere Seiten pro Blatt gedruckt, je nach ausgewählter Einstellung für Auto-Reduzierung.
Benutzerhandbuch Faxen C Wenn Sie einen Faxton hören, drücken Sie auf dem LCD-Bildschirm des Produkts auf Fax starten. D Wählen Sie Empfangen. E Drücken Sie auf x (Color) oder x (B&W), um das Fax zu empfangen, und legen Sie das Telefon wieder auf. Hinweis: Mit der Funktion Externer Empfang können Sie den Faxempfang über das Telefongerät statt über das Produkt starten. Aktivieren Sie diese Funktion und legen Sie einen Startcode fest.
Benutzerhandbuch Faxen ❏ Senden oder Löschen gescannter Dokumente mit der Funktion Faxdaten speichern ❏ Löschen eines für Abrufdienste gescannten Dokuments ❏ Erneutes Senden oder Löschen von Faxen, die nicht gesendet werden konnten, wenn Sie die Option Fehlerdaten speichern aktiviert haben. Gehen Sie folgendermaßen vor, um auf das Menü zuzugreifen: A Drücken Sie am Bedienfeld auf B Wählen Sie Auftragsüberwachung und dann Komm.-Auftrag oder Druckauftrag. C Wählen Sie einen Zielauftrag aus der Liste.
Benutzerhandbuch Faxen C Wählen Sie Fax-Einstellungen. D Wählen Sie Ausgabeeinstellungen. E Wählen Sie Auto-Fax-Protokolldruck. F Wählen Sie eine der zwei Optionen für automatisches Drucken. ❏ Aus Der Bericht wird nicht automatisch gedruckt. ❏ Ein (alle 30) Der Bericht wird automatisch nach jeweils 30 gesendeten bzw. empfangenen Faxaufträgen gedruckt. ❏ Ein (Zeit) Sie können angeben, wann der Bericht automatisch gedruckt werden soll.
Benutzerhandbuch Einstellungen der Kontaktliste Einstellungen der Kontaktliste Erstellen eines Kontakts Sie können häufig verwendete Faxnummern, eMail-Adressen und Netzwerkordner in der Kontaktliste registrieren. Dadurch können Sie beim Faxen und Scannen die Ziele schnell auswählen. Hinweis: Die Ziele können mithilfe eines LDAP-Servers registriert werden. Weitere Informationen finden Sie im OnlineAdministratorhandbuch.
Benutzerhandbuch Einstellungen der Kontaktliste H Nehmen Sie die weiteren Einstellungen gemäß der ausgewählten Funktion vor. Hinweis für Faxnummern: ❏ Eine Faxnummer muss eingegeben werden. Sie können bis zu 64 Stellen eingeben. I ❏ Wenn Ihr Telefonsystem PBX ist und Sie einen externen Zugangscode wie z. B. „9“ benötigen, um eine externe Nummer anzurufen, geben Sie den Zugangscode am Anfang der Faxnummer ein.
Benutzerhandbuch Einstellungen der Kontaktliste G Geben Sie ein Wort für den Eintrag unter Indexwort ein. Sie können bis zu 30 Zeichen eingeben. Dieses Indexwort ist hilfreich, wenn Sie nach einem Eintrag in der Kontaktliste suchen. H Drücken Sie Fortf.. I Wählen Sie einen Eintrag, den Sie in der Gruppenliste registrieren möchten. J Drücken Sie auf Speichern, um die Registrierung abzuschließen.
Benutzerhandbuch Menüliste des Bedienfelds Menüliste des Bedienfelds Dieses Gerät kann als Drucker, Kopierer, Scanner und Faxgerät verwendet werden. Mit Ausnahme der Druckerfunktion können Sie diese Funktionen jeweils durch Drücken der entsprechenden Modustaste auf dem Bedienfeld aufrufen. Sobald Sie einen Modus ausgewählt haben, wird der Hauptbildschirm für diesen Modus eingeblendet. Modus Kopie Hinweis: ❏ Einstellungsoptionen hängen vom Layout oder anderen Einstellungen ab.
Benutzerhandbuch Menüliste des Bedienfelds Menü Einstellungen und Beschreibung Schatten entf. Wählen Sie Ein, um die Schatten zu entfernen, die in der Mitte eines Dokuments entstehen, wenn Sie ein Buch oder ein Dokument mit dickem Papier kopieren. Lochung entf. Wählen Sie Ein, um die Lochung auf einem Dokument zu entfernen. B. Kop. sort. Wählen Sie Ein, um mehrere Kopien eines mehrseitigen Dokuments in der entsprechenden Reihenfolge zu drucken und sie in Gruppen zu sortieren.
Benutzerhandbuch Menüliste des Bedienfelds Menü Einstellungen und Beschreibung Bildanpassungen Foto korrigieren Wählen Sie die Bildkorrekturmethode. Rote-Augen-Korr.* Wählen Sie Ein, um ein Foto mit Rote-Augen-Effekt automatisch zu korrigieren. Bilder wählen Wählen Sie diese Option, um alle Fotos auf dem externen Speichergerät auszuwählen. Gruppe wählen Wählen Sie diese Option, um eine andere Gruppe auf dem externen Speichergerät auszuwählen.
Benutzerhandbuch Menüliste des Bedienfelds Modus Fax Menü Einstellungen und Optionen Menü Fax-Sendeeinstellungen Auflösung Wählen Sie die Auflösung des ausgehenden Faxes. Wählen Sie Foto für Dokumente, die eine Vielzahl von Bildern enthalten. Dichte Wählen Sie die Dichte des ausgehenden Faxes. Wenn Sie textbasierte schwarzweiße Dokumente senden, wählen Sie Auto. Dokumentengröße (Glas) Wählen Sie die Größe und Ausrichtung des auf dem Vorlagenglas platzierten Dokuments.
Benutzerhandbuch Menüliste des Bedienfelds Modus Scan Hinweis: ❏ Je nach Produkt werden die Funktionen In Netz-ordner/FTP scannen und An eMail scannen möglicherweise nicht unterstützt. Weitere Informationen finden Sie im folgenden Abschnitt. & „Verfügbare Funktionen“ auf Seite 8 ❏ Die Einstellungsoptionen hängen vom Menü ab. An Speichergerät scannen Menü Einstellungen und Beschreibung Format Wählen Sie das Dateiformat des gescannten Bilds. Wenn Sie TIFF (mehrs.
Benutzerhandbuch Menüliste des Bedienfelds Menü Einstellungen und Beschreibung Menü eMail-Einstellungen Grundeinstellungen Betreff Geben Sie den Betreff der eMail ein, an die Sie die gescannte Datei anhängen möchten. Dateinamenspräfix Geben Sie das Präfix für den Dateinamen ein. Auflösung Wählen Sie die Auflösung beim Scannen. Scan-Bereich Wählen Sie den Scan-Bereich. 2-seitig Wählen Sie Ein, um ein doppelseitiges Dokument zu scannen. Dokumententyp Wählen Sie den Dokumententyp.
Benutzerhandbuch Menüliste des Bedienfelds Modus Setup Menü Einstellungen und Beschreibung Tintenstand Überprüft den Status der Tintenpatronen und der Wartungsbox. Wartung Druckkopf-Düsentest Druckt ein Muster, um zu überprüfen, ob die Druckkopfdüsen verstopft sind. Druckkopfreinigung Reinigt den Druckkopf, um verstopfte Düsen zu säubern. Tintenpatronenaustausch Startet den Vorgang zum Austauschen der Tintenpatrone.
Benutzerhandbuch Menüliste des Bedienfelds Einstellungen für Systemadministration Der Administrator kann das Bedienfeld sperren, um unbeabsichtigte Änderungen zu verhindern. Um das Bedienfeld zu sperren, wählen Sie die nachstehenden Menüs aus und geben Sie das Kennwort ein. Setup > Admin-Einstellungen > Sperreinstellung Das Kennwort ist für die Verwendung der folgenden Funktionen erforderlich.
Benutzerhandbuch Menüliste des Bedienfelds Menü Einstellungen und Beschreibung Druckereinstellungen Papierquelleneinst. A4/Letter-Auto-Wechsel Nehmen Sie die Papiereinstellungen für A4 und Letter vor. Wenn ein Papier im A4- oder Letter-Format für den Druckvorgang ausgewählt ist und keine Papierzufuhr für das ausgewählte Papierformat angegeben wurde, erfolgt der Ausdruck mit einem alternativen Papierformat (Letter für A4 oder A4 für Letter). Auto-Auswahleinst.
Benutzerhandbuch Menüliste des Bedienfelds Menü Einstellungen und Beschreibung Allgemeine Einstellungen LCD-Helligkeit Passt die Helligkeit des LCD-Bildschirms an. Ton Passen Sie die Audioeinstellungen an. Schlaf-Timer Geben Sie die Dauer an, nach der der LCD-Bildschirm dunkel wird. Abschalttimer Geben Sie die Dauer an, nach der die Stromversorgung automatisch ausgeschaltet wird. Sie können die Zeitdauer, bevor sich das Energiesparsystem einschaltet, anpassen.
Benutzerhandbuch Menüliste des Bedienfelds Menü Einstellungen und Beschreibung Wi-Fi-/Netzwerkeinst. Wi-Fi-/Netzwerkstatus Wi-Fi-Setup Sie können die aktuellen Netzwerkeinstellungen anzeigen und ein Blatt mit dem Netzwerkstatus drucken. Wi-Fi-Setup-Assistent Ausführliche Informationen zu den Einstellungsoptionen finden Sie im Online-Netzwerkhandbuch.
Benutzerhandbuch Menüliste des Bedienfelds Menü Einstellungen und Beschreibung Fax-Einstellungen Benutzerstandardeinst. Sie können die Standardeinstellungen zum Senden von Faxen ändern. Weitere Informationen zu den Menüs finden Sie im folgenden Abschnitt.
Benutzerhandbuch Menüliste des Bedienfelds Menü Einstellungen und Beschreibung Ausgabeeinstellungen Fax-Ausgabe & „Ausgeben empfangener Faxe“ auf Seite 98 Auto-Reduzierung Mit dieser Option können Sie angeben, ob die Größe von Faxen, die in einem größeren Format empfangen wurden, verkleinert wird, um sie auf das Papierformat der ausgewählte Papierkassette anzupassen, oder ob sie in der Originalgröße auf mehreren Blättern gedruckt werden.
Benutzerhandbuch Menüliste des Bedienfelds Menü Einstellungen und Beschreibung Grundeinstellungen Faxgeschwindigkeit Gibt die Geschwindigkeit an, mit der Sie Faxe senden und empfangen. ECM Gibt an, ob der Fehlerkorrekturmodus automatisch verwendet wird, um fehlerhafte gesendete bzw. empfangene Faxdaten, aufgrund von Problemen mit der Leitung oder anderer Ursachen, zu korrigieren. Wenn die Einstellung ECM deaktiviert wurde, können keine farbigen Faxe gesendet bzw. empfangen werden.
Benutzerhandbuch Menüliste des Bedienfelds Menü Einstellungen und Beschreibung Sicherheitseinstellungen Universaldruckeinstell. Direktwahlbeschränkungen Wählen Sie Ein, um die manuelle Eingabe der Faxnummer des Empfängers zu deaktivieren, wodurch der Empfänger nur aus der Kontaktliste oder dem Verlauf gesendeter Faxe ausgewählt werden kann. Wählen Sie Zweimal eingeben, sodass die Faxnummer zweimal eingegeben werden muss, um eine falsche Eingabe zu verhindern.
Benutzerhandbuch Menüliste des Bedienfelds Menü Einstellungen und Beschreibung Sparmodus Ein Werkseinstlg. wiederh. Aus Sie können die Zeitdauer, bevor sich das Energiesparsystem einschaltet, anpassen. Eine Erhöhung dieser Ausschaltzeitdauer wirkt sich auf die Energieeffizienz des Geräts aus. Denken Sie an die Umwelt, bevor Sie etwaige Änderungen vornehmen. Wählen Sie Ein, um alle folgenden Funktionen für Sparmodus zu aktivieren.
Benutzerhandbuch Informationen zu Tintenpatrone und Zubehörteilen Informationen zu Tintenpatrone und Zubehörteilen Tintenpatronen Sie können die folgenden Tintenpatronen für dieses Gerät verwenden: Produkt Symbol WF-7610 WF-7620 WF-3620 WF-3640 Black (Schwarz) Cyan Magenta Yellow (Gelb) 27 27XL 27 27XL 27 27XL Wecker 27 27XL 27XXL * Weitere Informationen zur Nutzungsdauer der Tintenpatronen von Epson finden Sie auf der folgenden Website. http://www.epson.
Benutzerhandbuch Informationen zu Tintenpatrone und Zubehörteilen Wartungsbox Sie können die folgenden Wartungsboxen für dieses Gerät verwenden.
Benutzerhandbuch Auswechseln der Tintenpatronen Auswechseln der Tintenpatronen Sicherheitsanweisungen für Tintenpatronen, Vorsichtsmaßnahmen und Spezifikationen Sicherheitsanweisungen Bitte beachten Sie beim Umgang mit den Tintenpatronen folgende Hinweise: ❏ Bewahren Sie Tintenpatronen außerhalb der Reichweite von Kindern auf. ❏ Seien Sie beim Umgang mit benutzten Tintenpatronen vorsichtig, da um die Tintenzuleitungsöffnung noch immer ein wenig Tinte vorhanden sein kann.
Benutzerhandbuch Auswechseln der Tintenpatronen ❏ Berühren Sie nicht den grünen Chip oder das kleine Fenster an der Seite der Tintenpatrone. Hierdurch können sowohl der normale Betrieb als auch der Druckbetrieb beeinträchtigt werden. ❏ Lassen Sie das Produkt nicht ohne Tintenpatronen oder schalten Sie das Gerät während des Wechselns der Tintenpatronen nicht aus. Andernfalls kann die Tinte in den Druckkopfdüsen eintrocknen und das Drucken verhindern.
Benutzerhandbuch Auswechseln der Tintenpatronen ❏ Verpackung der Tintenpatronen bis zum Installationszeitpunkt nicht öffnen. Die Tintenpatrone ist vakuumverpackt, um die Haltbarkeit zu gewährleisten. Bleibt die Tintenpatrone vor der Benutzung längere Zeit ausgepackt liegen, ist normales Drucken unter Umständen nicht möglich. ❏ Installieren Sie alle Tintenpatronen; andernfalls ist das Drucken nicht möglich.
Benutzerhandbuch Auswechseln der Tintenpatronen Prüfen des Status der Tintenpatronen Für Windows Hinweis: Wenn eine Tintenpatrone einen geringen Füllstand aufweist, wird automatisch der Bildschirm Low Ink Reminder (Erinnerung für niedrigen Tintenstand) angezeigt. In diesem Fenster können Sie den Status der Tintenpatronen überprüfen.
Benutzerhandbuch Auswechseln der Tintenpatronen ❏ Öffnen Sie den Druckertreiber, klicken Sie auf die Registerkarte Maintenance (Utility) und dann auf die Schaltfläche EPSON Status Monitor 3. Der Status der Tintenpatrone wird grafisch angezeigt. Hinweis: ❏ Wenn der EPSON Status Monitor 3 nicht angezeigt wird, öffnen Sie den Druckertreiber und klicken Sie auf die Registerkarte Maintenance (Utility) und anschließend auf die Schaltfläche Extended Settings (Erweiterte Einstellungen).
Benutzerhandbuch Auswechseln der Tintenpatronen B Klicken Sie auf das Symbol EPSON Status Monitor. Der EPSON Status Monitor wird angezeigt. Hinweis: ❏ In der grafischen Anzeige wird der Status der Tintenpatronen zum Zeitpunkt des Öffnens von EPSON Status Monitor angezeigt. Um den Status der Tintenpatronen zu aktualisieren, klicken Sie auf Update (Aktualisieren). ❏ Die angezeigten Tintenstände sind Annäherungswerte. Verwenden des Bedienfelds A Drücken Sie am Bedienfeld auf .
Benutzerhandbuch Auswechseln der Tintenpatronen Vorübergehendes Drucken mit schwarzer Tinte bei verbrauchten Farbtintenpatronen Wenn die farbige Tinte verbraucht und noch schwarze Tinte vorhanden ist, können Sie für kurze Zeit auch nur mit schwarzer Tinte drucken. Sie sollten die verbrauchte(n) Patrone(n) jedoch so bald wie möglich ersetzen. Wie Sie vorübergehend mit schwarzer Tinte weiterdrucken können, finden Sie im folgenden Abschnitt.
Benutzerhandbuch Auswechseln der Tintenpatronen A Wenn EPSON Status Monitor 3 Sie zum Abbrechen des Druckauftrags auffordert, klicken Sie auf Cancel (Abbrechen) oder Cancel Print (Druck abbrechen), um den Druckauftrag abzubrechen. Hinweis: Wenn die Fehlermeldung, dass eine Tintenpatrone verbraucht ist, von einem anderen Computer im Netzwerk stammt, müssen Sie ggf. den Druckauftrag am Produkt abbrechen. B Legen Sie Normalpapier oder Briefumschläge ein. C Rufen Sie die Druckereinstellungen auf.
Benutzerhandbuch Auswechseln der Tintenpatronen H Drucken Sie die Datei. I EPSON Status Monitor 3 wird erneut auf dem Computerbildschirm angezeigt. Klicken Sie auf Print in Black (Schwarz drucken), um mit schwarzer Tinte zu drucken. Für Mac OS X Führen Sie die nachstehenden Schritte aus, um vorübergehend mit schwarzer Tinte weiterzudrucken. A Wenn der Druck nicht fortgesetzt werden kann, klicken Sie auf das Druckersymbol im Dock.
Benutzerhandbuch Auswechseln der Tintenpatronen B Öffnen Sie System Preferences (Systemeinstellungen), klicken Sie auf Print & Scan (Drucken & Scannen) (Mac OS X 10.8 oder 10.7) oder Print & Fax (Drucken & Faxen) (Mac OS X 10.6 oder 10.5) und wählen Sie das Produkt aus der Liste Printers (Drucker). Klicken Sie anschließend auf Options & Supplies (Optionen & Zubehör) und dann auf Driver (Treiber).
Benutzerhandbuch Auswechseln der Tintenpatronen Das nachfolgende Fenster wird angezeigt, wenn die schwarze Tinte fast leer und mehr farbige Tinte als schwarze Tinte vorhanden ist. Das Fenster wird nur angezeigt, wenn plain papers (Normalpapier) als Papiertyp festgelegt ist und Standard als Quality (Qualität) ausgewählt wurde. In diesem Fenster können Sie auswählen, ob Sie die schwarze Tinte normal weiterverwenden oder schwarze Tinte einsparen möchten, indem Sie aus farbigen Tinten Schwarz mischen.
Benutzerhandbuch Auswechseln der Tintenpatronen c ❏Wichtig: Bewegen Sie den Tintenpatronenhalter nicht von Hand, ansonsten kann das Gerät beschädigt werden. ❏ Heben Sie die Scannereinheit nicht an, wenn die Dokumentenabdeckung geöffnet ist. B Öffnen Sie die Patronenabdeckung. C Drücken Sie die Tintenpatrone zusammen und enfernen Sie sie.
Benutzerhandbuch Auswechseln der Tintenpatronen Hinweis: ❏ Die Abbildung zeigt den Austausch der schwarzen Tintenpatrone. Tauschen Sie die entsprechende Tintenpatrone aus. ❏ D Um die Tintenzufuhröffnung entnommener Tintenpatronen befindet sich möglicherweise Tinte. Achten Sie deshalb beim Entnehmen der Tintenpatrone darauf, dass Tinte keine Gegenstände in der Umgebung verschmutzt.
Benutzerhandbuch Auswechseln der Tintenpatronen E Nur das gelbe Band entfernen. c ❏Wichtig: Sie müssen vor der Installation das gelbe Band von der Patrone entfernen; andernfalls kann die Druckqualität zurückgehen oder das Drucken verhindert werden. F ❏ Wenn Sie eine Tintenpatrone installiert haben, ohne das gelbe Band zu entfernen, nehmen Sie die Patrone aus dem Produkt, entfernen Sie das gelbe Band und installieren Sie sie erneut.
Benutzerhandbuch Auswechseln der Tintenpatronen G Schließen Sie die Patronenabdeckung. Drücken Sie am Bedienfeld des Produkts auf Prüfen, um zu überprüfen, ob die Patronen ordnungsgemäß installiert sind. H Schließen Sie langsam die Scannereinheit. Die Tintenbefüllung startet. Hinweis: ❏ Die Betriebsanzeige blinkt während der Tintenbefüllung dauerhaft. Schalten Sie das Produkt während des Tintenladevorgangs nicht aus. Wird der Tintenladevorgang abgebrochen, können Sie möglicherweise nicht drucken.
Benutzerhandbuch Produkt- und Softwarewartung Produkt- und Softwarewartung Überprüfen der Druckkopfdüsen Sollten die Ausdrucke blasser werden oder Lücken im Druckbild aufweisen, können Sie die Ursache des Problems möglicherweise durch einen Düsentest feststellen. Die Druckkopfdüsen können Sie vom Computer aus mit dem Utility Nozzle Check (Düsentest) oder vom Drucker aus mit den Druckertasten überprüfen.
Benutzerhandbuch Produkt- und Softwarewartung Verwenden des Bedienfelds Führen Sie die nachstehenden Schritte aus, um die Druckkopfdüsen über die Tasten des Bedienfelds zu überprüfen. A Achten Sie darauf, dass keine Warnungen oder Fehler im Bedienfeld angezeigt werden. B Achten Sie darauf, dass sich Papier im Format A4 in der Papierkassette befindet. C Wechseln Sie über das Menü „Startseite“ in den Modus Setup. D Wählen Sie Wartung.
Benutzerhandbuch Produkt- und Softwarewartung Den Druckkopf können Sie vom Computer aus mit dem Utility Head Cleaning (Druckkopfreinigung) des Druckertreibers oder vom Drucker aus mit den Druckertasten reinigen. Wichtig: c Schalten Sie das Produkt während der Druckkopfreinigung nicht aus. Wird die Druckkopfreinigung nicht vollständig durchgeführt wird, können Sie möglicherweise nicht drucken. Hinweis: ❏ Öffnen Sie während der Druckkopfreinigung nicht die Scannereinheit.
Benutzerhandbuch Produkt- und Softwarewartung Verwenden des Utilitys Head Cleaning (Druckkopfreinigung) für Mac OS X Führen Sie die nachstehenden Schritte zur Reinigung des Druckkopfs mithilfe des Utilitys Head Cleaning (Druckkopfreinigung) aus. A Achten Sie darauf, dass keine Warnungen oder Fehler im Bedienfeld angezeigt werden. B Rufen Sie das Dialogfeld Epson Printer Utility 4 auf.
Benutzerhandbuch Produkt- und Softwarewartung Hinweis: Brechen Sie den Druckvorgang nicht ab, während ein Testmuster mit dem Utility Print Head Alignment (Druckkopf-Justage) gedruckt wird. Verwenden des Utilitys Print Head Alignment (Druckkopf-Justage) für Windows Führen Sie die nachstehenden Schritte aus, um den Druckkopf mit dem Utility Print Head Alignment (Druckkopf-Justage) auszurichten. A Achten Sie darauf, dass keine Warnungen oder Fehler im Bedienfeld angezeigt werden.
Benutzerhandbuch Produkt- und Softwarewartung A Achten Sie darauf, dass keine Warnungen oder Fehler im Bedienfeld angezeigt werden. B Achten Sie darauf, dass sich Papier im Format A4 in der Papierkassette 1 befindet. C Wechseln Sie über das Menü „Startseite“ in den Modus Setup. D Wählen Sie Wartung. E Wählen Sie Druckkopfausrichtung. F Wählen Sie Vertikale Ausrichtung oder Horizontale Ausrichtung und folgen Sie den Anweisungen am Bildschirm, um ein Ausrichtungsmuster zu drucken.
Benutzerhandbuch Produkt- und Softwarewartung Netzwerkdiensteinstellungen Sie können Netzwerkdiensteinstellungen (wie Epson ConnectAirPrint oder Google Cloud Print) über einen Webbrowser auf dem Computer, Smartphone, Tablet-PC oder Laptop vornehmen, der bzw. das sich im selben Netzwerk befindet wie das Produkt. Geben Sie die IP-Adresse des Produkts in der Adressleiste des Webbrowsers ein und suchen Sie das Produkt. [IPv4] http://192.168.11.
Benutzerhandbuch Produkt- und Softwarewartung Freigeben des Geräts für das Drucken Sie können den Drucker so einrichten, damit ihn andere Computer im Netzwerk ebenfalls verwenden können. Der Computer, der direkt mit dem Drucker verbunden ist, dient als Server. Andere Computer im Netzwerk können auf den Server zugreifen und den Drucker ebenfalls verwenden. Weitere Informationen erhalten Sie in der Hilfe zum Computer.
Benutzerhandbuch Produkt- und Softwarewartung ❏ Achten Sie darauf, dass die Glasfläche des Vorlagenglases nicht zerkratzt oder beschädigt wird. Verwenden Sie zur Reinigung keine harte oder scheuernde Bürste. Eine beschädigte Glasfläche kann die Scanqualität beeinträchtigen. ❏ Öffnen Sie die Abdeckung des ADF und reinigen Sie die Rolle und die Innenseite des ADF mit einem weichen, trockenen und sauberen Tuch.
Benutzerhandbuch Produkt- und Softwarewartung Ersetzen der Wartungsbox Überprüfen des Wartungsboxstatus Der Status der Wartungsbox wird im selben Bildschirm wie der Patronenstatus angezeigt. Sie können den Status über die Druckersoftware oder das Bedienfeld überprüfen. & „Prüfen des Status der Tintenpatronen“ auf Seite 130 Sicherheitsanweisungen für die Wartungsbox Lesen Sie vor dem Ersetzen der Wartungsbox alle Hinweise in diesem Abschnitt.
Benutzerhandbuch Produkt- und Softwarewartung B Nehmen Sie die Ersatzwartungsbox aus der Verpackung. Hinweis: Berühren Sie nicht den grünen Chip an der Seite der Box. Anderenfalls kann die normale Funktionsweise beeinträchtigt werden. C Für Serien WF-7610 und WF-7620: Öffnen Sie die hintere Abdeckung 1. Für Serien WF-3620 und WF-3640: Ziehen Sie die hintere Abdeckung heraus. D Halten Sie die Wartungsbox an ihrem Griff und ziehen Sie sie heraus.
Benutzerhandbuch Produkt- und Softwarewartung E Legen Sie die gebrauchte Wartungsbox in den mit der neuen Wartungsbox gelieferten Plastikbeutel und entsorgen Sie sie ordnungsgemäß. Hinweis: Kippen Sie die gebrauchte Wartungsbox nicht, bevor sie nicht in dem mitgelieferten Plastikbeutel versiegelt ist. F Fügen Sie die Wartungsbox soweit wie möglich in das Fach ein. G Für Serien WF-7610 und WF-7620: Schließen Sie die hintere Abdeckung 1.
Benutzerhandbuch Produkt- und Softwarewartung c ❏Wichtig: Beim Transportieren oder Lagern darf das Gerät nicht gekippt, vertikal aufgestellt oder auf den Kopf gestellt werden. Anderenfalls kann Tinte austreten. ❏ Lassen Sie die Tintenpatronen installiert. Durch das Entfernen der Tintenpatronen kann der Druckkopf austrocknen, sodass das Gerät möglicherweise nicht mehr einwandfrei drucken kann. A Achten Sie darauf, dass das Produkt ausgeschaltet ist. B Öffnen Sie die Scannereinheit.
Benutzerhandbuch Produkt- und Softwarewartung J Packen Sie das Gerät mit dem Originalmaterial wieder in den Lieferkarton ein. Hinweis: Halten Sie das Produkt während des Transports eben. Überprüfen und Installieren Ihrer Software Überprüfen der auf Ihrem Computer installierten Software Um die Funktionen zu nutzen, die in diesem Benutzerhandbuch beschrieben werden, müssen Sie die folgende Software installieren.
Benutzerhandbuch Produkt- und Softwarewartung B Doppelklicken Sie auf den Ordner Epson Software im Ordner Applications (Programme) und überprüfen Sie den Inhalt. Hinweis: ❏ Der Ordner Applications (Programme) enthält Software von Drittanbietern. ❏ Um zu prüfen, ob der Druckertreiber installiert ist, klicken Sie auf System Preferences (Systemeinstellungen) im Apple-Menü und anschließend auf Print & Scan (Drucken & Scannen) (für Mac OS X 10.8 oder 10.7) oder Print & Fax (Drucken & Faxen) (für Mac OS X 10.
Benutzerhandbuch Produkt- und Softwarewartung Windows XP und Server 2003: Klicken Sie auf Start (Startseite) und wählen Sie Control Panel (Systemsteuerung). D Fahren Sie folgendermaßen fort. Windows 8, Windows 7, Vista, Server 2012 und Server 2008: Wählen Sie Uninstall a program (Programm deinstallieren) aus der Kategorie Programs (Programme). Windows XP: Doppelklicken Sie auf das Symbol Add or Remove Programs (Software). Windows Server 2003: Klicken Sie auf das Symbol Add or Remove Programs (Software).
Benutzerhandbuch Produkt- und Softwarewartung Für Mac OS X Hinweis: ❏ Um die Druckersoftware deinstallieren zu können, laden Sie den Uninstaller herunter. Besuchen Sie die Website unter: http://www.epson.com Wählen Sie dann den Bereich „Support“ Ihrer regionalen Epson-Website aus. ❏ Zum Deinstallieren von Anwendungen müssen Sie sich bei einem Computer Administrator (Computeradministrator)-Konto anmelden.
Benutzerhandbuch Übertragen von Daten mithilfe eines externen Speichergeräts Übertragen von Daten mithilfe eines externen Speichergeräts Mithilfe der Speicherkartensteckplätze oder des externen USB-Anschlusses Ihres Produkts können Sie Dateien auf einen an das Produkt angeschlossenen Computer kopieren. Außerdem können Sie auf diese Weise Dateien vom Computer auf das Speichergerät kopieren.
Benutzerhandbuch Übertragen von Daten mithilfe eines externen Speichergeräts Mac OS X: Das Symbol für Wechseldatenträger ( C ) wird automatisch auf dem desktop (Schreibtisch) angezeigt. Doppelklicken Sie auf das Symbol für Wechseldatenträger und wählen Sie den Ordner, in dem die Dateien gespeichert sind. Hinweis: Wenn Sie eine Datenträgerbezeichnung festgelegt haben, wird diese als Laufwerksname angezeigt.
Benutzerhandbuch Übertragen von Daten mithilfe eines externen Speichergeräts C Doppelklicken Sie auf das Symbol für Wechseldatenträger und wählen Sie den Ordner, in dem Sie die Dateien speichern möchten. Hinweis: Wenn Sie eine Datenträgerbezeichnung festgelegt haben, wird diese als Laufwerksname angezeigt. Wenn Sie keine Datenträgerbezeichnung festgelegt haben, wird „Wechseldatenträger“ als Laufwerksname unter Windows XP und Server 2003 angezeigt.
Benutzerhandbuch Fehleranzeigen Fehleranzeigen Fehlermeldungen am Bedienfeld Dieser Abschnitt beschreibt die Bedeutung der Meldungen, die auf dem LCD-Bildschirm angezeigt werden. drücken. Außerdem können Sie Fehler im Statusmenü überprüfen, indem Sie auf & „Statusmenü“ auf Seite 25 Meldungen Lösungen Papierstau & „Papierstau“ auf Seite 171 Druckerfehler. Gerät aus- & wieder einschalten. Infos – siehe Dokumentation. Schalten Sie das Gerät aus und wieder ein.
Benutzerhandbuch Fehleranzeigen Meldungen Lösungen Recovery Mode Die Aktualisierung der Firmware ist fehlgeschlagen. Sie müssen die Aktualisierung der Firmware erneut ausführen. Halten Sie ein USB-Kabel bereit und rufen Sie Ihre regionale Epson-Website für weitere Hinweise auf. & „Wo Sie Hilfe bekommen“ auf Seite 217 * In einigen Druckzyklen kann sich eine geringfügige Menge an überschüssiger Tinte im Tintenkissen ansammeln.
Benutzerhandbuch Fehleranzeigen Code Fehler Lösung 206 Das Telefonkabel ist nicht ordnungsgemäß mit dem LINE- und EXT-Anschluss des Produkts verbunden. Schließen Sie das Produkt ordnungsgemäß an die Telefonleitung an. & „Anschluss an eine Telefonleitung“ auf Seite 83 207 Das Produkt ist nicht mit der Telefonleitung verbunden. 208 Das Fax konnte nicht an einige der angegebenen Empfänger gesendet werden.
Benutzerhandbuch Fehleranzeigen Code Fehler Lösung 314 Die Datengröße überschreitet die maximale Größe für Dateianhänge. Wenn Sie einen Scanvorgang durchführen, erhöhen Sie die Einstellung Max.Gr.Anhang oder ändern Sie die folgenden Einstellungen zum Verringern der Größe der gescannten Daten. - Wählen Sie eine geringere Auflösung. - Wählen Sie einen höheren Wert für Kompr.-Verh.. 306 Der Speicher ist voll. Warten Sie, bis laufende Aufträge beendet sind.
Benutzerhandbuch Fehleranzeigen Code Fehler Lösung 341 Ein Kommunikationsfehler ist aufgetreten. Stellen Sie sicher, dass das Produkt ordnungsgemäß mit dem Computer oder Netzwerk verbunden ist. Weitere Informationen finden Sie im Netzwerkhandbuch. Wenn Sie An Computer scannen verwenden, vergewissern Sie sich ,dass Epson Event Manager installiert ist.
Benutzerhandbuch Fehlerbehebung für das Drucken/Kopieren Fehlerbehebung für das Drucken/Kopieren Problemdiagnose Probleme mit dem Gerät versuchen Sie am besten in zwei Schritten zu beheben: Zuerst stellen Sie den Fehler fest, dann befolgen Sie die Lösungsvorschläge, bis der Fehler behoben ist. Die Informationen, die Sie zur Diagnose und Behebung der gängigsten Probleme benötigen, finden Sie in der Online-Problemlösung, am Bedienfeld des Druckers oder auf dem Statusmonitor.
Benutzerhandbuch Fehlerbehebung für das Drucken/Kopieren Produktstatus wird geprüft Wenn während des Druckens ein Problem auftritt, wird im Statusmonitorfenster eine Fehlermeldung angezeigt. Wenn Sie eine Tintenpatrone oder eine Wartungsbox austauschen müssen, klicken Sie in dem Fenster auf die Schaltfläche „How to (Wie Sie)“. Daraufhin gibt Ihnen der Statusmonitor Schritt-für-Schritt-Anweisungen zum Austauschen der Tintenpatrone oder der Wartungsbox.
Benutzerhandbuch Fehlerbehebung für das Drucken/Kopieren Der EPSON Status Monitor 3 zeigt folgende Informationen an: ❏ Aktueller Status: Bei niedrigem Tintenstand bzw. verbrauchter Patrone oder voller bzw. fast voller Wartungsbox wird die Schaltfläche How to (Wie Sie) im Fenster EPSON Status Monitor 3 angezeigt. Durch Klicken auf How to (Wie Sie) wird eine Anleitung zum Austauschen der Tintenpatrone oder der Wartungsbox angezeigt.
Benutzerhandbuch Fehlerbehebung für das Drucken/Kopieren B Klicken Sie auf das Symbol EPSON Status Monitor. Der EPSON Status Monitor wird angezeigt. Sie können dieses Utility auch verwenden, um den Tintenpatronenstatus vor dem Drucken zu überprüfen. EPSON Status Monitor zeigt den Tintenpatronenstatus zum Zeitpunkt des Öffnens an. Um den Status der Tintenpatronen zu aktualisieren, klicken Sie auf Update (Aktualisieren).
Benutzerhandbuch Fehlerbehebung für das Drucken/Kopieren Bei niedrigem Tintenstand bzw. verbrauchter Patrone oder voller bzw. fast voller Wartungsbox wird die Schaltfläche How to (Wie Sie) angezeigt. Klicken Sie auf How to (Wie Sie). Daraufhin gibt Ihnen EPSON Status Monitor Schritt-für-Schritt-Anweisungen zum Austauschen der Tintenpatrone oder der Wartungsbox. Papierstau !Vorsicht: Die Tasten im Bedienfeld niemals berühren, wenn Ihre Hand im Gerät ist.
Benutzerhandbuch Fehlerbehebung für das Drucken/Kopieren Entfernen von gestautem Papier aus der hinteren Abdeckung Serien WF-7610 und WF-7620 A Drehen Sie das Produkt um. Hinweis: Um den Standort des Produkts zu wechseln und das Gerät anzuheben, benötigen Sie zwei Personen. B Öffnen Sie die hintere Abdeckung 1.
Benutzerhandbuch Fehlerbehebung für das Drucken/Kopieren C Entfernen Sie das gestaute Papier. D Ziehen Sie die hintere Abdeckung 2 heraus. E Entfernen Sie vorsichtig das gestaute Papier.
Benutzerhandbuch Fehlerbehebung für das Drucken/Kopieren F Entfernen Sie vorsichtig das gestaute Papier. G Öffnen Sie die hintere Abdeckung 2.
Benutzerhandbuch Fehlerbehebung für das Drucken/Kopieren H Entfernen Sie vorsichtig das gestaute Papier. I Bringen Sie die hintere Abdeckung 2 wieder an. J Schließen Sie die hintere Abdeckung 1. Serien WF-3620 und WF-3640 A Ziehen Sie die hintere Abdeckung heraus.
Benutzerhandbuch Fehlerbehebung für das Drucken/Kopieren B Entfernen Sie vorsichtig das gestaute Papier. C Entfernen Sie vorsichtig das gestaute Papier. D Öffnen Sie die hintere Abdeckung.
Benutzerhandbuch Fehlerbehebung für das Drucken/Kopieren E Entfernen Sie vorsichtig das gestaute Papier. F Bringen Sie die hintere Abdeckung wieder an. Entfernen von gestautem Papier aus dem Inneren des Geräts A Entfernen Sie das gestaute Papier vorsichtig. B Öffnen Sie die Scannereinheit.
Benutzerhandbuch Fehlerbehebung für das Drucken/Kopieren Wichtig: c Heben Sie die Scannereinheit nicht an, wenn die Vorlagenabdeckung geöffnet ist. C Entfernen Sie sämtliches Papier im Innern, einschließlich zerrissener Stücke. Wichtig: c Berühren Sie nicht das flache, weiße Kabel, das an die Patronenhalterung angeschlossen ist. D Schließen Sie langsam die Scannereinheit.
Benutzerhandbuch Fehlerbehebung für das Drucken/Kopieren Entfernen von gestautem Papier aus der Papierkassette A Ziehen Sie die Papierkassette ganz heraus. B Für Serien WF-7610 und WF-7620: Entfernen Sie die Abdeckung. C Entfernen Sie das gestaute Papier aus der Kassette. D Entfernen Sie vorsichtig sämtliches im Produkt gestautes Papier.
Benutzerhandbuch Fehlerbehebung für das Drucken/Kopieren E Richten Sie die Papierränder aus. F Für Serien WF-7610 und WF-7620: Bringen Sie die Papierkassettenabdeckung wieder an. G Halten Sie die Papierkassette waagerecht und setzen Sie sie langsam und vorsichtig wieder in das Produkt ein.
Benutzerhandbuch Fehlerbehebung für das Drucken/Kopieren Entfernen von gestautem Papier aus dem automatischen Vorlageneinzug (ADF) A Entnehmen Sie den Papierstapel aus dem Zufuhrfach des automatischen Vorlageneinzugs. B Für Serien WF-7610 und WF-7620: Heben Sie den ADF-Hebel an und öffnen Sie die ADF-Abdeckung. Für Serien WF-3620 und WF-3640: Öffnen Sie die ADF-Abdeckung. Wichtig: c Öffnen Sie die Abdeckung des ADF, bevor Sie das gestaute Papier entfernen.
Benutzerhandbuch Fehlerbehebung für das Drucken/Kopieren D Öffnen Sie die Dokumentenabdeckung. E Entfernen Sie vorsichtig das gestaute Papier. F Schließen Sie die Vorlagenabdeckung und ADF-Abdeckung. G Heben Sie das Zufuhrfach des automatischen Vorlageneinzugs an.
Benutzerhandbuch Fehlerbehebung für das Drucken/Kopieren H Entfernen Sie vorsichtig das gestaute Papier. I Bringen Sie das Zufuhrfach des automatischen Vorlageneinzugs wieder in die ursprüngliche Position. Vermeiden von Papierstau Wenn häufiger Papierstaus auftreten, prüfen Sie Folgendes: ❏ Das Papier ist glatt, nicht gewellt oder zerknittert. ❏ Sie verwenden ein hochwertiges Papier. ❏ Das Papier ist mit der bedruckbaren Seite nach unten in die Papierkassette eingelegt.
Benutzerhandbuch Fehlerbehebung für das Drucken/Kopieren C Aktivieren Sie das Kontrollkästchen Print Preview (Druckvorschau) im Fenster Main (Haupteinstellungen) des Druckertreibers. D Nehmen sie die für den Druckvorgang gewünschten Einstellungen vor. E Klicken Sie auf OK, um das Druckereinstellungsfenster zu schließen, und drucken Sie dann die Datei. Das Fenster Print Preview (Druckvorschau) wird geöffnet.
Benutzerhandbuch Fehlerbehebung für das Drucken/Kopieren & „Falsche oder fehlende Farben“ auf Seite 186 & „Undeutlicher oder verschmierter Ausdruck“ auf Seite 186 Horizontale Streifen ❏ Achten Sie darauf, dass die bedruckbare Seite des Papiers (heller oder glänzender) im hinteren Papiereinzug nach oben zeigt. ❏ Achten Sie darauf, dass die bedruckbare Seite des Papiers (heller oder glänzender) in der Papierkassette nach unten zeigt.
Benutzerhandbuch Fehlerbehebung für das Drucken/Kopieren ❏ Starten Sie das Utility zur Print Head Alignment (Druckkopf-Justage). & „Ausrichten des Druckkopfs“ auf Seite 145 ❏ Deaktivieren Sie unter Windows das Kontrollkästchen High Speed (Schnell) im Fenster More Options (Weitere Optionen) des Druckertreibers. Weitere Informationen dazu finden Sie in der Online-Hilfe. Wählen Sie unter Mac OS X unter High Speed Printing (Druck mit hoher Geschwindigkeit) die Option Off (Aus).
Benutzerhandbuch Fehlerbehebung für das Drucken/Kopieren ❏ Stellen Sie sicher, dass das Papier nicht beschädigt, schmutzig oder zu alt ist. ❏ Achten Sie darauf, dass das Papier trocken ist und die bedruckbare Seite (heller oder glänzender) im hinteren Papiereinzug nach oben zeigt. ❏ Achten Sie darauf, dass das Papier trocken ist und die bedruckbare Seite (heller oder glänzender) in der Papierkassette nach unten zeigt.
Benutzerhandbuch Fehlerbehebung für das Drucken/Kopieren ❏ Wenn das Papier nach dem Drucken mit Tinte verschmiert ist, reinigen Sie das Innere des Geräts. & „Innere Reinigung des Geräts“ auf Seite 150 ❏ Reinigen Sie bei Problemen mit der Kopierqualität die Glasfläche des Vorlagenglases. & „Äußere Reinigung des Gehäuses“ auf Seite 149 Verschiedene Druckausgabeprobleme Falsche oder unvollständige Zeichen ❏ Löschen Sie etwaige angehaltene Druckaufträge.
Benutzerhandbuch Fehlerbehebung für das Drucken/Kopieren ❏ Deinstallieren Sie den Druckertreiber und installieren Sie ihn dann erneut. & „Deinstallieren Ihrer Software“ auf Seite 156 Etwas schiefer Ausdruck ❏ Achten Sie darauf, dass das Papier im hinteren Papiereinzug oder in der Papierkassette korrekt eingelegt wurde.
Benutzerhandbuch Fehlerbehebung für das Drucken/Kopieren ❏ Prüfen Sie unter Windows die Einstellung Skip Blank Page (Leers. Übersp.) durch Klicken auf die Schaltfläche Extended Settings (Erweiterte Einstellungen) im Fenster Maintenance (Utility) des Druckertreibers. Wählen Sie unter Mac OS X unter Skip Blank Page (Leers. Übersp.) die Option On (Ein). Um Skip Blank Page (Leers. Übersp.
Benutzerhandbuch Fehlerbehebung für das Drucken/Kopieren Wenn Sie alle zuvor erwähnten Methoden versucht haben und das Problem weiterhin besteht, erhalten Sie nachstehend weitere Informationen. Das Papier wird nicht ordnungsgemäß eingezogen Das Papier wird nicht eingezogen Nehmen Sie den Papierstapel heraus und stellen Sie Folgendes sicher: ❏ Sie haben die Papierkassette vollständig in das Produkt eingesetzt. ❏ Das Papier ist nicht gewellt oder zerknittert. ❏ Das Papier ist nicht zu alt.
Benutzerhandbuch Fehlerbehebung für das Drucken/Kopieren Papier ist falsch eingelegt Wenn das Papier zu weit in das Gerät geschoben wurde, kann es nicht einwandfrei eingezogen werden. Schalten Sie das Gerät aus und nehmen Sie das Papier vorsichtig heraus. Schalten Sie das Gerät dann wieder ein und legen Sie das Papier wieder richtig ein.
Benutzerhandbuch Fehlerbehebung für das Drucken/Kopieren ❏ Windows-Anwender können angehaltene Druckaufträge im Windows Spooler (Windows-Spooler) löschen. & „Abbrechen eines Druckauftrags“ auf Seite 57 ❏ Deinstallieren Sie den Druckertreiber und installieren Sie ihn dann erneut. & „Deinstallieren Ihrer Software“ auf Seite 156 Nach dem Auswechseln der Patrone wird ein Tintenfehler angezeigt A Öffnen Sie die Scannereinheit.
Benutzerhandbuch Fehlerbehebung für das Drucken/Kopieren C Öffnen Sie die Patronenabdeckung. Entfernen Sie die Tintenpatrone, setzen Sie sie wieder ein und fahren Sie mit der Installation der Tintenpatrone fort. D Schließen Sie die Patronenabdeckung fest. E Schließen Sie langsam die Scannereinheit. Sonstige Probleme Leises Ausdrucken von Normalpapier Wenn Normalpapier als Druckmedium im Druckertreiber ausgewählt ist, wählen Sie Quiet Mode (Ruhemodus) für einen leiseren Betrieb.
Benutzerhandbuch Fehlerbehebung für das Drucken/Kopieren Die Speicherkarte wird nicht erkannt Je nach Einstellungen für Speichergeräteschnitt. wird die Speicherkarte möglicherweise nicht erkannt. Wählen Sie das nachstehend gezeigte Menü aus. Setup > Systemadministration > Speichergeräteschnitt. > Sp.
Benutzerhandbuch Fehlerbehebung für das Scannen Fehlerbehebung für das Scannen Durch Mitteilungen auf dem LCD-Bildschirm oder der Statusanzeige angezeigte Probleme ❏ Achten Sie darauf, dass das Produkt ordnungsgemäß an den Computer angeschlossen ist. ❏ Schalten Sie das Produkt aus und wieder ein. Falls das Problem dann noch nicht gelöst ist, kann dies darauf hinweisen, dass eine Funktionsstörung des Produkts vorliegt oder dass die Lichtquelle im Scanner ersetzt werden muss.
Benutzerhandbuch Fehlerbehebung für das Scannen ❏ Falls Sie auf die Schaltfläche Keep Blocking (Weiterhin blocken) im Fenster Windows Security Alert (Windows-Sicherheitshinweis) während oder nach der Installation der Epson Software geklickt haben, entsperren Sie Epson Event Manager. & „Entsperren des Epson Event Manager“ auf Seite 197 Entsperren des Epson Event Manager A Klicken Sie auf Start (Startseite) oder auf die Start-Schaltfläche und zeigen Sie dann auf die Control Panel (Systemsteuerung).
Benutzerhandbuch Fehlerbehebung für das Scannen Benutzung des Automatischen Vorlageneinzugs (Automatic Document Feeder/ADF) ❏ Falls die Vorlagenabdeckung oder die ADF-Abdeckung offen ist, schließen Sie diese und versuchen Sie, erneut zu scannen. ❏ Vergewissern Sie sich, dass alle Kabel ordnungsgemäß an das Produkt und die Stromversorgung angeschlossen sind.
Benutzerhandbuch Fehlerbehebung für das Scannen ❏ Wenn Quiet Mode (Ruhemodus) ausgewählt ist, kann der Scanvorgang länger dauern. Wählen Sie Quiet Mode (Ruhemodus) aus der Pulldown-Liste auf dem Einstellungsbildschirm Configuration (Konfiguration) von Epson Scan. Probleme mit gescannten Bildern Scanqualität ist unbefriedigend Die Scanqualität kann verbessert werden, indem Sie die gegenwärtigen Einstellungen ändern oder das gescannte Bild anpassen.
Benutzerhandbuch Fehlerbehebung für das Scannen Im gescannten Bild erscheinen wellige Muster Wellen- oder Schraffurmuster (als Moiré bekannt) können im gescannten Bild eines gedruckten Dokuments auftreten. ❏ Wenn Sie das Vorlagenglas verwenden, verschieben Sie das Originaldokument. ❏ Wählen Sie Descreening (Entrasterung) als Bildqualitätseinstellung. ❏ Ändern Sie die Einstellung Resolution (Auflösung).
Benutzerhandbuch Fehlerbehebung für das Scannen Mehrere Dokumente werden als eine einzige Datei gescannt Legen Sie die Vorlagen mindestens 20 mm voneinander entfernt auf das Vorlagenglas. Scannen des gewünschten Bereichs ist unmöglich ❏ In Abhängigkeit von den Dokumenten können Sie eventuell nicht den Bereich scannen, den Sie wollen. Verwenden Sie die normale Vorschau oder erstellen Sie Laufrahmen um den gewünschten Scanbereich.
Benutzerhandbuch Fehlerbehebung für das Scannen Probleme bleiben nach Ausprobieren aller Lösungsvorschläge bestehen Wenn Sie alle Lösungsvorschläge ausprobiert haben und das Problem nicht lösen konnten, initialisieren Sie die Epson Scan-Einstellungen. Klicken Sie auf Configuration (Konfiguration), wählen Sie die Registerkarte Other (Sonstiges) und klicken Sie anschließend auf Reset All (Alle zurücksetzen).
Benutzerhandbuch Fehlerbehebung beim Faxen Fehlerbehebung beim Faxen Fax-Sendungen können nicht gesendet und empfangen werden ❏ Stellen Sie sicher, dass das Telefonkabel ordnungsgemäß angeschlossen ist. & „Anschluss an eine Telefonleitung“ auf Seite 83 ❏ Führen Sie den Fax-Verbindungstest aus, um die Ursache des Problems festzustellen. & Setup > Systemadministration > Fax-Einstellungen > Fax-Verbindungstest ❏ Überprüfen Sie den Fehlercode für den fehlgeschlagenen Faxauftrag.
Benutzerhandbuch Fehlerbehebung beim Faxen Fehler „Kein Wählton erkannt.“ tritt auf Wenn Ihr Gerät an eine Nebenstellenanlage oder einen Terminaladapter (TA) angeschlossen ist, ändern Sie die Einstellung Leitungstyp auf PBX. & „Festlegen des Leitungstyps“ auf Seite 88 Wenn Sie weiterhin kein Fax senden können, ändern Sie die Einstellung Wähltonerkennung auf Aus. Dadurch kann jedoch möglicherweise die erste Ziffer der Faxnummer verloren gehen und das Fax an eine falsche Nummer gesendet werden.
Benutzerhandbuch Fehlerbehebung beim Faxen ❏ Sie können das Fax über das Statusmenü erneut drucken.
Benutzerhandbuch Produktinformationen Produktinformationen Systemvoraussetzungen Für Windows System PC-Schnittstelle Windows 8 (32-Bit, 64-Bit), Windows 7 (32-Bit, 64-Bit), Vista (32-Bit, 64-Bit), XP SP1 oder höher (32-Bit) oder XP Professional x64 Edition, Server 2012, Server 2008 R2, Server 2008 und Server 2003 Hi-Speed-USB Für Mac OS X System PC-Schnittstelle Mac OS X 10.5.8, 10.6.x, 10.7.x, 10.8.x Hi-Speed-USB Hinweis: Das UNIX-Dateisystem (UFS) für Mac OS X wird nicht unterstützt.
Benutzerhandbuch Produktinformationen Papier Hinweis: ❏ Epson kann keine Empfehlungen im Hinblick auf einen bestimmten Hersteller oder eine bestimmte Papiersorte geben, da sich die Qualität einer Marke oder Sorte ändern kann. Machen Sie daher immer zuerst ein paar Probedrucke, bevor Sie ein Druckmedium in größeren Mengen anschaffen oder große Druckaufträge starten. ❏ Eine schlechte Papierqualität beeinträchtigt die Druckqualität und kann Papierstaus oder andere Probleme verursachen.
Benutzerhandbuch Produktinformationen Druckbereich Markierte Bereiche kennzeichnen den Druckbereich. Einzelblatt: Normal Randlos Briefumschläge: Minimaler Rand Medientyp Einzelblattpapier Umschläge (#10/DL/C6) Umschlag (C4) A 3,0 mm (0,12 Zoll) 3,0 mm (0,12 Zoll)*1 3,0 mm (0,12 Zoll)*1 B 3,0 mm (0,12 Zoll) 5,0 mm (0,20 Zoll) 5,0 mm (0,20 Zoll)*3 10,0 mm (0,40 Zoll)*4 C 3,0 mm (0,12 Zoll) 3,0 mm (0,12 Zoll)*2 *1Der empfohlene Rand beträgt 21mm. *2Der empfohlene Rand beträgt 50mm.
Benutzerhandbuch Produktinformationen Hinweis: Je nach Art des Papiers kann die Druckqualität zum oberen und unteren Seitenrand des Ausdrucks hin schlechter ausfallen oder diese Bereiche können verschmiert sein. Technische Daten des Scanners Scannertyp Flachbett, Farbe Fotoelektrisches Gerät CIS Effektive Pixel 10200 × 14040 Pixel bei 1200 dpi Der Scanbereich kann bei hoher Auflösungseinstellung eingeschränkt sein.
Benutzerhandbuch Produktinformationen Technische Daten des Faxgeräts Faxtyp Walk-up Schwarzweiß- und Farbfaxgerät (ITU-T Super Group 3) Unterstützte Leitungen Standardmäßige analoge Telefonleitungen, Nebenstellenanlagen Geschwindigkeit Bis zu 33,6 kbps Auflösung Monochrom Standard: 203 × 98 dpi Fein: 203 × 196 dpi Foto: 203 × 196 dpi Superfein: 203 × 392 dpi Ultrafein: 406 × 392 dpi Farbe Fein: 200 × 200 dpi Foto: 200 × 200 dpi Kurzwahlnummern Serien WF-7610 und WF-7620: 200 Serien WF-3620 und WF-
Benutzerhandbuch Produktinformationen Sicherheitsprotokoll SSL/TLS HTTPS-Server/-Client IPPS *1Kompatibel mit IEEE 802.11b/g/n oder IEEE 802.11b/g, je nachdem, wo das Gerät gekauft worden ist. *2Kompatibel mit WPA2 mit Unterstützung von WPA/WPA2 Personal. *3Sie können das Produkt in einem Wi-Fi Direct- und Simple AP-Modus verwenden, auch wenn Sie es mit einem Ethernet-Netzwerk verbinden. *4Angeschlossene Geräte sollten IEEE802.3az erfüllen.
Benutzerhandbuch Produktinformationen Mechanik Serie WF-7610 Abmessungen Lagerung Breite: 567 mm (22,3 Zoll) Tiefe: 486 mm (19,1 Zoll) Höhe: 340 mm (13,4 Zoll) Drucken* Breite: 567 mm (22,3 Zoll) Tiefe: 817 mm (32,2 Zoll) Höhe: 340 mm (13,4 Zoll) Gewicht Ca. 18,5 kg (40;8 lb) ohne Tintenpatronen und Netzkabel. * Mit ausgezogener Erweiterung des Ausgabefachs.
Benutzerhandbuch Produktinformationen Abmessungen Lagerung Breite: 449 mm (17,7 Zoll) Tiefe: 427 mm (16,8 Zoll) Höhe: 308 mm (12,1 Zoll) Drucken* Breite: 449 mm (17,7 Zoll) Tiefe: 563 mm (22,2 Zoll) Höhe: 308 mm (12,1 Zoll) Gewicht Ca. 11,5 kg (25,4 lb) ohne Tintenpatronen und Netzkabel. * Mit ausgezogener Erweiterung des Ausgabefachs.
Benutzerhandbuch Produktinformationen Hinweis: Überprüfen Sie die Spannungsdaten auf dem Typenschild an der Geräterückseite. Serie WF-3620 Modell 100-240 V Eingangsspannung 90 bis 264 V Frequenzbereich 50 bis 60 Hz Eingangsfrequenz 49,5 bis 60,5 Hz Nennstrom 0,8 bis 0,4 A Leistungsaufnahme (mit USB-Anschluss) Unabhängiges Kopieren Ca. 17 W (ISO/IEC24712) Bereitschaftsmodus Ca. 7,3 W Ruhemodus Ca. 1,6 W Netz aus Ca.
Benutzerhandbuch Produktinformationen Luftfeuchtigkeit Betrieb:* 20 bis 80 % Lagerung:* 5 bis 85 % * Ohne Kondensierung Normen und Zertifizierungen US-Modell: Sicherheit UL60950-1 CAN/CSA-C22.2 No.60950-1 EMV FCC Part 15 Subpart B Class B CAN/CSA-CEI/IEC CISPR 22 Class B Dieses Gerät enthält das folgende Wireless-Modul. Hersteller: Askey Computer Corporation Typ: WLU6117-D69 (RoHS) Dieses Produkt entspricht Teil 15 der FCC-Regeln und RSS-210 der IC-Regeln.
Benutzerhandbuch Produktinformationen Epson übernimmt keine Verantwortung für die Nichtbeachtung der Schutzvorschriften, die durch eine nicht empfohlene Änderung des Produkts herrühren. Australisches Modell: EMV AS/NZS CISPR22 Class B Epson erklärt hiermit, dass die Gerätemodelle C441C, C481D und C481E den wichtigsten Anforderungen und anderen relevanten Bestimmungen der Richtlinie AS/NZS4268 entsprechen.
Benutzerhandbuch Wo Sie Hilfe bekommen Wo Sie Hilfe bekommen Website für technischen Support Wenn Sie weitere Hilfe benötigen, rufen Sie die im Folgenden gezeigte Epson-Support-Website auf. Wählen Sie Ihr Land bzw. Ihre Region und rufen Sie den Bereich „Support“ Ihrer regionalen Epson-Website auf. Außerdem finden Sie auf dieser Website die neuesten Treiber, FAQs, Handbücher oder andere herunterladbare Elemente. http://support.epson.net/ http://www.epson.
Benutzerhandbuch Wo Sie Hilfe bekommen Hilfe für Benutzer in Europa Im Gesamteuropäischen Garantieschein finden Sie Informationen, wie Sie sich an den Epson-Kundendienst wenden können. Hilfe für Benutzer in Australien Epson Australia ist bestrebt, Ihnen einen hohen Kundendienststandard zu bieten. Zusätzlich zu der Produktdokumentation bieten wir folgende Informationsquellen: Internet-URL http://www.epson.com.au Besuchen Sie die Websites von Epson Australia.
Benutzerhandbuch Wo Sie Hilfe bekommen http://www.epson.com.
Benutzerhandbuch Index Index 2 hoch.............................................................................................109 2 hoch kopieren...............................................................................44 2-seitig....................................................................................109, 114 2-seitig (K.)....................................................................................124 2-seitiger Druck...............................................................
Benutzerhandbuch Index Mac OS X...................................................................................145 Windows....................................................................................144 Druckoption Seiten pro Blatt........................................................64 Druckqualität Verbessern.................................................................................184 Druckreihenfolge..........................................................................
Benutzerhandbuch Index Laufrahmen...............................................................................79, 80 Layout....................................................................................109, 110 LCD-Helligkeit.....................................................................118, 124 Leere Seiten....................................................................................189 Leerseite überspringen.................................................................
Benutzerhandbuch Index Schlaf-Timer..........................................................................118, 124 Schnittstellenkabel........................................................................216 Sendeeinstellungen.......................................................................120 Service.............................................................................................217 Sicherheitseinst.............................................................................