
Printer User Manual
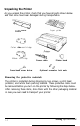
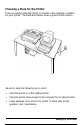
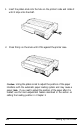
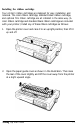
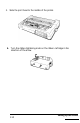
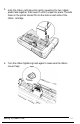
Table Of Contents
- FRONT MATTER
- TABLE OF CONTENTS
- INTRODUCTION
- CHAP 1-SETTING UP THE PRINTER
- CHAP 2-PAPER HANDLING
- CHAP 3-USING THE PRINTER
- CHAP 4-USING SOFTWARE AND GRAPHICS
- Using the LQ-2550 With Application Programs
- Computer-Printer Communication
- Enhancing Your Printing
- Graphics
- User-Defined Characters
- Designing Your Characters
- Design Grids
- Data Numbers
- Sending Information to Your Printer
- Printing User-Defined Characters
- Copying ROM Characters to RAM
- Letter Quality Characters
- Proportional Mode Characters
- Superscripts and Subscripts
- The Graphics Command
- Column Reservation Numbers
- A simple Graphics Program
- Using Hand-Calculated Data to Print Graphics
- Using Software and Graphics
- Mixing Print Styles
- CHAP 5-MAINTENANCE AND TRANSPORTATION
- CHAP 6-TROUBLESHOOTING
- Troubleshooting
- Problems and Solutions
- The Printer Does Not Print
- The Printer Stops Printing
- The Printout is Spaced Incorrectly
- The Printout is Faint or Uneven
- The Printout is Not what You Expect
- Single Sheets Do Not Feed Properly
- Continuous Paper Does Not Feed Properly
- Cut Sheet Feeder Does Not Load Paper Correctly
- The Short Tear-Off Feature Does Not Work Properly
- Color Printing Is Not What You Expect
- Data Dump Mode
- CHAP 7-USING PRINTER OPTIONS
- CHAP 8-COMMAND SUMMARY
- APPENDIX A-TECHNICAL SPECIFICATIONS
- GLOSSARY
- INDEX

Use a grounded outlet - one that has three holes to match the
power plug on the printer. Don’t use an adapter plug.
Avoid locations that are subject to direct sunlight, excessive heat,
moisture, or dust.
Avoid using electrical outlets that are controlled by wall switches or
automatic timers. Accidental disruption of power can wipe out
information in your computer’s and printer’s memory.
Avoid using outlets on the same circuit with large motors or other
appliances that might disturb the power supply.
Keep the entire computer system away from potential sources of
interference, such as loudspeakers or the base units of cordless
telephones.
Assembling the Printer
After you have decided on a location for your printer, it is necessary to
install the platen knob, the ribbon cartridge, and the paper guide.
Installation instructions for these three components are given below.
Installing the platen knob
After you have decided on a location for your printer, the first step in
setting it up is to install the platen knob.
You will find the platen knob packed in an indentation in the white foam
packing material.
Setting Up the
Printer
1-7