
Printer User Manual
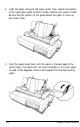
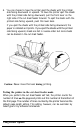

Table Of Contents
- FRONT MATTER
- TABLE OF CONTENTS
- INTRODUCTION
- CHAP 1-SETTING UP THE PRINTER
- CHAP 2-PAPER HANDLING
- CHAP 3-USING THE PRINTER
- CHAP 4-USING SOFTWARE AND GRAPHICS
- Using the LQ-2550 With Application Programs
- Computer-Printer Communication
- Enhancing Your Printing
- Graphics
- User-Defined Characters
- Designing Your Characters
- Design Grids
- Data Numbers
- Sending Information to Your Printer
- Printing User-Defined Characters
- Copying ROM Characters to RAM
- Letter Quality Characters
- Proportional Mode Characters
- Superscripts and Subscripts
- The Graphics Command
- Column Reservation Numbers
- A simple Graphics Program
- Using Hand-Calculated Data to Print Graphics
- Using Software and Graphics
- Mixing Print Styles
- CHAP 5-MAINTENANCE AND TRANSPORTATION
- CHAP 6-TROUBLESHOOTING
- Troubleshooting
- Problems and Solutions
- The Printer Does Not Print
- The Printer Stops Printing
- The Printout is Spaced Incorrectly
- The Printout is Faint or Uneven
- The Printout is Not what You Expect
- Single Sheets Do Not Feed Properly
- Continuous Paper Does Not Feed Properly
- Cut Sheet Feeder Does Not Load Paper Correctly
- The Short Tear-Off Feature Does Not Work Properly
- Color Printing Is Not What You Expect
- Data Dump Mode
- CHAP 7-USING PRINTER OPTIONS
- CHAP 8-COMMAND SUMMARY
- APPENDIX A-TECHNICAL SPECIFICATIONS
- GLOSSARY
- INDEX

Setting up your software
When you switch to cut sheet feeder fed paper from another paper feed
system, you usually need to change the settings of your software
program. Because of the physical requirements of feeding a single sheet
of paper, sheet feeders always create an unprintable top and bottom
margin on each sheet. To work properly, your software program needs to
know how many printable lines are available on the page.
Paper comes in many different sizes, and it is sometimes difficult to know
exactly how many printable lines per page you have. When you run the self
test for the cut sheet feeder, the LQ-2550 automatically counts and prints
out the number of lines that are available on any size of paper. This is the
number of lines you should use as the page length in your software setup.
See the section on testing the printer in this chapter for details.
In addition to the number of printable lines, which your software may refer
to as page length or form length, you may need to set the top margin, the
bottom margin, and the actual number of lines to be printed on the page.
The cut sheet feeder for the LQ-2550 normally creates a two-line unprintable
top margin. Therefore, if you want a total top margin of six lines (one
inch), you should set the top margin in your software to four lines. The
LQ-2550 sheet feeder usually creates an unprintable bottom margin of about
three lines, so to create a total bottom margin of six lines (one inch), you
should set the bottom margin in your software to three lines. With a total
page length of 61 printable lines, for example, the number of printed lines
per page would be 54 (9 inches).
Some software designed only for printing on continuous forms will not
use the Form Feed or ESC EM commands recommended for proper sheet
feeder operation. This type of software may not have a sheet feeder
setup mode or allow for margin settings, and it may only use Line Feeds
to advance to the next form. Your sheet feeder can still work with most
of these applications without any problems. Simply insert the paper you
will be using into the sheet feeder, use the self test to print out the
number of printable lines, then use that number of lines as the page
length setting in your software. If you change paper sizes, repeat this
process. Your sheet feeder will work as if it were feeding a continuous
form. If your software does not allow you to set the page length, consult
your software manufacturer.
Using Printer Options
7-15