
Printer User Manual
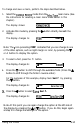
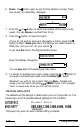
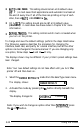
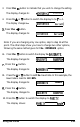
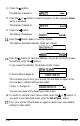
Table Of Contents
- FRONT MATTER
- TABLE OF CONTENTS
- INTRODUCTION
- CHAP 1-SETTING UP THE PRINTER
- CHAP 2-PAPER HANDLING
- CHAP 3-USING THE PRINTER
- CHAP 4-USING SOFTWARE AND GRAPHICS
- Using the LQ-2550 With Application Programs
- Computer-Printer Communication
- Enhancing Your Printing
- Graphics
- User-Defined Characters
- Designing Your Characters
- Design Grids
- Data Numbers
- Sending Information to Your Printer
- Printing User-Defined Characters
- Copying ROM Characters to RAM
- Letter Quality Characters
- Proportional Mode Characters
- Superscripts and Subscripts
- The Graphics Command
- Column Reservation Numbers
- A simple Graphics Program
- Using Hand-Calculated Data to Print Graphics
- Using Software and Graphics
- Mixing Print Styles
- CHAP 5-MAINTENANCE AND TRANSPORTATION
- CHAP 6-TROUBLESHOOTING
- Troubleshooting
- Problems and Solutions
- The Printer Does Not Print
- The Printer Stops Printing
- The Printout is Spaced Incorrectly
- The Printout is Faint or Uneven
- The Printout is Not what You Expect
- Single Sheets Do Not Feed Properly
- Continuous Paper Does Not Feed Properly
- Cut Sheet Feeder Does Not Load Paper Correctly
- The Short Tear-Off Feature Does Not Work Properly
- Color Printing Is Not What You Expect
- Data Dump Mode
- CHAP 7-USING PRINTER OPTIONS
- CHAP 8-COMMAND SUMMARY
- APPENDIX A-TECHNICAL SPECIFICATIONS
- GLOSSARY
- INDEX

f3UTO
LINE FEED:
This setting should remain at its default value
(0
f f
) in most cases. Most applications send automatic line feeds at
the end of every line. If all of the lines are printing on top of each
other, then set
FIIJTO
LINE
FEED to
On.
DC 1
/DC3:
This setting should also be left at its default value
(Disable)
in most cases. See these codes in Chapter 8 for more
information.
DEFWJLT
MfKRO:
This setting controls which macro is loaded when
you turn on the printer.
To change and save the default settings, perform the steps listed below.
The following example describes the procedure for changing the
interface, baud rate, and parity for a serial interface, but all the other
options can be changed in the same manner. If you are changing only
one option, follow steps 1
-
4 and 13
-
17 only.
The displays shown may be different if your printer’s preset settings have
been changed.
Note: Your new default settings do not take effect until you turn
the
printer off and then back on.
1.
Select the
CHfINGE
DEFfWLTS
mode from the SelecType main menu.
The display shows:
SCHfiNGEDEFAULTS
b
2.
Activate this mode by pressing the
b
button directly beneath the
display.
The display changes to:
SINTERFCICE
Parallel b
Note: If you wish to change an option other than
INTERFfKE,
press
the
A
or V button.
3-20
Using the Printer