
User Guide

Installation Methods
118
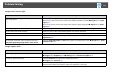
Installation Methods
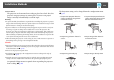
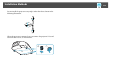
The projector can be mounted on a ceiling or placed on a desk. Also, this
projector can project images to various places because it can project
images vertically or horizontally at each 90° angle.
Warning:
• A special method of installation is required when installing the projector to project
images downward (ceiling mount) or upward. If it is not installed correctly, it could
fall and turnover causing an accident and injury.
• If you use adhesives on the Ceiling mount fixing points to prevent the screws from
loosening, or if you use things such as lubricants or oils on the projector, the
projector case may crack causing it to fall from its ceiling mount. This could cause
serious injury to anyone under the ceiling mount and could damage the projector.
When installing or adjusting the Ceiling mount, do not use adhesives to prevent the
screws from loosening and do not use oils or lubricants.
• When mounting the projector on the ceiling, be sure to take measures to prevent it
from falling such as passing a wire through the handles.
Caution:
• Do not install the projector in any positions other than those shown in the following
illustrations, and do not install the projector at any angles other than those shown
in the illustration on s p.119.
• Do not use the projector upside down.
• Set the Direction properly in the configuration menu according to the angle of
installation. s p.73
• Using the projector at an improper angle or with the wrong configuration menu
settings can cause malfunctions and shorten the operating life of optical parts.
An optional Ceiling mount is required when suspending the projector
from a ceiling. s p.129
The Projection setting can be changed from the configuration menu.
s p.73
• Suspend the projector from the
ceiling and project images from
in front of a screen.
• Suspend the projector from the
ceiling and project images from
behind a translucent screen.
• Project images from in front of a
screen.
• Project images from behind a
translucent screen.
• Project images directly up • Project images directly down