
User Manual


10
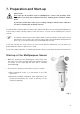
Proceed as follows for mounting:
1. Own individual installation mast
•
Screw out the two small screws at the bottom
of the multipurpose sensor a little bit.
• Insert the supplied mounting rod of 25cm from
into the multipurpose sensor the bottom in such
a way that the two holes in the mounting rod
are directly positioned under the screws.
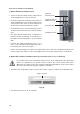
• Then tighten the two screws carefully (screws
are to be screwed into the holes of the mounting
rod).
• The mast required must have a diameter of
between 25mm and 45mm. It can either be a
free mast or a mounting angle, e.g. for a satellite
dish.
• Position the shaped aluminium part on one
side of this mast/mounting angle and put a
hose band clip over the two parts.
• Set the short mounting rod of the sensor against the other side of the shaped aluminium part
(on the right side in Figure 2 above) and tighten the hose band clip by using a screwdriver.
2. Optionally available installation mast (not included in the scope of delivery)
If you want to drive the rod with the flat tip (serves as an earth tip) into the ground by
means of a hammer, use a suited wooden clump in any case to protect the mast.
Otherwise, the upper end of the rod will be damaged (installation of the sensor mast
will not be possible any longer), guarantee will lapse!
• Assemble the single parts of the sensor mast. Plastic couplers combine the individual rods.
plastic coupler
Fig. 2b
• The flat rod end serves as an earth tip.
supplied
mounting rod
supplied shaped
aluminium part
mounting clip
installation mast
Fig. 2a