EQUATOR SERVICE MANUAL AND SPARE PARTS CATALOG First Edition - October 2003 COMBINATION WASHER-DRYER MODELS: EZ 1500 EZ 2500 C EZ 3600 C/CEE www.WasherDryer.
Table Of Contents WARRANTY INFORAMTION TROUBLESHOOTING 1 2-6 INSTALLATION WASH CYCLE DRY CYCLE 2 2-5 5-6 SPARE PARTS CATALOG 7-18 CABINET OSCILLATING GROUP CONTROLS WATER INLET VENTILATION 7-9 10-12 13-14 15-16 17-18 TESTING THE ELECTRONIC CONTROL MODULE 19 TESTING THE DRIVE MOTOR 20 CIRCUIT DIAGRAM 21 TIMER CHART 22
WARRANTY INFORMATION Your Equator appliance is protected by this warranty under normal, personal, family or household use (1 Year), and limited commercial use (90 days) in the USA and Canada. WARRANTY SERVICE WARRANTY Equator Corporation undertakes to the consumer-owner This warranty is given by: Equator Corporation, to repair or, at Equator Corporation’s option, to replace Equator Plaza, any part of this product which proves to be defective in 2801 W. Sam Houston Pkwy. N.
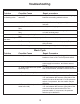
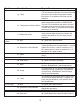
Troubleshooting Installation Problem Possible Cause Repair procedure 1. Machine vibrating 1a. Shipping brackets not or vibrating noise removed 1a. Open back of machine, remove 4 shipping brackets connecting cabinet to drum 1b. Machine not leveled 2. Water leaking from door 1c. Machine installed on uneven floor 1d. Machine installed on wood floor 1e. Rubber cap missing from rear foot 2a. Door not screwed in properly 2b. Door not aligned 1b. Adjust front leveling legs and tighten locknuts 1c.
Problem Possible Cause Repair Procedure 1g. Set to start of regular wash cycle. Test for 115 vac between high side of hot and cold water inlet valves and common (low) side of water 1g. Timer inlet valves. If not present, the timer may be defective. 1h. Set to Start of the regular wash cycle. Set water temperature selector to WARM/COLD. Test for 115 vac between high side of hot and 1h. Temperature Selector Switch cold water inlet valves and common (low) side of water inlet valves.
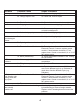
Problem Possible Cause Repair Procedure 5. Noisy 5a. Not leveled. 5a. Adjust levelling legs, tighten lock nuts. 5b. Foreign object in tub. 5b. Check tub, remove object. 5c. Shock Absorber. 5c. Check that attachment bolts are tight. 6a. Shipping brackets attached. 6a. Remove & store shipping brackets. 6b. Unstable floor 6c. Not leveled properly 6b. Remove carpeting, move to abeter location, or install underlayment. 6c. Adjust levelling legs, tighten lock nuts. 7a. Not leveled. 7a.
Problem 11. Machine overfills. 12. Door won't open. 13. Clothes wet at end of wash cycle. Possible Cause Repair Procedure 11a. Pressure Switch. 11a.Unplug unit. With excessive water still in tub, check for continuity between terminals 21 and 22. Drain machine, then replace pressure switch if test indicates continuity. 11b. Pressur Switch Hose. 11b. Drain machine, then replace pressure kinked or leaking switch hose. 12a. Door lock enabled. 12a. Water in tub. See Won't drain. 12b. Pressure Switch.
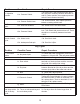
Problem Possible Cause Repair Procedure 2b. Blower inoperative. 2c. Thermostats open. 2b. Check for 115 vac at the blower motor terminals. Check motor resistance: 10 ohms maximum. 2c. Check for continuity, at room temperature. 2d. Thermal fuse open. 2d. Check for continuity. 2e. Heating elements. 2e. Check resistance: 25 ohms maximum open. 2f. Dryer timer. 2f. Test for 115 vac between either terminal of 88° C thermostat & either terminal of 110° C thermostat. 3a.
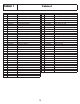
TABLE 1 Pos.
TABLE 1 EZ 3600 CEE 8
TABLE 2 EZ 3600 C 10
TABLE 2 EZ 3600 CEE 11
TABLE 2 Pos.
TABLE 3 13
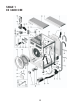
TABLE 3 Pos. 1 1 2 4 5 5 6 6 7 7 7 7 8 10 11 12 13 14 15 17 22 Part Number 119803998 119804128 119803935 112903471 112400492 112400418 117090235 112400430 112605474 112605545 112605546 112605851 112400414 116102684 116102685 116102965 116102685 116103107 116102964 116103032 116102761 Controls Part Name Control panel Control panel for CEE Knob Push button Soap dispenser drawer for 2500 C Soap dispenser drawer Container (additives compartment) Container (additives compt.
TABLE 4 15
TABLE 4 Pos.
TABLE 5 17
TABLE 5 Pos.
TABLE 1 EZ 3600 C 7
Testing the Electronic Control Module To help avoid electrical shock, no live electrical test of the Electronic Control Module will be made. Start by unplugging the unit, then remove the connector from terminals 10 and 11 of the Electronic Control Module. With this connector removed, plug the unit in, set the dry timer to 10 minutes, then push the unit’s ON button. All measurements are made with an ohmmeter. When the test is concluded, unplug the unit before replacing the connector on terminals 10 and 11.
Testing the Drive Motor (7 and 10 pin connector) 20
21
TIMER CHART 22
Equator Corporation • Equator Plaza • 2801 W. Sam Houston Pkwy N. • Houston, Texas 77043-1611 Phone: (800) 776-3538 • Parts: (888) 483-9627 • Fax: (713) 464-2151 www.equatorappliances.com • E-mail: service@equatorappliances.com E Q U A T O R S E R V IC E A G R E E M E N T Dear Service Agent: Welcome to the world of Equator! We are pleased to appoint you as an Equator Authorized Service Agent. Equator is an appliance manufacturer that produces Advanced Appliances.