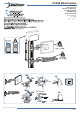
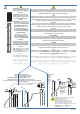
LX Wall Mount System User's Guide Guía del usuario Manuel de l’utilisateur Benutzerhandbuch Gebruikersgids Guida per l’utente ユーザーガイド 用户指南 사용자 안내서 1.38" - 3.75" (35-95 mm) 50 lbs (22.7 kg) 7 - 20 lbs (3.2 - 9.1 kg) 0 - 5 lbs (0 - 2.3 kg) 180° 80° 360° 13" (330 mm) 180° 180° 5° 360° 13" (330 mm) 80° 180° 888-45-176-W-02 rev.
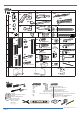
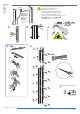
A 1 B C D 1x 1x 14x 2x 14x 1x 2x 2 1/4-20 x 2" 2x 1x 2x 3 4 7x 2x 4x 1x 3x 7x 9x 1/4-20 x 1/2" 1x 5 2x 1x 6 8x 2x 2x 10-24 x 1/2" 2x 4x 1x 12x 4x 2.5mm 1x 1/8” 3/8-16 x 5/8" 4x 7 1x 2x 8 1x 4x M4 x 10mm 7/32” 4x M4 x 10mm 4x 2x 9 4mm 1x 4x M4.
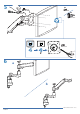
Set Your Workstation to Work For YOU! Configure su estación de trabajo para que trabaje para USTED. Ajustez votre station de travail en fonction de VOS besoins ! Richten Sie Ihren Arbeitsplatz so ein, dass er für SIE arbeitet! Stel uw werkstation zo in dat het voor U werkt! Approntare la stazione di lavoro nella posizione ergonomica ottimale. 一人ひとりにピッタリのワークステーション! 按照您自身的需要设置工作站! Height Position top of screen slightly below eye level. Position keyboard at about elbow height with wrists flat.
1 Mounting Heights Altura de montaje Hauteur de fixation Montagehöhe Bevestigingshoogte Altezze di montaggio 取り付け高さ 安装高度 설치 높이 These mounting heights assume your monitor mounting holes are located in the center, relative to the monitor screen. If your monitor's mounting holes are located off center (vertically), you can adjust your mounting height accordingly. ie. (Back of Monitor) * 15" 16" 18.
2 CAUTION: Make sure the wall mount bracket is level, flush and snug to the wall surface. DO NOT OVERTIGHTEN THE BOLTS. PRECAUCIÓN: Asegúrese de que la fijación de la montura en pared está nivelada, iguálela y ajústela respecto a la pared. NO RETIRAR ESTA ETIQUETA! AVERTISSEMENT : assurez vous que le support moral soit bien à plat et consup su u tre tre la surface du mur. NE PAS SERRER EXCESSIVEMENT LES BOULONS.
Wood Madera Bois Solide Holzbalkenträger Massief Houten Pilaren Due montanti in legno massiccio 木 木质 나무 Studs ≥ 25 gauge steel Pernos de acero de calibre ≥ 25 Goujons ≥ calibre 25 en acier Bolzen ≥ Blechlehre Nr.
Hollow Wall Pared Mur Wand Muur Parete 壁 墙壁 Requires minimum material thickness of 5/8” (16 mm). Requiere un grosor mínimo de 16 mm. Epaisseur minimum de 16 mm. Requer uma espessura mínima de 5/8” (16 mm). Mit einer Materialdicke von mindestens 16 mm. Vereist een minimale materiaaldikte van 1.6 cm. Richiede uno spessore del materiale non inferiore a 16 mm.
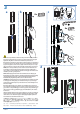
3 a b c 8x 1/4-20 x 1/2" 4x 10-24 x 1/2" 8x 10-24 x 1/2" 4x 10-24 x 1/2" NOTE: Fasteners may unwind due to vibration caused by movement of mounting solution over time. Inspect mounting solution for loose fasteners on a routine basis. If desired, apply a light duty thread locking adhesive to fasteners before installation to prevent back-out. NOTA: Los fijadores pueden llegar a soltarse debido a la vibración generada por el movimiento de la solución de montaje con el paso del tiempo.
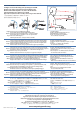
4a b c 1x d 2x 3/8-16 x 5/8" 1/8" 7/32" e 12x f 2x g 888-45-176-W-02 rev.
5 4x M4 x 10mm 4x M4 x 10mm M3 x 6mm 0° 6 a b 888-45-176-W-02 rev.
7 7mm 4x 8 b a d e c f g 4x h i j k 888-45-176-W-02 rev.
9 4x 888-45-176-W-02 rev.
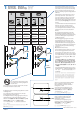
10 CABLE ROUTING GUÍA DE CABLEADO CHEMIN DE CÂBLE KABELFÜHRUNG LEIDT DE KABEL INSTRADARE I CAVI ケーブル配線 走线 케이블 정리 Leave Slack in cable No deje el cable excesivamente tenso Laisser du mou dans le câble Berücksichtigen Sie entsprechendes Kabelspiel Geef wat extra lengte in de kabel Lasciare del gioco nel cavo ケーブル配線はアームの移動が自由に行えるよう、多少たるみを持たせてください。 让电缆保持松驰 케이블을 느슨하게 유지 888-45-176-W-02 rev.
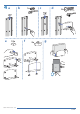
11 a Ø 7/32" (5.6 mm) b 1 b c d 2 e f M4.2 x 25mm 12 a 3 M4.2 x 25mm b d e c 888-45-176-W-02 rev.
13 Einstellung Regolazione 调节 조절 Réglage Instellen 調整 Adjustment Ajuste It is important that you adjust this product according to the weight of the mounted equipment as described in the following steps. Any time equipment is added or removed from this product, resulting in a change in the weight of the mounted load, you should repeat these adjustment steps to ensure safe and optimum operation. Adjustments should move smoothly and easily through the full range of motion and stay where you set it.
a Lift – Up and down Elevación (arriba y abajo) Ajustement en hauteur : bas et haut Höhenverstellung – rauf und runter Verstel in hoogte – Omhoog en omlaag Sollevamento – Su e Giù リフト(上下) 升降(上下) 높이 (위/아래로) Follow these instructions to tighten or loosen tension. Siga estas instrucciones para ajustar o aflojar la tensión. Suivez ces instructions pour desserrer ou resserrer la tension. Befolgen Sie diese Anleitung, um die Spannung zu lockern oder zu verstärken.
b Tilt – Forward and Backward Inclinación (adelante y atrás) Inclinaison : Avant et arrière Neigung – vor und zurück Kantel – Naar voren en naar achteren Inclinazione – Avanti ed Indietro チルト (前後) 倾斜(前后) 기울기 – 앞/뒤로 Follow these instructions to tighten or loosen tension. Siga estas instrucciones para ajustar o aflojar la tensión. Suivez ces instructions pour desserrer ou resserrer la tension. Befolgen Sie diese Anleitung, um die Spannung zu lockern oder zu verstärken.