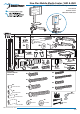
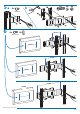
Neo-Flex Mobile Media Center, VHD & UHD with 90˚ Portrait/Landscape rotation User's Guide Guía del usuario Manuel de l’utilisateur 90˚ A B C 2x 1x 4x 4x 1 1x 1x 4x 4x 2 1x M10 x 60mm M5 x 10mm 1x 4x D 1x 8x 1x 4x M3.
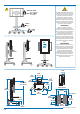
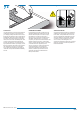
WARNING VHD: 50 - 90 lbs Stored Energy Hazard: The lift mechanism in the tower is under tension and will move up rapidly, on its own, as soon as attached equipment is removed. For this reason, DO NOT remove equipment or make adjustments to lift tension unless the front assembly has been moved to the highest position on the tower! Failure to follow this instruction may result in serious personal injury and/or equipment damage! (22.7 - 40.
1a 1x 1x 15mm b 4x 1x 4x 2 8x 1x 1x M3.5 x 6mm CAUTION: DO NOT overtighten fasteners. Overtightening may cause damage to your equipment. Cuidado:: No sobreapriete los tornilllos, pues podría causar un daño al equipo. Attention: ne forcez pas le serrage de la vis, cela pourrait endommager l’écran et/ou les attaches. 888-24-064-M-00 rev.
3a 1x 2x b 4x M3 x 37mm 8x 2x 4a 2x b c 888-24-064-M-00 rev.
a 4x b 4x 4x 4x M6x14mm M6x8mm 6 2x 4x 200 mm M5 x 10mm 200 mm 400 mm 400 mm 600 mm 600 mm 888-24-064-M-00 rev.
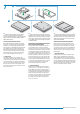
7 * a * If a stand is already attached to your display, remove it according to display manufacturer directions. Place the display on a clean, flat, padded surface or, if you prefer, lean the display against a stable, vertical surface. Choosing Display Bracket Fasteners Notice that several sizes of screws and spacers have been provided for mounting the Tilt Mount brackets to your large display.
b Ø b Hole Diameter Four sets of display bracket screws have been provided, each of a different diameter: 4mm, 5mm, 6mm, and 8mm. Compare the screws with the diameter of the mounting holes at the back of your display to find the same size. NOTE: Washer A is provided for use with the 4mm and 5mm screws while Washer B works with 6mm and 8mm screws. c b DIAMETRO DE LOS ORIFICIOS Se incluyen 4 juegos de tornillos para el soporte del monitor, con diferentes diámetros: 4mm, 5mm, 6mm. y 8mm.
7d Compare this measurement Compare this measurement to the recommended screw (based on display back type and diameter), taking into consideration the need for a minimum amount of thread engagement (the minimum thread engagement is the same as the diameter of the screw, for instance, the minimum thread engagement for an 8mm diameter screw is 8mm).
MM MM MM 7e Test Fasteners It is important that you test the chosen fastener combination to be sure it is the right size for your display: partially thread the screw into the display by hand with the correct combination of washers and spacers (do not fully insert and do not tighten screw at this time). If you feel resistance, remove the screw immediately and check to see if a screw with a better matching size has been provided.
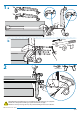
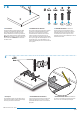
7f TOP Arriba Haut y1 = y2 x < 600mm ATTACH BRACKETS TO DISPLAY f Place Display Brackets (with pre-determined fasteners) on back of display: (y) The display brackets should be centered vertically on the back of the display - the distance between the top of the bracket (y1) and the top of the display should be the same as the distance between the bottom of the bracket (y2) and the bottom of the display.
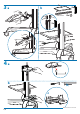
8a 9 b 2x M4 x 16mm It is important that you adjust this product according to the weight of the mounted equipment as described in the following steps. Any time equipment is added or removed from this product, resulting in a change in the weight of the mounted load, you should repeat these adjustment steps to ensure safe and optimum operation. Adjustments should move smoothly and easily through the full range of motion and stay where you set it.
10 1x 90˚ a b 888-24-064-M-00 rev.
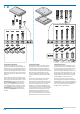
11 1x a 1x M5x8mm b c 4x 2x NOTE: Leave enough slack in cables to allow full range of motion. No deje el cable excesivamente tenso Laisser du mou dans le câble d 1x 888-24-064-M-00 rev.
WARNING WARNING STORED ENERGY HAZARD! DO NOT OPEN TOWER OR REMOVE SAFETY GUARD! A primary mechanism within the tower is under tension and can be hazardous to people exposed to it under certain extreme conditions. DO NOT open the tower; DO NOT attempt to service the cart/stand. DO NOT remove safety guards or labels designed to protect or inform of possible hazards. Only Ergotron-approved installers may service or otherwise modify cart/stand.