StyleView® VL Enclosure User's Guide Guía del usuario Manuel de l’utilisateur Gebruikersgids Benutzerhandbuch Guida per l’utente Användarguide ユーザーガイド 用户指南 사용자 안내서 www.ergotron.
This Class A digital apparatus complies with Canadian ICES-003. Cet appareil numérique de la classe A est conforme à la norme NMB-003 du Canada. FCC Compliance Statement This product has been tested and found to comply with the limits for a Class A digital device, pursuant to part 15 of the FCC Rules. These limits are designed to provide reasonable protection against harmful interference when the equipment is operated in a commercial environment.
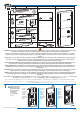
Specifications Especificaciones Spécifications Technische Daten Specificaties Specifiche Specifikationer 仕様 规格 27.2” (691 mm) Combined weight of all equipment mounted to lift engine should be: 8 - 33 lbs (3.63 - 14.
Set Your Workstation to Work For YOU! Configure su estación de trabajo para que trabaje para USTED. Ajustez votre station de travail en fonction de VOS besoins ! Richten Sie Ihren Arbeitsplatz so ein, dass er für SIE arbeitet! Stel uw werkstation zo in dat het voor U werkt! Approntare la stazione di lavoro nella posizione ergonomica ottimale. Få din arbetsstation att arbeta för DIG! 一人ひとりにピッタリのワークステーション! 按照您自身的需要设置工作站! Height Position top of screen slightly below eye level.
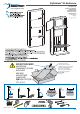
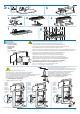
A 1 B C D 6x 6x 1x E 1x 1/4-20 x 2" 2 1x 6x 4x 1x 3 M4 x 10mm 4 4x 1x 1x 5/32" 5 2x 6 1x 7 3/16" 2x 1x 5x 2x WARNING: Because surfaces vary widely and the ultimate mounting method is out of Ergotron’s control, it is imperative that you consult with appropriate engineering, architectural or construction professional to ensure that your Ergotron mounting solution is mounted properly to handle applied loads.
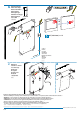
b Mounting Height Altura de montaje Hauteur de fixation Montagehöhe Montagehoogte Altezza di montaggio Monteringshöjd 取付け高さ 安装高度 2 1 X 86" (2184 mm) - x = H OR FLO TO c Drill Holes Taladre los orificios Tous de forage Bohrlöcher Boorgaten Eseguire i fori Borra hål 穴を開けます。 钻孔 To Floor Al suelo Vers le sol Zum Boden Tot de vloer Rispetto al pavimento Till golv 床に設置 离地面 바닥에 d NOTE: If mounting with different hardware than provided, drill appropriate size holes.
2a 6x 1 b 2 3 4 2x 1/4-20 x 2" 2x 3a 1x 5/32" b 888-60-506-W-02 rev.
b c 4x 1/4-20 x 2" 4x 4a c 5/32" 4x M4 x 10mm b Plug cables into monitor Enchufe los cables en el monitor Branchez les câbles dans l'écran Schließen Sie die Kabel am Monitor an. Sluit kabels aan op monitor Collegare i cavi nel monitor Anslut kablar till skärm ケーブルをモニターに接続します。 将线缆插入显示器 d 888-60-506-W-02 rev.
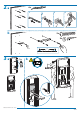
5a c b d f 6 e g Center CPU in top compartment to allow for sufficient air flow. DO NOT place anything above the CPU, this will prevent proper ventilation. Route Cables Pase los cables Acheminer les câbles Verlegen Sie die Kabel. Kabels geleiden Instradare i cavi Led kablar ケーブルを配置します。 走线 Centre la CPU en el compartimento superior para que circule suficiente aire. NO coloque NADA encima de la CPU, ya que impediría una ventilación adecuada.
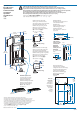
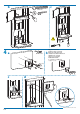
7 It is important that you adjust this product according to the weight of the mounted equipment as described in the following steps. Any time equipment is added or removed from this product, resulting in a change in the weight of the mounted load, you should repeat these adjustment steps to ensure safe and optimum operation. Adjustments should move smoothly and easily through the full range of motion and stay where you set it.
b c d Tilt Inclinación Inclinaison Neigung Kantel Inclinazione Vinkel チルト 倾斜 기울기 Tighten screws for less keyboard tilt. Apriete los tornillos para reducir la inclinación del teclado. Serrez les vis pour que le clavier s’incline moins. Ziehen Sie die Schrauben an, um die Tastaturneigung zu verringern. Haal de schroeven aan zodat het toetsenbord minder kantelt. Serrare le viti per ridurre l’inclinazione della tastiera. Dra åt skruvar för mindre tangentbordsvinkel.
English 8 Guía del usuario - Español Manuel de l’utilisateur - Français Gebruikersgids - Nederlands Benutzerhandbuch - Deutsch Guida per l’utente - Italiano Svenska ユーザーガイド : 日本語 用户指南 : 汉语 사용자 안내서 : 대한민국 4x 1x Ensure that the batteries are installed in the battery pack. NOTE: User should change Master Code upon receipt of Enclosure. Programming New Codes (Default Master Code: 12345) 1 Enter Master Code on Keypad.
Español 8 4x Manuel de l’utilisateur - Français Gebruikersgids - Nederlands Benutzerhandbuch - Deutsch Guida per l’utente - Italiano Svenska ユーザーガイド : 日本語 用户指南 : 汉语 사용자 안내서 : 대한민국 1x Compruebe que las baterías están instaladas en el paquete de baterías. NOTA: El usuario debe cambiar el código maestro en cuanto reciba el recinto. Cómo programar los nuevos códigos: (Código maestro predefinido: 12345) 1 Introduzca el código maestro en el teclado.
Français 8 4x Gebruikersgids - Nederlands Benutzerhandbuch - Deutsch Guida per l’utente - Italiano Svenska ユーザーガイド : 日本語 用户指南 : 汉语 사용자 안내서 : 대한민국 1x Assurez-vous que les batteries sont bien installées dans le boîtier à piles. REMARQUE : il est conseillé que l’utilisateur change le code principal à la réception du coffret. Programmer des nouveaux codes: (Code principal par défaut : 12345) 1 Entrez le code principal à l’aide du pavé numérique.
Nederlands 8 4x Benutzerhandbuch - Deutsch Guida per l’utente - Italiano Svenska ユーザーガイド : 日本語 用户指南 : 汉语 사용자 안내서 : 대한민국 1x Stellen Sie sicher, dass Batterien in das Batteriefach eingelegt sind. HINWEIS: Nach Erhalt des Gehäuses sollte der Benutzer den Generalcode ändern. Neue Codes programmieren: (Generalcodeeinstellung: 12345) 1 Geben Sie den Generalcode über die Tastatur ein. 2 Die Zahlen 3 und 5 beginnen auf der Tastatur zu blinken und zeigen an, dass der Generalcode akzeptiert wurde.
Deutsch 8 4x Guida per l’utente - Italiano Svenska ユーザーガイド : 日本語 用户指南 : 汉语 사용자 안내서 : 대한민국 1x Controleer of de batterijen in het batterijenpakket zijn geïnstalleerd. OPMERKING: de gebruiker moet bij ontvangst van de behuizing de hoofdcode wijzigen. Nieuwe codes programmeren: (Standaardhoofdcode: 12345) 1 Voer hoofdcode in op keypad. 2 Knop 3 en 5 van de keypad beginnen te knipperen om aan te geven dat de hoofdcode is geaccepteerd. 3 Druk tegelijkertijd op 3 en 5 terwijl deze knipperen.
Italiano 8 4x Svenska ユーザーガイド : 日本語 用户指南 : 汉语 사용자 안내서 : 대한민국 1x Verificare che le batterie siano installate nella batteria ricaricabile. NOTA: l’utente deve modificare il codice principale alla ricezione della custodia. Programmazione di un nuovo codice (codice principale predefinito: 12345) 1 Immettere il codice principale dal tastierino. 2 I numeri 3 e 5 sul tastierino iniziano a lampeggiare, indicando che il codice principale è stato accettato. 3 Premere contemporaneamente 3 e 5 mentre lampeggiano.
Svenska 8 4x ユーザーガイド : 日本語 用户指南 : 汉语 사용자 안내서 : 대한민국 1x Se till att batterierna har installerats i batterifacket. OBS: Användaren bör ändra masterkoden vid mottagande av skåpet. Att programmera nya koder (standard masterkod: 12345) 1 Tryck in masterkod på sifferpanelen. 2 Siffrorna 3 och 5 på sifferpanelen kommer att börja blinka, vilket betyder att masterkoden har accepterats. 3 Tryck samtidigt ned 3 och 5, medan de blinkar.
日本語 8 4x 用户指南 : 汉语 사용자 안내서 : 대한민국 1x バッテリーパックに電池が装着されていることを確認します。 注: エンクロージャのご使用前にマスターコードを変更してください。 新しいコードのプログラミング手順:(デフォルトのマスターコード: 12345) 1 キーパッドにマスターコードを入力します。 2 キーパッドの3番と5番が点滅し、マスターコードが受理されたことが分かります。 3 3番と5番が点滅している間に、この2つを同時に押します。 4 すべての番号が点灯します(コードを入力できる時間は3秒間です)。 5 新しいコードを入力します(任意の数字5桁)。(最初に入力したコードがマスターコードとなります。) 6 コードが受け入れられるとすべてのLEDが点滅し、コードの受け入れが確認できます(コードを入力できる時間は3秒間です)。 7 次に個人コードを10件までプログラムできます。ステップ5と6を繰り返してください。 8 コードの入力完了後はLEDの点滅が3秒間続き、システムがプログラムモードを終了します。 ロック解除(3つの方法): • マスターコードを入力します。 • 個人
汉语 8 4x 사용자 안내서 : 대한민국 1x 确保电池安装在电池组中。 注意: 在收到机柜时,用户应更改主密码。 编制新密码:(默认主密码:12345) 1 在数字键盘上输入主密码。 2 数字键盘上的数字 3 和 5 将开始闪烁,表示主密码已被接受。 3 在闪烁的同时按 3 和 5。 4 所有数字都将亮起(有 3 秒钟时间输入密码)。 5 输入新密码——任意序列的五个数字。 (编入的首个密码即是新的主密码)。 6 在密码被接受后,所有 LED 指示灯将闪一次作为确认(有 3 秒钟时间输入下一个密码)。 7 然后可重复第 5 步和第 6 步继续编制密码,最多可编制 10 个私人密码。 8 当完成输入新密码时,系统将在 3 秒种后伴随着一系列的 LED 指示灯闪烁退出编制模式。 解锁(3 种方法): • 输入主密码。 • 输入私人密码。 • 钥匙 - 逆时针转动 1/8 圈 解锁(2 种方法): • 等候 4 秒钟让其自动上锁 • 同时按数字键盘上的1 和 2 删除所有密码(不能只删除一个密码): 1 输入主密码 2 同时按 3 和 5(正在闪烁时) 3 同时按数字键盘上的 1 和 2 4 遵照
대한민국 8 4x Ensure that the batteries are installed in the battery pack. NOTE: User should change Master Code upon receipt of Enclosure. 1x 새 코드 프로그래밍: (기본 마스터 코드: 12345) 1 Enter Master Code on Keypad. 2 Numbers 3 and 5 on the Keypad will start flashing, indicating the Master Code has been accepted. 3 Simultaneously press 3 and 5 while they are flashing. 4 All the numbers will light (you have 3 seconds to enter a code). 5 Enter a new code—any sequence of 5 numbers.