
Installation manual

INTRODUCTION
This manual contains instructions for the assembly of a
Desk Top Station. This is done by installing an MDX mobile
or ORION mobile radio into the Desk Top Station Assembly,
using the hardware kit supplied.
Mobile radios which can be accommodated by the Desk
Top Station are all MDX radios and ORION up to the mid
transmitter power levels. Only the local control version sta-
tion is available for the ORION mobile.
Included are mounting instructions for the radio, as well
as instructions for making the few required cable connec-
tions. Installation is made easy with the help of an Installa-
tion Diagram and an Interconnection Diagram, included as
part of this manual.
UNPACKING AND CHECKING
EQUIPMENT
Hardware Kit 349A9561 was used to assemble your sta-
tion. The unused material was shipped with the station. Re-
move the kit and store for possible use.
Installation of the Desk Top Station includes three parts:
1. Installation of the Mobile Radio in the Desk Top
Station Assembly using Hardware Kit 349A9561
(supplied).
2. Installation of Option Boards in the Desk Top Sta-
tion Assembly, in accordance with options selected.
Remote Interface Board Option, with one of the
following remote boards:
a. DC Remote Board
b. 4-Channel Tone Remote Board
c. 5-Channel EDACS Tone Remote Board
d. Standby Power Transfer Option
e. Clock/VU Meter Option
3. Installation of the Desk Top Station in the place of
operation with the necessary power, antenna, mi-
crophone, and line connections.
INSTALLATION
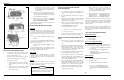
PREPARATION OF DESK TOP STATION
1. Loosen the two (2) captive screws which hold the
top cover on the Desk Top Assembly. Remove the
cover.
2. Disconnect cable W2 from J202 on the Interconnect
board and also from J215 (ORION Application).
3. Loosen,
Do Not Remove
, the two (2) M3.5 screws
that hold the radio mounting bracket on the Desk
Top Station Assembly.
4. When external wires for options are to be con-
nected, remove and discard the round knockout but-
ton in the rear of the station housing. Insert the
rubber grommet 5490407P10 in the hole. Place the
cable clamp (344A3480P1) around the wires. Snap
the cable clamp retainer into the hole adjacent to
the grommet.
PREPARATION OF MOBILE RADIO
MDX Radio
1. Remove the bottom cover of the radio by removing
the four (4) retaining TORX
®
screws.
2. Unplug the radio internal speaker cable from J904
on the radio and let it hang.
3. Discard the rubber plug and in its place slip the rub-
ber sleeve on cable W2. P905 of W2 plugs into
J905.
4. Replace the bottom cover of the radio with the four
(4) retaining TORX
®
screws removed in Step 1.
5. Using a permanent marker, copy the FCC identifi-
cation number of the radio onto the Desk Top Sta-
tion FCC label.
6. Attach the side mounting brackets with four (4) hex
mounting screws and four (4) washers (2 per side)
in the sides of the radio.
ORION Radio
1) No special modifications required.
2) Attach the side mounting brackets with four (4) hex
mounting screws (2 per side) in the sides of the ra-
dio.
Copyright© September 1993, Ericsson GE Mobile Communications Inc.
TABLE OF CONTENTS
Page
INTRODUCTION . . . . . . . . . . . . . . . . . . . . . . . . . . . . . . . . . . . . . . . . . . . . . . . . . . . . . 1
UNPACKING AND CHECKING EQUIPMENT . . . . . . . . . . . . . . . . . . . . . . . . . . . . . . . . . . . . 1
INSTALLATION . . . . . . . . . . . . . . . . . . . . . . . . . . . . . . . . . . . . . . . . . . . . . . . . . . . . . 1
PREPARATION OF DESK TOP STATION . . . . . . . . . . . . . . . . . . . . . . . . . . . . . . . . . . . . 1
PREPARATION OF MOBILE RADIO . . . . . . . . . . . . . . . . . . . . . . . . . . . . . . . . . . . . . . . 1
INSTALLING THE MOBILE RADIO . . . . . . . . . . . . . . . . . . . . . . . . . . . . . . . . . . . . . . . 2
INSTALLING THE DESK TOP STATION . . . . . . . . . . . . . . . . . . . . . . . . . . . . . . . . . . . . . 2
INSTALLING THE STANDBY POWER TRANSFER OPTION . . . . . . . . . . . . . . . . . . . . . . . . . 2
INSTALLING THE REMOTE OPTION . . . . . . . . . . . . . . . . . . . . . . . . . . . . . . . . . . . . . . 2
ADJUSTING THE REMOTE OPTION . . . . . . . . . . . . . . . . . . . . . . . . . . . . . . . . . . . . . . 2
INSTALLING THE KEYPAD BOARD OPTION . . . . . . . . . . . . . . . . . . . . . . . . . . . . . . . . . 3
INSTALLING THE CLOCK/VU MODULE OPTION . . . . . . . . . . . . . . . . . . . . . . . . . . . . . . 3
PROGRAMMING NOTES . . . . . . . . . . . . . . . . . . . . . . . . . . . . . . . . . . . . . . . . . . . . . . . . 3
DIAGRAMS
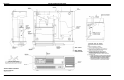
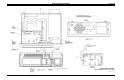
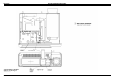
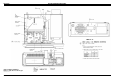
INSTALLATION INSTRUCTIONS (MDX RADIO APPLICATION) . . . . . . . . . . . . . . . . . . . . . . . . . 4
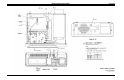
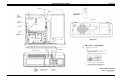
INSTALLATION INSTRUCTIONS (ORION RADIO APPLICATION) . . . . . . . . . . . . . . . . . . . . . . . . 16
INTERCONNECTION DIAGRAM (MDX RADIO APPLICATION) . . . . . . . . . . . . . . . . . . . . . . . . . 17
INTERCONNECTION DIAGRAM (ORION RADIO APPLICATION) . . . . . . . . . . . . . . . . . . . . . . . . 20
This manual is published by
Ericsson Inc.
, without any warranty. Improvements and changes to this manual necessitated
by typographical errors, inaccuracies of current information, or improvements to programs and/or equipment, may be
made by
Ericsson Inc.
, at any time and without notice. Such changes will be incorporated into new editions of this man-
ual. No part of this manual may be reproduced or transmitted in any form or by any means, electronic or mechanical, in-
cluding photocopying and recording, for any purpose, without the express written permission of
Ericsson Inc.
The software contained in this device is copyrighted by the Ericsson Inc. Unpublished rights are reserved under the
copyright laws of the United States.
NOTICE!
This manual covers Ericsson and General Electric products manufactured and sold by Ericsson Inc.
NOTICE!
LBI-38977
1