ADSL Modem HM121dp/di - User Guide Copyright This manual is published by Ericsson AB, without any warranty. Improvements and changes to this manual necessitated by typographical errors, inaccuracies of current information, or improvements to programs and/or equipment, may be made by Ericsson AB at any time and without notice. Such changes will, however, be incorporated into new editions of this manual. All rights reserved.
Contents 1 Introduction 5 1.1 About this Guide 5 1.2 1.3 About ADSL About the ADSL Modem HM121dp/di 1.3.1 Protocol and Device Driver Selection Package Contents System Requirements LED Indicators 5 6 6 7 8 8 1.4 1.5 1.6 2 Installation Procedure 2.1 2.2 2.3 2.4 3 Before You Start Driver Installation Connect the Modem Installation Program Group 9 9 9 15 16 Accessing the Internet 17 3.1 17 18 18 18 19 19 20 21 3.2 4 Page Using LAN Driver 3.1.1 In Windows 98, 98SE and ME 3.1.
8.1 8.2 8.3 Product Care and Maintenance Licence Agreement 8.2.1 Licence 8.2.2 Term 8.2.3 Limited Warranty 8.2.4 Intended Use 8.2.5 Limitation of Liability 8.2.6 Governing Law Regulatory Information 8.3.1 Europe 8.3.2 USA 8.3.3 Caution 8.3.4 Environmental Information 8.3.
Introduction 1 Introduction 1.1 About this Guide This User Guide provides general information about the installation of the Ericsson ADSL Modem HM121dp/di in a PC/Windows environment, as well as information about day-to-day use of the modem. You can learn more about unfamiliar or technical terms by consulting the "Glossary" in this guide. The following chapters are included in this guide: 1.
Introduction 1.3 About the ADSL Modem HM121dp/di The Ericsson ADSL Modem HM121d comes in two versions: HM121dp and HM121di. Both products offer the same features, but they rely on different types of telephone line in order to provide the ADSL service. HM121dp offers ADSL service over POTS (Plain Old Telephone System) lines, while HM121di uses ISDN (Integrated Services Digital Network) lines to provide the ADSL service.
Introduction PPP provides session setup, user authentication (login), and encapsulation for upper layer protocols such as IP (Internet Protocol). The use of PPP makes the modem appear as a dial-up modem to the operating system and Dial-Up Networking is used to establish a connection. • Bridged Ethernet over ATM (RFC 1483B) / Routed IP over ATM (RFC 1483R). This protocol makes the modem appear as a LAN (Local Area Network) device to the operating system.
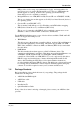
Introduction Note: Your package may also include other materials provided by your ADSL operator. 1.5 System Requirements In order to successfully connect and install the HM121dp/di to your PC, please check the following requirements with your equipment: 1.6 • • • Pentium II 233 MHz or above At least 32 MB RAM (64 MB recommended) Microsoft Windows 98/98SE/Me/2000/XP. For Windows 98/98SE the Windows Installation CD may be required. • • • 20 MB of free hard disk space. CD-ROM drive.
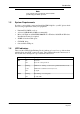
Installation Procedure 2 Installation Procedure The step-by-step instructions in this chapter guides you through the complete installation procedure for all supported operating systems. Notes will indicate when operating system specific differences occur. The installation procedure is divided into two steps: 2.1 • Driver installation; Installation of driver and, if required, user parameter input. • Connect the modem; The physical cable connections.
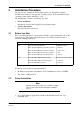
Installation Procedure From Windows Start menu, select Run and type D:\setup.exe (where D: is the letter of your CD-ROM drive) and press Enter. 10 (47) 2 A "License Agreement" is displayed. Click Accept to proceed. Decline will exit the setup program. 3 The "Select Service Provider" window appears. With Advanced selected, click Next> to continue.
Installation Procedure 4 The "Select Driver Type" window appears. Select the driver type and click Next>.
Installation Procedure 5 12 (47) In the "Communication Settings" window, enter/select the VPI, VCI, Encapsulation and Modulation type. Click Next> to proceed.
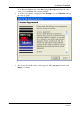
Installation Procedure Note: The Encapsulation types that appear in the drop-down list vary depending upon the type of driver selected in the previous step. 6 When the "Ready to Install" window appears, you may review your settings and click to accept the current settings.
Installation Procedure 7 14 (47) Drivers are now being installed, and a progress bar is shown.
Installation Procedure 2.3 Connect the Modem Connect the modem according to the following instructions: 1 2 Connect one end of the provided ADSL Line cable to the modem's LINE port. Connect the other end to the ADSL service port (splitter/filter or phone outlet). Connect the square plug of the provided USB cable to the USB port on the back of the modem. Connect the flat plug to the USB port on your PC. This port is most likely marked with the standard USB symbol.
Installation Procedure Note: Windows 98. At this point there may be a need for you to insert the Windows Installation CD to install some Microsoft network components. Insert the CD in the disk drive, and click OK, if prompted. 2.4 4 The system must be rebooted to have the new settings take effect, therefore the "Reboot" window appears: 5 Remove all disks from their drives, select Yes, reboot the computer now, and click Close to reboot.
Accessing the Internet 3 Accessing the Internet The way how to access the Internet differs depending on the settings your ADSL service provider is using. The "Control Panel" provides information about which driver type that is used in your installation and from that information you can proceed to the respective sections in this chapter. Follow these steps to check which driver type your modem is using: 3.
Accessing the Internet If you have not been provided any IP settings from your ISP/service provider, you can directly access the Internet by using a web browser. If your ISP/service provider has provided you with IP settings (for instance IP address, subnet mask and default gateway), and/or explicitly stated that DHCP is not used, you have to change your PCs network configuration before you can access the Internet. Follow the steps below to change your PCs network configuration: 3.1.
Accessing the Internet 3 4 5 6 7 Click the Properties button. Select Internet Protocol (TCP/IP) and click the Properties button. Select "Use the following IP address" and enter the IP settings provided by your ISP/service provider. Click OK. Click Close in the "Local Area Connection Properties" dialog box and in the "Local Area Connection Status" dialog box. Close the "Network and Internet Connections" window. You are now ready to access the Internet, by using a web browser. 3.
Accessing the Internet Note: Be sure to enter your User name and Password exactly as provided, that is, distinguish between uppercase and lowercase letters. 6 When a connection has been established, you should be ready to access the Internet. You may start your application, e.g. a web browser or E-mail application for Internet access. When you want to disconnect, double-click on the Modem Connection icon (showing two PCs connected to each other) in your PCs system tray. In the "Connected to ...
Accessing the Internet When you want to disconnect, double-click on the Modem Connection icon (showing two PCs connected to each other) in your PCs system tray. In the "Connected to ..." window that opens, click the Disconnect button. Shutting down your PC will also disconnect your dial-up connection. 3.2.3 In Windows XP 1 2 3 Double-click on the shortcut icon HM121dp/di Dial-up PPP Connection on your PCs desktop to open the "Connect To" window. Now proceed to step 3.
Verifying your ADSL Connection 4 Verifying your ADSL Connection When the installation procedure has been completed, you can use the Control Panel to view the current modem status regarding performance and ADSL connection. 4.1 Using the ADSL Modem icon During driver installation, an ADSL Modem monitoring program is also installed on your system.
Verifying your ADSL Connection Figure 17: Control Panel - Physical Link tab State indicates TRAINING when the ADSL line is "training" to achive the optimum transmission rate. Once the line is trained the indication is changed to DATA. When no ADSL signal is present the indication is NO SIGNAL. Modulation shows the ADSL mode used. The setting is determined by the service offered by your ADSL service provider and is normally either T1.413, G.Dmt or G.Lite. Data Rate(kbps) shows the transmission rate.
Verifying your ADSL Connection Figure 18: Control Panel - System Info tab 4.2.3 Configuration The "Configuration" tab of the Control Panel views communication settings for your modem. Note: The information displayed on the "Configuration" tab differs depending on which driver type that is used in your installation.
Verifying your ADSL Connection If you are using the WAN driver, only the Modulation type will be displayed.
Customizing Communication Settings 5 Customizing Communication Settings Once the ADSL Modem HM121dp/di and software have been installed, the communication settings may be easily updated by performing the following steps. Note: The communication settings should only be changed if you have received new information from your ADSl service provider 1 2 From your PC desktop click Start -> Programs -> HM121dp/di DSL Modem -> Configure.
Customizing Communication Settings 3 4 Make the necessary changes to the VPI, VCI, Encapsulation type and/or Modulation Type and click the Next> button. The system must be rebooted to have the new settings take effect, therefore the "Reboot" window will appear. Remove all disks from their drives, select "Yes, reboot the computer now" and click Close to reboot.
Uninstalling and Updating Modem Software 6 Uninstalling and Updating Modem Software 6.1 Software Uninstall The HM121dp/di is a hot swapable USB device. You may plug it in and out without powering down your computer. However, this does not mean that both driver and software are removed when plugging out the USB device. Should you need to remove the HM121dp/di driver and software, follow the steps below: 1 28 (47) Click the Start menu, select Programs -> HM121dp/di DSL Modem -> Uninstall.
Uninstalling and Updating Modem Software 4 When the below notification message appears, unplug the modem from your PC and click OK.
Uninstalling and Updating Modem Software 6 Remove all disks from their drives, select Yes, reboot the computer now, and click Close to reboot. Note: The USB cable must be unplugged before the system is rebooted. 6.2 Updating Modem Software Once the HM121dp/di has been installed, updating to a new version of the software is an easy process.
Uninstalling and Updating Modem Software Note: Before you uninstall the driver, view the current configuration via Start -> Programs -> HM121dp/di DSL Modem -> Configure. Write down your modem settings, e.g. VPI/VCI values, encapsulation, etc. You will need to provide these information when installing the new driver.
Troubleshooting 7 Troubleshooting This chapter provides some tips and solutions for resolving some of the problems that might encounter while installing or using your modem. 7.1 The USB Cable Connected First If the USB cable is connected between the modem and the PC before the Installation CD is inserted, the "Add/Found New Hardware Wizard" will start indicating that new drivers are required. If this is the case, follow the steps below: 7.2 1 Disconnect the USB cable from the PC.
Troubleshooting LED Status Description DATA Flashing Transmitting or receiving data Off No data traffic The Control Panel can also be used to view the current state of the ADSL connection. Follow the steps below to access the Control Panel: 1 Double-click on the ADSL Modem icon (two arrows) in your PC's system tray. 2 When the Control Panel windows appears, select the "Physical Link" tab: State indicates TRAINING when the ADSL line is "training" to achieve the optimum transmission rate.
Important Information 8 Important Information 8.1 Product Care and Maintenance Note: This is guidelines for safe and efficient use. Read this information before using your Ericsson ADSL Modem HM121dp/di. Your ADSL Modem HM121dp/di is a highly sophisticated electronic device. To get the most out of your modem, be sure to read the following text about product care, safety and efficient use. Do not expose the product to liquid or moisture.
Important Information You may not: subject to when applicable, the EC Council Directive of May 14, 1991 on the legal protection of computer programs (91/250/EEG) ("Software Directive" Article 6) distribute copies of this Software or its documentation to others; modify, rent, lease or grant your rights to this Software to third parties (except in the event the Ericsson product containing an item of Software is transferred to a third party and provided the transferee agrees in writing to be bound by the terms
Important Information 8.2.5 Limitation of Liability If no event shall Vendor or its suppliers be liable for any indirect or consequential losses or damages whatsoever including loss of data, loss of business, loss of profits, business interruption or personal injury arising out of the use of or inability to use this Software. Vendor and its suppliers entire liability under this Agreement shall be limited to the amount actually paid by Licensee for the Software. 8.2.
Important Information 8.3 Regulatory Information 8.3.1 Europe 8.3.1.
Important Information 38 (47) EN/LZT 108 6429 R1 May 2003
Important Information 8.3.2 USA The Ericsson ADSL Modem HM121dp/di is cULus approved according to UL 1950 and also to FCC Part 15 and Part 68 as described in the following sections.
Important Information Note: This information is only applicable for units sold for the U.S. market. 8.3.2.1 UL Required Information When using your telephone equipment, basic safety precautions should always be followed to reduce the risk of fire, electric shock and injury to persons, including the following: 1 2 3 Do not use this product near water, for example, near a bathtub, washbowl, and kitchen sink or laundry tub, in a wet basement or near a swimming pool.
Important Information • Consult your service provider or an experienced radio/TV technician for help.
Important Information 42 (47) EN/LZT 108 6429 R1 May 2003
Important Information 8.3.2.2.2 FCC Part 68 The Federal Communications Commission (FCC) has established Rules which permit this device to be directly connected to the telephone network. Standardized jacks are used for these connections. This equipment should not be used on party lines or coin phones. If this device is malfunctioning, it may also be causing harm to the telephone network; this device should be disconnected until the source of the problem can be determined and until repair has been made.
Important Information 8.3.5 44 (47) Intended Use The HM121dp/di is intended for indoor public and private use.
Glossary Glossary ADSL Short for Asymmetric Digital Subscriber Line, a technology that allows more data to be sent over existing copper telephone lines (POTS). ADSL support data rates of fromm 1.5 to 9 Mbps when receiving data (known as the downstream rate) and from 16 to 640 Kbps when sending data (known as the upstream rate). ATM Short for Asynchronous Transfer Mode, a network technology based on transferring data in cells or packets of a fixed size.
Glossary G.lite A kind of asymmetric DSL technology, based on DMT modulation, that offers up to 1.5 megabits per second downstream bandwidth, 384 Kilobits per second upstream, does not usually require a splitter and is easier to install than other types of DSL. "G.lite" is a nickname for the standard officially known as G.992.2. IP address An identifier for a computer or device on a TCP/IP network. Networks using the TCP/IP protocol route messages based on the IP address of the destination.
Glossary USB Short for Universal Serial Bus, an external bus standard that supports data transfer rates of 12 Mbps. A USB port can be used to connect peripheral devices, such as mice, modems, and keyboards. USB also supports Plug-and-Play installation and hot plugging. User name A name used to gain access to a computer system. User names (and often passwords) are required in multiuser systems.