
User guide


NAT Configuration
EN/LZT 108 6492 R1 49 (98)
April 2003
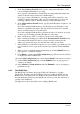
8 On the NAT Configuration page, ensure that the Enable radio button is selected.
9 On the NAT Configuration page, click the Submit button. A page appears to
confirm your changes.
10 Select Admin > Commit & Reboot and click Commit to save your changes to
permanent storage.
8.5.5 The BIMAP Rule
Unlike the other NAT flavors, the BIMAP flavor performs address translations in both
the outgoing and incoming directions.
In the incoming direction, when the specified interface receives a packet destined to
your public IP address, this address is translated to the private IP address of a
computer on your LAN.
In the outgoing direction, the private source IP address in a data packet is translated to
the LAN's public IP address.
BIMAP rules can be used to provide external access to a LAN device. They do not
provide the same level of security as RDR rules, because RDR rules also reroute
incoming packets based on the port ID. BIMAP rules do not account for the port
number, and therefore allow external access regardless of the destination port type
specified in the incoming packet.
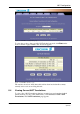
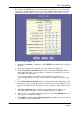
Figure 40: NAT Rule BIMAP - Add
1 Display the NAT Rule - Add page, select BIMAP as the Rule Flavor and type a
Rule ID.
2 Select the interface and, if desired, a protocol that this rule applies to.
3 In the Local Address field, type the private IP address of the computer to which
you are granting external access.
4 In the Global Address field, type the address that you want to serve as the
publicly known address for the LAN computer.
5 When you have completed entering all information, click the Submit button. A
page appears to confirm the change.
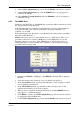
6 Click Close to return to the NAT Configuration page. The new rule should now
be displayed in the NAT Rule table.
7 On the NAT Configuration page, ensure that the Enable radio button is selected.