IP Phone Installer Guide LIP-8002/8002A SIP (Session Initiation Protocol) iPECS Please read this manual carefully before installation. Retain it for future reference.
LIP-8002/8002A iPECS Installer Guide Regulatory and Safety Notices LIP-8002/8002A 1. Radio Frequency Emissions FCC Compliance statement: This device complies with Part 15 rules. Operation is subject to the following two conditions; 1. This device may not cause harmful interference, and 2. This device must accept any interference received, including interference that may cause undesired operation.
LIP-8002/8002A iPECS Installer Guide Care & Precautions: Before connecting or using your new phone, take a moment to consider safety and reliability. Use common sense when locating, connecting and using your IP Phone LIP-8002/8002A . Locate on a dry level surface away. Keep the phone away from the edges of the surface to avoid the potential of a fall. Locate cables to avoid potential for damage. For example, do not locate under rugs or carpet as damage may result from foot traffic or heavy objects.
LIP-8002/8002A iPECS Installer Guide Table of Contents 1. Introducing the LIP-8002/8002A ............................................................................1 1.1 The IP Phone LIP-8002/8002A Overview .........................................................................1 2. Installing the LIP-8002/8002A ................................................................................4 2.1 Connecting the IP Phone .................................................................................
LIP-8002/8002A iPECS Installer Guide 3.6.2.2 3.6.3 3.6.4 3.6.5 Ringer Off ................................................................................................................29 Flexible Button Setting.............................................................................................29 Time Configuration ..................................................................................................30 3.6.5.1 3.6.5.2 3.6.5.3 3.6.5.4 3.6.5.5 3.6.6 Trunk Ring Type.................
LIP-8002/8002A iPECS Installer Guide 4.10 Call Log...........................................................................................................................64 4.11 Network Time Configuration...........................................................................................65 4.12 Upgrade Configuration....................................................................................................67 4.13 QoS Configuration .........................................................
LIP-8002/8002A iPECS Installer Guide 1. Introducing the LIP-8002/8002A 1.1 The IP Phone LIP-8002/8002A Overview The LG-Ericsson IP phone (LIP-8002/8002A) is Internet Protocol (IP) phones designed to support hosted telephony services over a managed IP network. Based on the open standard Session Initiation Protocol (SIP), LIP-8002/8002A interoperates and exchanges signaling messages with SIP call servers, proxies and gateways to establish, maintain and terminate calls.
LIP-8002/8002A iPECS Installer Guide Phone Book Private line Private Hold Speakerphone, full duplex Speed dial buttons Speed number dialing Station-to-Station dialing Volume control (handset, speakerphone, and ring) 3-Way conference For ease of use, the LIP-8002/8002A is equipped with fixed buttons, flexible (programmable) buttons, an LCD display, menu navigation buttons, and a dial pad. Figure 1.1-1illustrates these elements of the LIP-8002/8002A.
LIP-8002/8002A iPECS Number 1 2 3 4 5 6 7 8 9 10 11 Installer Guide Function Left button - Move to the previous menu in the settings menu. Right button Up button - When the phone is in the idle state, accesses the call log. Down button - When the phone is in the idle state, accesses the phonebook. OK button - Select a current item or save a value in the settings menu. Retrieve a hold Call button (In Hold State) - Use to retrieve a hold call.
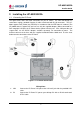
LIP-8002/8002A iPECS Installer Guide 2. Installing the LIP-8002/8002A 2.1 Connecting the IP Phone The figure below shows the cable connections for your IP Phone. The LAN and desktop PC connections employ standard Category 5 cables terminated with RJ-45 connectors. The LIP8002 supports PoE (Power over Ethernet) in accordance with the IEEE-802.1af standard. (The LIP-8002A doesn’t support PoE and can use only the supplied adaptor.
LIP-8002/8002A iPECS 3 Power 4 Handset Installer Guide The LIP-8002 supports PoE. So, if the LAN port supports PoE, IEEE 802.3af compliant, Class 2, the AC/DC adapter is not required. If not supported, connect the IP Phone power port to the DC out of Power Adapter. Connect the Power Adapter AC plug to an AC wall jack. The LIP-8002A doesn’t support PoE. So, must connect the IP Phone power port to the DC out of Power Adapter. Connect the Power Adapter AC plug to an AC wall jack.
LIP-8002/8002A iPECS Installer Guide Remove the Handset hook from the phone as shown in the figure below. Reverse the hook and re-install in the IP Phone so that the hook catches the groove in the handset receiver. Complete all wiring as described in section 2.1. Figure 2.2-1 LIP-8002/8002A Wall Mount Installation 2.3 Provisioning the LIP-8002/8002A LIP-8002/8002A supports ‘plug and play’ installation employing the automated provisioning process described in Appendix F.
LIP-8002/8002A iPECS Installer Guide o o Default gateway address Subnet mask Two methods are available for manual configuration. The LCD Configuration Menu permits local configuration using the dial pad, see section 3 The second method employs the LIP8002/8002A Web Manager, which allows access to the IP phone configuration using a Web browser, see section 4. Manual configuration permits assignment of all parameters required to gain full operation of the IP phone.
LIP-8002/8002A iPECS Installer Guide 3. Using the LCD Configuration Menu This chapter provides detailed information to configure the LIP-8002/8002A using the LCD Configuration Menu. The LCD displays the configuration menu. The dial pad select menu items and input values. A configuration session begins by pressing the Settings ( ) button, which accesses the LCD Configuration Menu shown in Figure 3-1.
LIP-8002/8002A iPECS Installer Guide 1. Network Configuration 1. Network Mode 2. IP Address 3. Subnet Mask 4. Default Gateway 2. SIP Configuration 5. Primary DNS Address 1. VLAN Priority (LAN) 6. Secondary DNS Address 2. VLAN ID (LAN) 7. MAC Address 3. VLAN Priority (PC) 8. VLAN Settings 4. VLAN ID (PC) 1. Line Configuration 1. Call Server Address 2. Outbound Proxy Addr. 2. Proxy Port 3. Outbound Proxy Port 3. Display Name 4. Backup Proxy Address 4. Name 5. Backup Proxy Port 5. Auth.
LIP-8002/8002A iPECS 3.1 Installer Guide Navigating the LCD Configuration Menu The IP phone must be idle to access the configuration menu and may be password protected (Locked). If locked, advanced configuration parameters can be viewed, however, data entry is not possible. Refer to section 3.3. To access the configuration menu: Press the Settings ( ) button.
LIP-8002/8002A iPECS Installer Guide data displays while the menu is locked however, the menu must be unlocked using the password in order to change advanced parameters. Parameters under the ‘Phone Settings’ item listed below are not subject to the lock feature, allowing the user access without the need to enter a password.
LIP-8002/8002A iPECS 3.4 Installer Guide Network Configuration Under Network Configuration are the Network mode (DHCP or static), various IP addresses, DNS (Domain Name Service), and other LAN parameters. In addition, the IP phone MAC (Media Access Control) address can be viewed. When using the WiFi Module refer to section 5 for the Network Configuration sub-menus. Changing network parameters requires a reboot of the IP phone; when you exit the LCD Configuration Menu, you will receive a reboot notice.
LIP-8002/8002A iPECS Installer Guide Press the digit, or move the cursor to 1.Network Configuration using the navigation buttons and press the OK button. digit, or move the cursor to 2.IP Address using the navigation buttons and Press the press the OK button. Input the IP Address using the dial pad and press the OK button to save your entry. Move to another parameter with the navigation buttons and continue the session or press the Settings ( ) button to exit the configuration session.
LIP-8002/8002A iPECS Installer Guide Press the Settings ( ) button. If the LCD Menu is locked, use the unlock procedure. Refer to section 3.3. digit, or move the cursor to 1.Network Configuration using the navigation Press the buttons and press the OK button. Press the digit, or move the cursor to 4.Default Gateway using the navigation buttons and press the OK button. Input the Default Gateway IP address using the dial pad and press the OK button to save your entry.
LIP-8002/8002A iPECS 3.4.6 Installer Guide Secondary DNS Address With an FQDN assigned as any of the servers in the IP phone configuration, the IP phone contacts the primary DNS server to resolve the FQDN to an IP address. Should the primary not respond, the IP phone contacts a secondary DNS for FQDN resolution. This is an optional but recommended setting. To assign the Secondary DNS Address: Press the Settings ( ) button. If the LCD Menu is locked, use the unlock procedure. Refer to section 3.3.
LIP-8002/8002A iPECS 3.4.8 Installer Guide VLAN Settings VLAN settings define the Ethernet frame priority and VLAN identification in accordance with IEEE 802.1p/Q standards. Separate VLAN tags are assigned for the IP Phone PC port and the LAN (voice) port. With a VLAN Id assigned, only frames with the assigned Id are accepted, and all SIP and voice frames sent by the LIP-8002/8002A include the VLAN Id assigned to the LAN port.
LIP-8002/8002A iPECS Installer Guide To assign the VLAN ID for the LAN (voice) port: Press the Settings ( ) button. If the LCD Menu is locked, use the unlock procedure. Refer to section 3.3. digit, or move the cursor to 1.Network Configuration using the navigation Press the buttons and press the OK button. Press the digit, or move the cursor to 8.VLAN Settings using the navigation buttons and press the OK button. digit, or move the cursor to 2.
LIP-8002/8002A iPECS Installer Guide 3.4.8.4 VLAN ID (PC) The VLAN ID (PC) assigns the identification for Ethernet frames for the IP Phone PC port. Setting the VLAN ID to zero (0) disables VLAN framing and the IP Phone uses only standard Ethernet frames. To assign the VLAN ID (PC) port: Press the Settings ( ) button. If the LCD Menu is locked, use the unlock procedure. Refer to section 3.3. Press the digit, or move the cursor to 1.
LIP-8002/8002A iPECS Installer Guide Press the digit, or move the cursor to 1.Call Server Address using the navigation buttons and press the OK button. Input the Call Server Address or FQDN using the dial pad and press the OK button to save your entry. Move to another parameter with the navigation buttons and continue the session or press the Settings ( ) button to exit the configuration session.
LIP-8002/8002A iPECS Installer Guide Press the digit, or move the cursor to 1.Line Configuration using the navigation buttons and press the OK button. digit, or move the cursor to 3.Display Name using the navigation buttons and Press the press the OK button. Input the Display Name using the dial pad and press the OK button to save your entry. Move to another parameter with the navigation buttons and continue the session or press the Settings ( ) button to exit the configuration session.
LIP-8002/8002A iPECS Installer Guide Press the digit, or move the cursor to 1.Line Configuration using the navigation buttons and press the OK button. digit, or move the cursor to 5.Auth. Username using the navigation buttons Press the and press the OK button. Input the Authentication User Name using the dial pad and press the OK button to save your entry.
LIP-8002/8002A iPECS Installer Guide 3.5.1.7 Registration Status The status of the line registration with the SIP call server can be viewed. The status is displayed as OK, NOK (Not OK) or undefined. The latter displays when no call server address is assigned. To view the Registration status for a line: Press the Settings ( ) button. Press the digit, or move the cursor to 2.SIP Configuration using the navigation buttons and press the OK button. digit, or move the cursor to 1.
LIP-8002/8002A iPECS Installer Guide 3.5.2.2 Outbound Proxy Port With the Outbound Proxy Server defined, the associated port must be defined as the Outbound Proxy Port. All SIP requests are sent to the assigned port instead of the proxy port configured in section 3.5.1.2. To assign the Outbound Proxy Port: Press the Settings ( ) button. If the LCD Menu is locked, use the unlock procedure. Refer to section 3.3. Press the digit, or move the cursor to 2.
LIP-8002/8002A iPECS Installer Guide 3.5.2.4 Backup Proxy Port The Backup Proxy Port defines the port used when sending SIP messages to the backup proxy defined under section 3.5.2.3. To assign the Backup Proxy Port: Press the Settings ( ) button. If the LCD Menu is locked, use the unlock procedure. Refer to section 3.3. Press the digit, or move the cursor to 2.SIP Configuration using the navigation buttons and press the OK button. digit, or move the cursor to 5.
LIP-8002/8002A iPECS Installer Guide To assign an RTP Start Port: Press the Settings ( ) button. If the LCD Menu is locked, use the unlock procedure. Refer to section 3.3. digit, or move the cursor to 2.SIP Configuration using the navigation buttons Press the and press the OK button. Press the digit, or move the cursor to 7.RTP Start Port using the navigation buttons and press the OK button. Input the RTP Start Port using the dial pad and press the OK button to save your entry.
LIP-8002/8002A iPECS Installer Guide Press the digit, or move the cursor to 2.SIP Configuration using the navigation buttons and press the OK button. digit, or move the cursor to 9.Register Expires using the navigation buttons Press the and press the OK button. Input the registration expiration time using the dial pad and press the OK button to save your entry.
LIP-8002/8002A iPECS Installer Guide Move to another parameter with the navigation buttons and continue the session or press the Settings ( ) button to exit the configuration session. Changing the Domain requires a reboot of the IP Phone; when you leave the menu, you will receive a reboot notice. The IP Phone must reboot to utilize the new values entered. To enter alphanumeric characters select the Mode button. Refer to Appendix E for the character mapping of dial pad digits. 3.
LIP-8002/8002A iPECS 3.6.2 Installer Guide Ring Setting The IP Phone uses one of 4 ring signals (Ring Types) or no ring (“Ringer Off”) for incoming call notification. The Phone Book record may have a different ring type assigned including “Ringer Off” and “Default Ring”. The “Default Ring Type” is used when a ring type is “Default Ring”. By assigning different ring signals to closely located phones, Phone Book records, the user can identify the ringing phone or caller. 3.6.2.
LIP-8002/8002A iPECS 3.6.3 Installer Guide Ringer Off The IP Phones can be programmed not to ring when an incoming call is received. To set the Ringer Off parameter: Press the Settings ( ) button. Press the digit, or move the cursor to 3.Phone Settings using the navigation buttons and press the OK button. digit, or move the cursor to 3.Ringer Off using the navigation buttons and Press the press the OK button. Select Yes or No using the Up/Down navigation button and press the OK button.
LIP-8002/8002A iPECS Installer Guide Press the digit, or move the cursor to 3.Phone Settings using the navigation buttons and press the OK button. digit, or move the cursor to 4.Flexible Button using the navigation buttons and Press the press the OK button. Select the desired flexible button. Select a function using Up/Down navigation button and press the OK button. Refer to the Table 3.6.5-1 Flexible Button Functions.
LIP-8002/8002A iPECS Installer Guide Move to another parameter with the navigation buttons and continue the session or press the Settings ( ) button to exit the configuration session. To enter alphanumeric characters select the Mode button. Refer to Appendix E for the character mapping of dial pad digits. 3.6.5.2 Time Zone For proper operation of the clock, the IP Phone requires the local time zone. To enter the Time Zone: Press the Settings ( ) button. digit, or move the cursor to 3.
LIP-8002/8002A iPECS Installer Guide 3.6.5.4 Time Format The format of the LCD time display can be set to display time in the 12-hour format or 24-hour format. In addition, the LCD time display can be disabled. To set the display format for time: Press the Settings ( ) button. Press the digit, or move the cursor to 3.Phone Settings using the navigation buttons and press the OK button. digit, or move the cursor to 5.Time Configuration using the navigation buttons Press the and press the OK button.
LIP-8002/8002A iPECS 3.6.6 Installer Guide S/W Update Within the S/W Update selection, the type of provisioning (TFTP/HTTPS), the Server Address, HTTPS Verification settings and DHCP Options can be viewed and changed. 3.6.6.1 Provisioning Type The LIP-8002/8002A supports two provisioning protocols: - Trivial File Transfer Protocol (TFTP) – a simple transfer mechanism using UDP but lacks security and TFTP ports are often blocked at firewalls.
LIP-8002/8002A iPECS Installer Guide Press the digit, or move the cursor to 2.TFTP Server Address using the navigation buttons and press the OK button. Input the TFTP Server Address using the dial pad, and press the OK button to save your entry. Move to another parameter with the navigation buttons and continue the session or press the Settings ( ) button to exit the configuration session.
LIP-8002/8002A iPECS Installer Guide 3.6.6.3.2 Username In some cases, the HTTP/HTTPS server requires a Username (Id) and Password for authentication prior to allowing file access. To set the Username: Press the Settings ( ) button. If the LCD Menu is locked, use the unlock procedure. Refer to section 3.3. digit, or move the cursor to 3.Phone Settings using the navigation buttons and Press the press the OK button. Press the digit, or move the cursor to 6.
LIP-8002/8002A iPECS Installer Guide Changing the Password requires a reboot of the IP Phone; when you leave the menu, you will receive a reboot notice. The IP Phone must reboot to utilize the new values entered. To enter alphanumeric characters select the Mode button. Refer to Appendix E for the character mapping of dial pad digits. 3.6.6.3.4 HTTPS URL DHCP Option Number An unused DHCP option can be used to define the HTTPS provisioning server URL. As a default, the IP Phone uses DHCP option 160.
LIP-8002/8002A iPECS Installer Guide Press the digit, or move the cursor to 6.S/W Update using the navigation buttons and press the OK button. button, or move cursor to 4.S/W Download Flag using the navigation buttons and Press press the OK button. Select Yes to enable the S/W Download, or select No to disable the S/W Download using the Up/Down navigation buttons and press the OK button.
LIP-8002/8002A iPECS Installer Guide To set the DHCP Options flag: Press the Settings ( ) button. If the LCD Menu is locked, use the unlock procedure. Refer to section 3.3. digit, or move the cursor to 3.Phone Settings using the navigation buttons and Press the press the OK button. Press the digit, or move the cursor to 6.S/W Update using the navigation buttons and press the OK button. digit, or move the cursor to 6.DHCP Option using the navigation buttons and Press the press the OK button.
LIP-8002/8002A iPECS 3.6.8 Installer Guide Speed Number LIP-8002/8002A includes a Phone Book that supports up to 100 entries. Each Phone Book record includes a two (2) digit Speed number, see section 3.8. When enabled, dialing the Speed Number (00~99) sends the contact information from the associated Phone Book record. To enable/disable Speed Number operation: Press the Settings ( ) button. Press the digit, or move the cursor to 3.Phone Settings using the navigation buttons and press the OK button.
LIP-8002/8002A iPECS Installer Guide Press the digit, or move cursor to 3.Phone Settings using the navigation buttons, and press the OK button. digits, or move cursor to 10.Language using the navigation buttons, and Press the press the OK button. Select a Language from the list using the Up/Down navigation buttons, and press the OK button. Move to another parameter with the navigation buttons and continue the session or press the Settings ( ) button to exit the configuration session.
LIP-8002/8002A iPECS Installer Guide If Call Waiting is disabled, the IP Phone will reject the new call. The call server configuration determines routing of the incoming call. To enable/disable Call Waiting: Press the Settings ( ) button. If the LCD Menu is locked, use the unlock procedure. Refer to section 3.3. digit, or move the cursor to 4.Call Preferences using the navigation buttons Press the and press the OK button. Press the digit, or move the cursor to 2.
LIP-8002/8002A iPECS Installer Guide Press the digit, or move the cursor to 4.Call Hold Ringback using the navigation buttons and press the OK button. Select On to enable the Hold Ringback, or select Off to disable the Hold Ringback using the Up/Down navigation buttons and press the OK button. Move to another parameter with the navigation buttons and continue the session or press the Settings ( ) button to exit the configuration session. 3.7.
LIP-8002/8002A iPECS 3.7.7 Installer Guide Caller ID Blocking The IP Phone normally sends the assigned display name as the SIP caller id for outgoing calls. Optionally, the IP Phone can send “anonymous” as the caller id in SIP message headers. To enable/disable blocking of caller id: Press the Settings ( ) button. If the LCD Menu is locked, use the unlock procedure. Refer to section 3.3. Press the digit, or move the cursor to 4.Call Preferences using the navigation buttons and press the OK button.
LIP-8002/8002A iPECS 3.8.1 Installer Guide Dialing from the Phone Book To dial a number from the Phone Book: Press the Settings ( ) button. Press the digit, or move the cursor to 5.Directory using the navigation buttons and press the OK button. Press the digit, or move the cursor to 1.Phone Book using the navigation buttons and press the OK button. Select a contact to dial using the Up/Down navigation buttons. Press the OK button to place the call. 3.
LIP-8002/8002A iPECS Installer Guide Press the digit, or move the cursor to 9.Reboot using the navigation buttons, and press the OK button. Press the OK button to reboot. If you press Left navigation button in the above step, move to another parameter with the ) button to exit the navigation buttons and continue the session or press the Settings ( configuration session without activating the changes. Any parameter changes will update during the next reboot.
LIP-8002/8002A iPECS Installer Guide 4. Using Web Manager for Configuration The Web Manager is a web-based tool for configuring the IP Phone parameters. The Web Manager has access to parameters not available through the LCD Configuration Menu. Appendix A includes information on parameter availability. In addition to remote access to the IP Phone configuration, Web Manager is a more convenient tool when configuring a number of IP Phones or parameters of a single IP Phone.
LIP-8002/8002A iPECS Installer Guide Click LOGIN; the password page displays as below. Enter a valid User name and Password to display the Web Manager Site map shown in Figure 4-1. The default User name is private and the Password is lip. Figure 4.1-1 Site Map On the left is the Web Manager page-link window and in the main screen is a more detailed site map. Select the desired page from either the page-link or the site map window.
LIP-8002/8002A iPECS 4.2 Installer Guide VoIP Configuration Figure 4.
LIP-8002/8002A iPECS Installer Guide Within the VoIP screen, adjustable parameters are: - Line based parameters o Proxy Server Address is the IP address or FQDN of the SIP call server or SIP proxy. o Proxy Port is the server port for incoming requests and outgoing responses o Display Name is the name used as part of the IP Phone caller ID. The display name assigned for Line1 displays on the LCD display. o Name is the name used during registration.
LIP-8002/8002A iPECS Installer Guide o o o Start RTP Port is the port for Real-time Transport Protocol (voice) packets. SRTP can use the Secure RTP by using the SRTP crypto suite. Codec priority selects the priority for audio codecs. To modify a parameter: Select the parameter and modify the value. Select the button. Changing the configurations except the display name, delayed ring and VMS address requires a reboot of the IP Phone. When you leave the menu, you will receive a reboot notice.
LIP-8002/8002A iPECS 4.3 Installer Guide LAN Configuration Figure 4.3-1 LAN Configuration When the WiFi Module is installed, refer to section 5 for LAN Configuration. When the WiFi module is not installed, in the LAN screen the adjustable parameters are: - LAN Configuration o Network Selection is the IP address mode for the IP Phone. The radial button selects static or DHCP address mode. o Desired IP Lease Time is the IP Address Lease Time value included in DHCP packet made from IP Phone in DHCP mode.
LIP-8002/8002A iPECS Installer Guide To modify any of the addressing information Select the appropriate box and enter the new value. Changes can only be made if static network mode is selected. button to load new values to the IP Phone memory. When complete, select the The MAC address is fixed and cannot be modified. The IP address, subnet mask, etc. can only be changed if the static Network Mode is assigned. Changing any value in the LAN screen requires a reboot of the IP Phone.
LIP-8002/8002A iPECS 4.4 Installer Guide Call Preferences Figure 4.4-1 Call Preferences The IP Phone supports various user preferences as listed below. - Call Preferences o Caller ID Blocking enables and disables blocking the outgoing caller id. When enabled, the IP Phone sends the anonymous id. o Anonymous Call Block, when enabled, blocks incoming calls with an anonymous caller id.
LIP-8002/8002A iPECS Installer Guide o o o o o Call Waiting Function, when enabled, visually notifies the user of an incoming call while in a conversation. If disable, when in a conversation, a new call is refused and the call server routes the call. Call Waiting Tone, when the IP Phone is in use with call waiting enabled, a beep tone delivered over the existing call indicates an incoming call. Call Hold Ringback, when enabled, rings the phone if the user returns to idle with a call on hold.
LIP-8002/8002A iPECS 4.5 Installer Guide Dial Plan The IP Phone incorporates a Dial Plan, which monitors the user-dialed digits for patterns matching the dial plan number. If a match occurs, the phone modifies the digits and processes the call using instructions in the dial plan. 4.5.1 Digit Map Table Figure 4.5.1-1 Digit Map Tables Configuration Using the Digit Map Table, a string of 512 characters may be entered to define the dial plan.
LIP-8002/8002A iPECS Installer Guide - Pre defines digits to insert in the front of the truncated number. Post defines the digits to insert at the end of the truncated number. The following are examples of Dial Plans using the digit map tables. Simple Dial Plan Customer requirement: Process the call after any 7 digit number is dialed or if the Operator is dialed at digit ‘0’. Digit map routing entry The digit map of this Dial Plan is (0T|xxxxxxx).
LIP-8002/8002A iPECS 4.6 Installer Guide Phone Information Figure 4.6-1 Phone Information The Phone Information screen displays the version information of the LIP-8002/8002A and the phone name. In addition, it is possible to change the Web Manager password through this screen. To change the phone name: Enter the desired name. When complete, select the button to load new values to the IP Phone memory. To change the password: Enter the existing password. Enter the new password and confirm.
LIP-8002/8002A iPECS 4.7 Installer Guide Phone Settings Figure 4.7-1 Phone Settings In the Phone Settings screen, the following parameters may be modified. - Phone Settings o Frame Duration sets the interval to send/receive RTP packets in milli-seconds. o DTMF Relay selects the method for DTMF signaling (in-band, out-of-band or negotiate).
LIP-8002/8002A iPECS Installer Guide o o o o o o DTMF Payload sets the RFC 2833 payload type for DTMF signals. DTMF Duration sets the duration of DTMF signals sent from the phone in milliseconds. Lock Outgoing Call locks the IP Phone, requiring password entry to place a call. Use Speed Number enables or disables use 2-digit dialing to dial Phone Book contacts. Key Tone enables or disables the tone generated when a button on the IP Phone is pressed.
LIP-8002/8002A iPECS 4.8 Installer Guide Phone Book Figure 4.8-1 Phone Book The IP Phone includes a Phone Book with 100 contact records. Calls to a contact are made using the Speed number (00-99). The contact number or SIP user id is maintained in the Phone Book. In the Phone Book menu, records may be added, edited, deleted or searched. To add a Phone Book entry: Click the button and enter the new values in the Phone Book Entry screen. Address field is the contact’s phone number or SIP user id.
LIP-8002/8002A iPECS Installer Guide Figure 4.8-2 Add a Phone Book Entry When complete, select the button to store the record. To modify an entry: Select Modify for the desired record and enter the new values in the Phone Book Entry screen. to store the modified record. When complete, select To place a call using the Phone Book: Click the button for the desired contact. To delete specific entries from the Phone Book: Click the ‘Clear’ box for the desired records and select the records.
LIP-8002/8002A iPECS Installer Guide An example Phone Book and resulting file are shown below. Phone Book Speed Number Name Phone Number 1 Lee Myunghee 1000 2 baragirl 2000 3 lmh 3000 sample *.csv file SpeedNumber,Name,PhoneNumber,Information 1,Lee Myunghee,1000,lmh@abc.com 2,baragirl,2000, 3,lmh,3000,korea 62 Information lmh@abc.
LIP-8002/8002A iPECS 4.9 Installer Guide Flexible Button Figure 4.9-1 Flexible Button The LIP-8002/8002A has 4 flexible buttons. The buttons can be assigned to various functions. Refer to Table 3.6.5-1 for available functions. To change button functions: Select the function from the drop-down menu next to button. - For a Speed dial button, enter the contact number or user id. Click the button to store changes. To delete the function assigned to all flexible buttons: Select the button.
LIP-8002/8002A iPECS Installer Guide 4.10 Call Log Figure 4.10-1 Call Log The Call Log is a list of all calls (incoming, outgoing or missed) at the extension. The log indicates the type of call (I/C, O/G and MIS), the contacts name and contact information, time and duration of the call, and state of the call. From the Call log, the user can call a contact or store a call log record directly to the Phone Book. To add a number from the Call Log to the Phone Book list: Select the button.
LIP-8002/8002A iPECS Installer Guide 4.11 Network Time Configuration Figure 4.
LIP-8002/8002A iPECS Installer Guide The Network Time screen allows you to set up the configuration for time and daylight savings time. Within Network Time Configuration, the following parameters can be set. - Network Time Configuration o SNTP Server Address is the IP address or FQDN of the SNTP (Simple Network Time Protocol) server. o Time Zone defines the local time zone of the IP Phone. o DST Usage enables or disables Daylight Savings Time.
LIP-8002/8002A iPECS Installer Guide 4.12 Upgrade Configuration Figure 4.12-1 Upgrade Configuration In the Upgrade screen, the results of the most recent download attempt are displayed at the top of the screen. Upgrade result messages are defined in Appendix C. A log displays any error conditions for the configuration file download.
LIP-8002/8002A iPECS Installer Guide o o o o o o o TFTP Server Address assigns the IP address or FQDN of the TFTP server where configuration and software files are located. With the “Received by DHCP on boot” box checked, the IP Phone only uses the TFTP server retrieved with DHCP option 66 or 150. HTTPS URL is the URL of the HTTP/HTTPS server where configuration and software files are located.
LIP-8002/8002A iPECS Installer Guide 4.13 QoS Configuration Figure 4.13-1 QoS Configuration Diffserv Configuration On the QoS screen, the DiffServ Code Point (DSCP) and VLAN parameters are defined. DSCP or ToS establishes the priority of voice packets.
LIP-8002/8002A iPECS Installer Guide priority, handling higher priority packets first. However, at congested routers, higher priority packets are discarded first. Thus, a median value for DSCP is recommended. IEEE 802.1Q The VLAN tag defines the priority for Ethernet frames and the VLAN ID based on IEEE 802.1p/Q. The IP Phone PC and LAN (voice) ports use separate VLAN tags. With a VLAN ID assigned, only frames with the Id are accepted and frames sent by the IP Phone include the LAN port Id and priority.
LIP-8002/8002A iPECS Installer Guide 4.14 Load Default Figure 4.14-1 Load Default The Load Default page permits the IP Phone configuration to be returned to factory default values. Refer to Appendix A for details. To set the IP Phone memory to the default configuration: Select and confirm. The IP Phone loads the default configuration and reboots.
LIP-8002/8002A iPECS Installer Guide 4.15 Reboot Figure 4.15-1 Reboot The Reboot screen is used to reboot the IP Phone manually. To reboot the IP Phone: Select the button. The IP Phone saves and loads any changes in the configuration to active memory and reboots using the updated configuration.
LIP-8002/8002A iPECS Installer Guide 5. TroubleShooting 5.1 Information The LIP-8002/8002A provides the means to quickly view the Network parameters (IP address, default gateway address, and subnet-mask), server IP addresses (call server, TFTP server, and SNTP server), and results of the last file download attempt. Press the Settings button. Press the digit, or move cursor to 8.Information using the navigation buttons, and press the OK button.
LIP-8002/8002A iPECS 5.2 Installer Guide Troubleshooting Guide Table 5.2-1 Troubleshooting Symptom Corrective Action LCD Off 1. Switch power source ON 2. Check/replace AC/DC adapter 3. Check/correct input power from the LAN Handset off-hook, no dial tone 1. Assure the RJ-45 LAN cable is connected correctly. 2. Make sure that the call server IP Address is correct. DHCP server is not responding. Phone displays “DHCP 1. Check DHCP server. Searching” constantly, 2. Check VLAN settings.
LIP-8002/8002A iPECS Installer Guide Appendix A. Factory Default Configuration Factory default configurations are settings for the configuration, which are set at the factory. Table A-1 below gives the default values for configurable parameters. Table A-1 Default Configuration Config File Parameter/Field Default Value Network mode DHCP IP address 192.168.1.1 Subnet mask 255.255.255.0 Default gateway 192.168.1.254 Primary DNS address 0.0.0.0 Secondary DNS address 0.0.0.
LIP-8002/8002A iPECS Installer Guide Config File Parameter/Field Default Value Section Name SRTP Crypto Suite* AES_CM_128_HMAC_SHA1_80/ ARIA_CM_128_HMAC_SHA1_80/ ARIA_CM_192_HMAC_SHA1_80 SRTP* [DSP] Disable Register expires* 3600 seconds SIP session timer** 0 SIP T1 timer** 500 msec. SIP T2 timer** 4000 msec.
LIP-8002/8002A iPECS Installer Guide Config File Parameter/Field Default Value telnet_server** enabled Phone password Not assigned Function download_flag* enabled Function onetouch_pickup* enabled Function dnd* enabled Web Manger login name* private Section Name [NETTIME] Web Manager login password* lip Line Lock Out enabled Line Lock Out Time 30 sec NTP server address Not assigned Synchronization Interval** 24 hours Time zone GMT+00:00 DST enable Off DST start configuration*
LIP-8002/8002A iPECS Installer Guide NOTE: Parameters marked with an asterisk, , cannot be modified via the LCD Configuration Menu. Parameters mark with double asterisk, , can only be modified using the configuration file download.
LIP-8002/8002A iPECS Installer Guide Appendix B. LIP-8002/8002A Specification Table B-1 provides the basic specifications of the IP Phone. Table B-1 LIP-8002/8002A Specifications Item LIP-8002/8002A Network Interface RJ-45 IEEE 802.3 Ethernet/Fast Ethernet switch port PC/Workstation Interface RJ-45 IEEE 802.3 Ethernet/Fast Ethernet switch port Power 802.3af or AC/DC Power Adapter LED Indicators Message Indicator LCD 128 x 32 dot graphic Physical Size (H x W x D) 19.5cm x 19.5cm x 11.
LIP-8002/8002A iPECS Installer Guide Appendix C. Download LCD Messages Table C-1 provides the messages displayed for the most recent software download attempt. Table C-1 Software Download Message Message Description LOAD FLAG OFF S/W load is disabled NULL SERVER ADDR TFTP/WEB server address is 0.0.0.
LIP-8002/8002A iPECS Installer Guide Appendix D. Using the Configuration File During automated provisioning with the Config. Download flag, section 4.12 enabled, IP Phones attempt to download a global and a phone specific configuration file from a TFTP or Web server supporting HTTP/HTTPS. The global file, “sysconf_8002_sip.cfg”, is typically for parameters with the same value for all IP Phones connecting to the server.
LIP-8002/8002A iPECS Installer Guide Table D-1 Configuration Parameters Field Name Section LAN network_mode ipAddress defaultGateway subnetMask dns1_address dns2_address domain_name tftp_server_address tos pc_802_priority phone_802_priority Description Sets use of DHCP or static addressing. In static mode, IP parameters are set manually.
LIP-8002/8002A iPECS Installer Guide Field Name Section pc_vlan_id phone_vlan_id NETTIME sntp_server_address interval timezone time_format date_format dst_auto_adjust dst_start_month dst_start_day_of_week dst_start_week_of_month dst_start_time dst_stop_month dst_stop_day_of_week Description Assigns unique identifier of the VLAN for the PC port. A ‘0’ disables VLANS. Valid values are 0 to 4094 Default is 0, disable. Assigns unique identifier of the VLAN for the LAN (voice) port.
LIP-8002/8002A iPECS Installer Guide Field Name Section dst_stop_week_of_month dst_stop_time VOIP outbound_proxy_server outbound_proxy_port backup_proxy_server back_proxy_port message_url SIP_service_domain preferred_codec rtp_port outbound_proxy_register prack_mode user_param replaces_mode local_udp_port Description Sets week of month DST ends. Valid values are 1 to 6 and 7, with 1 being the first week, each number thereafter being subsequent weeks.
LIP-8002/8002A iPECS Installer Guide Field Name Section local_tcp_port local_tls_port tcp_port tls_port transport_mode tls_crypto srtp_crypto srtp_use timer_register_expires timer_session timer_t1 timer_t2 Description Defines local TCP port used for SIP messages. Valid values are from 1024 to 32000. Default is 5060. Defines TLS port used for SIP messages.. Valid values are from 1024 to 32000. Default is 5061. Defines TCP port used for SIP messages. Valid values are from 1024 to 32000.
LIP-8002/8002A iPECS Installer Guide Field Name Section de_register line1_proxy_address line1_proxy_port line1_displayname line1_name line1_authname line1_password line1_delayed_ring DSP handsfree handset ring lcd ringer_off VAD Description Enables de-registration of each line during a reboot prior to re-registering. Valid values are enable or disable Default is enable Assgin the proxy address for the SIP proxy server. Valid value is an IP address or FQDN. Default is blank.
LIP-8002/8002A iPECS Section Installer Guide Field Name ring_type alert_ring_type external dtmf_payload dtmf_duration cadence0 cadence1 cadence2 cadence3 cadence4 cadence5 cadence6 Description Specifies the default ring type for the IP Phone. Ring type can be a value from 1 to 4. The default is 1. Specifies the external ring type for the IP Phone. Ring type can be a value from -1 to 4: • -1, Default ring • 0, ring off. • 1 ~ 4, ring type 1 to 4 (tone ring), The default is -1.
LIP-8002/8002A iPECS Section Installer Guide Field Name cadence7 cadence8 cadence9 cadence10 cadence11 frame_duration jitterbuffer_min_delay jitterbuffer_nom_delay jitterbuffer_max_delay Description Sets the ring cadence for calls with community-1 call in Alert Info header. The valid value is an eight value time array (on off on off on off on off). The valid range is 0 to 30000 milliseconds total time.
LIP-8002/8002A iPECS Installer Guide Field Name Section dtmf key_tone FWRD condition forwarding_address DIAL dial_mode pause_timer inter_digit_timer digitmap digitmap_tone digitmap_emergency Description Sets the method to determine RFC 2833 payload type. Valid values are: • inband — Always generate in-band DTMF. • nego — Negotiate RFC2833 with remote side. • rfc2833 — Always generate DTMF digits out-of-band RFC2833. • info — Always generate DTMF digits out-of-band in INFO message.
LIP-8002/8002A iPECS Section Installer Guide Field Name digitmap_process PROG add prog func num label prog string CALL callnum_in_line caller_id_blk anonymous_call_blk call_waiting Description Defines the digit map process for a dial plan. Valid values are: • num: the digitmap string, maximum 512-characters. • trunc: number of digits to strip, 0 to 30. • prefix: digits to insert in front of the number, maximum 32 digits. • post: digits to insert at the end of the number, maximum 32 digits.
LIP-8002/8002A iPECS Installer Guide Field Name Section call_waiting_tone call_hold_ringback msg_waiting_tone auto_answer call_direct call_direct_number call_direct_timer SYSTEM phone_name lang lock_outgoing_call use_speed_number web_server telnet_server function_dnd Description Controls audible notification when Call Waiting is enabled Valid values are enable or disable. Default is enable. Sets Held call ringback. If a user returns to idle with a call on hold, the held line will ring.
LIP-8002/8002A iPECS Installer Guide Field Name Section function onetouch_pickup function download_flag llo_use llo_time phone_password PROVISI ON type cfg_downlaod sw_downlaod dhcp_get_tftp dhcp_get_http https_url https_opt https_id https_password Description Enables call answer or resume from hold by pressing line button. With the parameter disabled, pressing the line button displays the line status. Valid values are enable or disable. The default is enable.
LIP-8002/8002A iPECS Section Installer Guide Field Name https_macform smartup_use smartup_type smartup_interval smartup_time smartup_confirm dhcp_lease_duration Description Specifies the filename of phone specific configuration file. The name or path must include “$MAC”, which is replaced by the MAC address during provisioning. The valid value is a maximum of 50 characters and includes “$MAC”. The default is “$MAC”. Enables Smart Update, to check for and download firmware periodically.
LIP-8002/8002A iPECS Installer Guide ;========================================================================= ;LIP-8002 configuration information(v1.0) ;copyright LG-Ericsson since 2010 ;========================================================================= ;Description for configuration file ;configuration file has following format ; SECTION-NAME is placed in brackets as shown below and includes LAN, VOIP, DSP, etc...
LIP-8002/8002A iPECS Installer Guide preferred_codec rtp_port outbound_proxy_register outbound_proxy_mode prack_mode user_param replaces_mode local_udp_port tcp_port local_tcp_port tls_port local_tls_port transport_mode srtp_use srtp_crypto tls_crypto timer_register_expires timer_session timer_t1 timer_t2 de_register line1_proxy_address line1_proxy_port line1_displayname line1_name line1_authname line1_password line1_delayed_ring [DSP] ;DSP configurations handsfree handset ring lcd ringer_off VAD ring_typ
LIP-8002/8002A iPECS Installer Guide jitterbuffer_max_delay dtmf key_tone [FWRD] ;Forwarding Configurations condition forwarding_address [DIAL] ;Dial Configurations dial_mode pause_timer inter_digit_timer digitmap digitmap_tone digitmap_emergency digitmap_process [PROG] ;add prog func [num] ; prog = programmable button number, 1 ~ 4 ; func = 0 for no function ; 1 for Speed Dial ; 2 for Phone Book ; 3 for Call Log ; 4 for Mute ; 6 for Redial ; 7 for Return ; 8 for FWRD ; 9 for CONF ; 1
LIP-8002/8002A iPECS Installer Guide [SYSTEM] ;System Configurations phone_name lang lock_outgoing_call use_speed_number web_server_port web_server telnet_server function download_flag function onetouch_pickup function dnd llo_use llo_time phone_password [PROVISION] ;Provisioning Configurations type cfg_download sw_download dhcp_get_tftp dhcp_get_http https_url https_opt https_id https_password https_macform smartup_use smartup_type smartup_interval smartup_time smartup_confirm dhcp_lease_duration 97
LIP-8002/8002A iPECS Installer Guide Appendix E. Dial Pad Mode The LIP-8002/8002A dial pad inputs digits or alphanumeric characters for specified entries such as hostname. Table E-1 provides the input information for dial pad mode.
LIP-8002/8002A iPECS Installer Guide Appendix F. Auto Provisioning Routine General The LIP-8002/8002A incorporates software routines to automatically provision the configuration and software of the phone. To initialize LAN settings, DHCP to gather basic network and provisioning server information, downloads configuration and software files from the provisioning server, and registers and subscribes with the SIP call server using the configuration data.
LIP-8002/8002A iPECS Installer Guide After completing download of the configuration files, the IP Phone requests the software version file from the server. This file, which is named “IP_8002_VER_SIP2”, is an ASCII text file that identifies the software version available on the server as well as the names of software files to be downloaded. The phone compares the software version identified in the file with the version in the phone. If different, the files identified in the version file are downloaded.
LIP-8002/8002A iPECS Installer Guide download. The phone first requests the file “mac address”/IP_8002_VER_SIP2, if not found, the file IP_8002_VER_SIP2 is requested. The phone compares the software version identified in the file with the version in the phone. If different, the files identified in the version file are downloaded. Typically, the files required for download include the main firmware file and an xml file but may include other files as needed for the upgrade.
LIP-8002/8002A iPECS Installer Guide Dec.