
User's Manual


57
Handling Paper and Other Media | 57
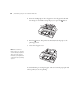
3. If the paper is not positioned correctly, press the d or u buttons to
match the cutting position on the paper with the cutting position on the
left side of the print head.
4. Press the button.
5. When the confirmation is displayed on the screen, press d to highlight
Cut, then press OK. The paper is cut.
Adjusting the Platen Gap for Thick or Thin Paper
When you print on unusually thick or thin paper, you may need to adjust
the platen gap setting. Normally, the
STANDARD setting allows the printer
to adjust automatically. However, if print quality is not satisfactory when
using very thin or very thick stock, you may need to change this setting
.
Follow these steps:
1. Press the
Menu button. PRINTER SETUP appears on the display.
2. Press the
Menu button again to display PLATEN GAP.
3. Press the
Menu button. STANDARD is displayed as the current setting.
4. Use the d or u buttons to change the setting. (
STANDARD is the
default setting; you can also choose
NARROW, WIDE, WIDER, or
WIDEST.)
5. Press the
OK button to save the setting. A checkmark appears next to the
selected setting.
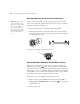
6. Press the l Paper Source button to exit the menu.
If you’ve selected a non-standard platen gap, the icon appears on the
LCD screen to remind you of the narrow or wide setting. When you switch
media, don’t forget to change the setting back to
STANDARD.
If you’re printing on non-Epson media, you may also need to create a paper
configuration to optimize your results. See the following section for more
information.
Caution: To avoid
damaging the printer,
make sure you do not
select the NARROW
setting when you print
on heavy media.