
User's Manual

101
Printing With Epson Drivers for Macintosh | 101
Creating a Custom Preset and Printing
Once you’ve made the correct settings for your print job, create a
custom preset. This will save you time when you use the same
profile/printer/ink/media combination for future print jobs.
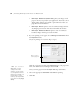
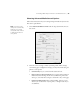
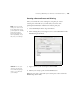
1. Select
Summary from the drop-down menu.
2. After verifying that your settings are correct, select
Save As from the
Presets drop-down menu.
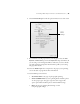
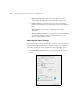
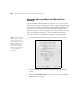
3. Type a name for your custom preset and click
OK.
4. When you’re ready to print, click the
Print button.
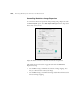
Whenever you want to print with your custom preset, select it from the
Presets drop-down menu.
Note: If you check the
settings on each screen
in the drop-down menu,
go through them carefully
from top to bottom.
Avoid cycling through
them repeatedly, or you
may lose your settings.
Caution: Do not open
and close the Presets
menu without typing a
name, or you will lose
your settings.