Contents B A e s ns U l tio a i a rc nic e m mu m o om C or ile C f t o N Mob on s s c i Er Getting started 3 Transferring and exchanging information 56 Make and receive the first call. Bluetooth wireless technology, synchronization. Getting to know your phone 6 More features 62 Key functions, quick keys, entering letters. Calendar, alarm clock, stopwatch, timer, games. Personalizing your phone 15 Security 69 Choose ring signal, theme and other settings. SIM card lock, phone lock.
Ericsson T68m First edition (October 2001) This manual is published by Ericsson Mobile Communications AB, without any warranty. Improvements and changes to this manual necessitated by typographical errors, inaccuracies of current information, or improvements to programs and/or equipment, may be made by Ericsson Mobile Communications AB at any time and without notice. Such changes will, however, be incorporated into new editions of this manual.
Getting started Assembly Before you can use your phone you need to: • insert the SIM card. • attach and charge the battery. See “SIM card and battery information” on page 4. B A e s ns U l tio a i a rc nic e m mu m o om C or ile C f t o N Mob on s s c i Er About this user’s guide For ease of reference, the “Getting to know your phone” chapter gives a quick overview of the main functions of the phone, shortcuts and general information.
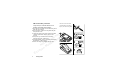
SIM card and battery information 1. 2. 3. 4. 5. 6. 4 You have to insert the SIM card and charge the battery before you can use the phone. B A e s ns U l tio a i a 30 min. rc nic e m mu m o om C 4 h. or ile C f t No Mob on s s c i Er It may take up to 30 minutes before an icon appears in the display when charging. Insert the SIM card. Make sure the SIM card is placed under the silvery holders. Place the battery on the back of the phone and push until you hear a click.
Making and receiving calls If you make a mistake while entering your PIN, delete the wrong number by pressing . If you enter the wrong PIN three times in a row, the SIM card is blocked and the message PIN blocked appears. To unblock it, you need to enter your PUK (Personal Unblocking Key). Your PUK is provided by your network operator. B A e s ns U l tio a i a rc nic e m mu m o om C or ile C f t o N Mob on s s c i Er On/off My Network • Enter the area code and phone number, and press to make the call.
Getting to know your phone B A e s ns U l tio a i a rc nic e m mu m o om C or ile C f t o N Mob on s s c i Er Key functions Volume Increase or decrease the key volume of the earpiece or handsfree loudspeaker during a call. Scroll through menus, lists and text. Enter the Status menu. Slide up or down once to temporarily turn off the ring signal. Slide up or down twice to reject an incoming call. Make and answer calls. Select a menu, submenu or an option. Press for options.
Quick keys The table describes some of the most useful key combinations. To... To... When in standby: reach a phone number saved on the SIM card at a specific position.
To... When in standby: To... When entering letters using multitap text input: B A e s ns U l tio a i a rc nic e m mu m o om C or ile C f t o N Mob on s s c i Er enter a p (pause) press and hold saving codes enter a p (pause) press melodies To... During a call: put a call on hold retrieve a call turn off the microphone press YES press YES again when when editing press and hold To...
To... When entering letters using T9 Text Input: want to go. To get back to standby, press and hold . You can quickly and easily reach the settings you use most by placing them in the menu My shortcuts. See “My shortcuts” on page 22.
Tip: You can rename an item in the same way. B A e s ns U l tio a i a rc nic e m mu m o om C or ile C f t o N Mob on s s c i Er Online services Online services are customized services offered by network operators, independently of mobile phones and mobile phone manufacturers. A SIM card which supports Online services works in the same way as a normal SIM card. When you have inserted your SIM card and turned on your phone, your network operator can download data to your SIM card.
Menu overview B A e s ns U l tio a i a rc nic e m mu m o om C or ile C f t o N Mob on s s c i Er Phone book Call contact Find and send * Add contact Edit contact Business cards Call from SIM Groups Calling cards Options Memory status Special numbers Messages SMS Call voice mail E-mail Options Calls Missed calls Calling local Call list Call costs Call timers Data counters Next call Options Fun & Games Themes Background Games My melodies Pictures WAP services Homepage Bookmarks Push inbox Enter address
Entering letters You can enter letters, for example, when you add names to the phone book, write text messages or enter WAP addresses. Apart from the way you normally enter letters in your phone, using multitap text input, you can use T9™ Text Input for entering text messages and email, for example, if the input language you select supports this. T9 Text Input is a predictive input method and is a quicker way to write texts. See “T9™ Text Input” on page 14.
input. You press each key as many times as needed to show the letter you want. In the following example, we are going to write a name: Press… to get… +&@/¤%$€£¥\§¿¡0Θ Ξ Ψ Ω #*↵¶ B A e s ns U l tio a i a rc nic e m mu m o om C or ile C f t o N Mob on s s c i Er To enter letters using multitap text input 1. Scroll to Phone book, YES, Add contact, YES. Press YES again. 2. Press the appropriate key, – , or , repeatedly until the character you want appears in the display.
T9™ Text Input You can use T9 Text Input when writing, for example, text messages and e-mail. The T9 Text Input method uses a built-in dictionary to recognize the most commonly used word for each sequence of key presses. This way, you press each key only once, even if the letter you want is not the first letter on the key. The following example shows how to start writing a text message: If you do not find the word you want by pressing : • press to go to a list of options. • Select Edit word, YES.
Turning off the T9 Text Input If you wish, you can turn off the T9 Text Input. This setting is valid for all input of texts – not only for the text you are currently writing. • To turn T9 Text Input on or off, scroll to Settings/ Language/Predictive. Personalizing your phone B A e s ns U l tio a i a rc nic e m mu m o om C or ile C f t o N Mob on s s c i Er You can adjust the phone settings to suit your own requirements.
comes with some pre-set themes. To select a theme, select Themes from the Fun & Games menu. 3. You can now start to edit the picture. See the table below. 4. Press YES, select Save, YES. The picture is saved in My pictures. B A e s ns U l tio a i a rc nic e m mu m o om C or ile C f t o N Mob on s s c i Er Pictures Your phone comes with a number of pictures. You can • Have a picture as background when in standby mode. • Enclose a picture in a text message.
Press… to… save and exit the picture. To view your background pictures 1. Scroll to Fun & Games, YES, Background, YES, Select picture, YES, select a picture and press YES to get a full view. B A e s ns U l tio a i a rc nic e m mu m o om C or ile C f t o N Mob on s s c i Er exit the picture editor. press and hold to clear the picture. move the cursor 1, 5 or 10 spaces. switch between black and white pen colour. The pictures can also be added to My favourites. To add a picture to My favourites 1.
To receive and save a picture 1. From standby, press and scroll to Receive, YES. The infrared port is activated for 10 minutes and the Bluetooth function is activated for three minutes. 2. Save picture? appears. Press YES to save the picture in My picture under Fun & Games/Background/Select picture. 2. Press or to increase or decrease the volume. 3. Press YES to save the setting.
Note: To send a ring signal or melody in a text message, see “To insert an object in a text message” on page 48. Specific ring signals for personal calls If you subscribe to the Two Line Service, you can set different ring signals for the two voice lines. Line 1 and Line 2 are displayed instead of Voice calls. If your SIM subscription supports fax and data calls, you can set different ring signals for voice, fax and data calls respectively.
To set the vibrating alert 1. Scroll to Settings, YES, Sounds & alerts, YES, Vibrating alert, YES. 2. Select the setting you want, YES. Display light The display light can be set to automatic, off or on. In automatic mode, the display light is turned off a few seconds after you press the last key. • To set the display light, scroll to Settings/Display/ Light. • To set the display contrast, scroll to Settings/Display/ Contrast.
Advanced time settings Under Time settings in the Settings/Time and date menu, you can set time zone and daylight saving time. Changing these, changes the time accordingly and thus also the appointments and tasks in your calendar. When your phone changes network, and the time sent out from the operator deviates from the time in your phone, you are asked whether you want to update the time if you have turned on Automatic time zone. If you press YES, the time is updated automatically. To select a greeting 1.
Automatic keylock Automatic keylock means the keypad is locked 25 seconds after you last press a key. • To turn automatic keylock On or Off, scroll to Settings/Locks/Auto keylock. • To lock the keypad manually, press and hold select Turn on keylock. Profiles Your phone has a number of pre-set profiles which are set to suit a certain environment. You can add accessories to, rename or change these profiles.
Automatic activation Some profiles, for example In car, are automatically activated when used with a specific accessory. When disconnected, the profile is changed back. Calling B A e s ns U l tio a i a rc nic e m mu m o om C or ile C f t o N Mob on s s c i Er Before you can make or receive any calls, you must turn on the phone and be within range of a network. See “Making and receiving calls” on page 5. Making calls 1. Enter the area code and the phone number. 2. Press YES to make the call. 3.
Automatic re-dialling If the connection of the call failed and the display shows Retry?, press YES. The phone re-dials the number (up to ten times): • until the call is connected. • until you press a key or receive a call. that these numbers can normally be used to make an emergency call in any country, with or without a SIM card inserted, if a GSM network is within range.
Tip: You can also use your voice to answer or reject calls. See “Voice control” on page 29. • To turn the call list on or off, scroll to Calls, YES, Options, YES, Call listing, YES. B A e s ns U l tio a i a rc nic e m mu m o om C or ile C f t o N Mob on s s c i Er Phone Book In the Phone Book you can save all the information needed to contact people. Missed calls If you have missed a call, Missed calls:1 appears in standby mode, indicating the number of missed calls. To check your missed calls 1.
3. Select the number you want to call, YES. If only one number is linked to the contact, press and hold YES at step 2. B A e s ns U l tio a i a rc nic e m mu m o om C or ile C f t o N Mob on s s c i Er Tip: You can also use the Call contact option in the Phone book menu to call a contact. Updating the phone book When needed, you can easily update or delete any contact information. 1. 2. 3. 4. 5. 6. 7. 8. To edit a contact Scroll to Phone book, YES, Edit contact, YES.
Groups You can create a group of contacts. By doing so you can send text messages to several recipients at the same time. See “Sending text messages” on page 48. To send your business card 8. Scroll to Phone book, YES, Business cards, YES, Send my own, YES. 9. Select a transfer method, YES. If you use infrared make sure that the infrared ports are facing each other. B A e s ns U l tio a i a rc nic e m mu m o om C or ile C f t o N Mob on s s c i Er To create a group of contacts 1.
2. Enter the first letters of the contact you want to send, YES. 3. Press YES to select the contact. Select transfer method, YES. If you use infrared make sure that the infrared ports are facing each other. • To copy contacts to the phone, scroll to Phone book/ Options/Copy from SIM. • To send all contacts, scroll to Phone book, YES, Business cards, YES, Send all, and select a transfer method. To call any of these phone numbers from standby: • Enter the position number and press YES.
• • • • • Voice control With your phone, you can: Voice dial – call someone by saying the name and number type. Answer and reject calls with your voice when using a handsfree kit. Change profile with your voice. Record or listen to voice memos by using voice commands. Activate the voice control by saying a “magic word”. phone book contacts, for example, “home” or “mobile”. Instructions appear. Press YES. Select a number type, YES.
Caller name You can choose whether you want to hear the recorded contact name when you receive an incoming call from that contact. • To turn the caller name On or Off, scroll to Settings/Voice control/ Voice settings/Caller name. • Saying the magic word. See “The magic word” on page 31. B A e s ns U l tio a i a rc nic e m mu m o om C or ile C f t o N Mob on s s c i Er Voice dialling You can voice dial by saying the name of the contact. To make a call 1.
Changing profiles If you record voice commands for your profiles, you can change profile with your voice. 1. 2. 3. 4. 5. To turn on and record recording commands 1. Scroll to Settings, YES, Voice control, YES, Voice settings, YES, Voice memo, YES. 2. Select On, YES. 3. Instructions appear. Press YES. 4. Lift the phone to your ear, wait for the tone and say “Record”, then press YES. 5. Say “Play”, press YES.
control. Instead of pressing and holding YES, you say the magic word and then one of your recorded voice commands. The magic word is especially suitable when using a car handsfree kit. To re-record a voice command 1. Scroll to Settings, YES, Voice control, YES, Voice commands, YES. 2. Select the type of voice command, YES. 3. Select a voice command, YES. 4. Select Replace voice, YES. 5. Lift the phone to your ear, wait for the tone and say the command.
• You used another intonation – use the same intonation as you did when recording the voice command. Call time and cost During a call, the duration of the call is shown in the display. If you subscribe to cost information, the call cost (or the number of call units) is displayed. B A e s ns U l tio a i a rc nic e m mu m o om C or ile C f t o N Mob on s s c i Er Voice mail If your subscription includes an answering service, callers can leave a voice mail message when you cannot answer a call.
To enter the price per call unit Scroll to Calls, YES, Call costs, YES, Set tariff, YES. Enter your PIN2, YES. Select Change tariff, YES. Enter the code for the currency you want, (for example GBP for Pounds Sterling), YES. 5. Enter the price per call unit, YES. To enter a decimal point, press . 1. 2. 3. 4. B A e s ns U l tio a i a rc nic e m mu m o om C or ile C f t o N Mob on s s c i Er Credit limit for calls You can enter a total amount of money that can be used for making calls.
To turn off a call divert, select a divert option and select Cancel. • To activate or deactivate the call waiting service, scroll to Settings/Call options/Call waiting. B A e s ns U l tio a i a rc nic e m mu m o om C or ile C f t o N Mob on s s c i Er To check status • Scroll to Settings, YES, Call options, YES, Divert calls, YES. Select a call type, YES. Scroll to the divert you want to check, YES. Select Get status, YES.
• Scroll to Ongoing call, then select Transfer call, to connect the two calls. You are disconnected from both calls. • Press NO to end the ongoing call, then press YES to retrieve the held call. • Press NO twice to end both calls. 2. Call the next person you wish to include in the conference call. 1. Scroll to Ongoing call, select Join calls, YES. Repeat steps 1 to 3 to include more participants.
All outgoing calls are made on this line until you change it. Incoming calls can still be received on either line. You can change the names of the lines, and have different settings for each line, for example, different ring signals. • To change the name of a line, scroll to Settings/ Display/Edit line tag. To turn the calling card service on or off 1. Scroll to Phone book, YES, Options, YES, Set callingcards, YES. 2. Enter your Phone Lock code, YES. 3. Select On or Off, YES.
To make a calling card call 1. Enter the phone number of the person you want to call, or retrieve the number from the phone book. 2. Press and hold YES. The access number of the calling card server is called. During the connecting phase, you are asked to send the phone number you want to call and the verification code. 3. Press YES when the display shows Send called number?, or wait a few seconds and the number and code are sent automatically.
• Partial numbers can be saved. For example, saving 0123456 allows calls to be made to all numbers starting with 0123456. • Numbers with question marks can be saved. For example, saving 01234567?0, allows calls to be made to numbers from 0123456700 to 0123456790. To enter a question mark, press and hold . To add a group 1. Scroll to Settings, YES, Call options, YES, Closed groups, YES, Edit list, YES. 2. Scroll to Add new?, YES. 3. Enter the name of the user group, YES. 4. Enter the index number, YES.
To add numbers to the accepted callers list 1. Scroll to Settings, YES, Call options, YES, Accept calls, YES, Accepted list, YES. 2. Scroll to Add to list?, YES. This takes you to the phone book. 3. Select an entry, YES. Additional calling functions B A e s ns U l tio a i a rc nic e m mu m o om C or ile C f t o N Mob on s s c i Er • To select an accept option, scroll to Settings/ Call options/Accept calls/Accept options.
To show or hide your phone number 1. Enter the phone number you want to call. 2. Scroll to Calls, YES, Next call, YES. 3. Select Hide my number or Show my numb. and press YES to make the call. Setting up mobile Internet B A e s ns U l tio a i a rc nic e m mu m o om C or ile C f t o N Mob on s s c i Er In order to use the Internet, browse via WAP services or send and receive e-mail messages, you must have a phone subscription that supports data transmission and settings entered.
2. When the message arrives, New settings. Install? appears. • Press YES to install the new settings or Note: If settings already exist in your phone you can either keep or replace them. See “Advanced setting information” on page 42 for more information. • Press NO to cancel installation. A new request for settings is then required, as in step 1. 3. After installation, see “Using mobile Internet” on page 53. Note: Please contact your network operator for charging details.
• Allow calls (Preferred service) – if you want to be able to accept incoming calls during a GPRS session, select Automatic. If not, select GPRS only. • IP address – the IP address that the phone uses when communicating with the network. If you do not enter an address, the network provides you with a temporary IP address. • Advan. settings (Advanced settings) – these are optional. Consult your network operator. To create a data account manually 1. Scroll to Connect, YES, Data comm.
Note: To see the status of GPRS coverage and connection, slide the volume key up or down from standby to enter the Status menu and then scroll to GPRS. 2. Scroll to WAP services, YES, WAP settings, YES. 3. Select the profile that you want to edit and press YES. 4. Scroll to Rename, YES. Enter a name for the profile. 5. Scroll to Chg homepage, YES. Enter the address of the WAP page you want to have as homepage. 6. Scroll to Save to, YES.
4. Scroll to Password, YES. Enter your password for the WAP gateway, YES. 5. Scroll to Data mode, YES. Select a data connection mode, YES. 6. Scroll to Security, YES. Select On if you want a secure connection, or Off if you do not want a secure connection. 7. Scroll to Show images, YES. Select On if you want to view images while browsing, or Off if you do not want to view images while browsing. 8. Scroll to Response timer, YES. Enter a time limit in seconds after which a download attempt will stop. 3.
3. Select Gateway, YES, IP settings or SMS settings, YES, Security, YES, On, YES. details about the transaction, can be saved in your phone. • To check your contracts, scroll to WAP services/WAP settings/Common/Security/Contracts. B A e s ns U l tio a i a rc nic e m mu m o om C or ile C f t o N Mob on s s c i Er To check the certificates in your phone 1. Scroll to WAP services, YES, WAP settings, YES, Common, YES, Security, YES. 2. Select Trusted certif. or Client certif.
• POP3 server – enter the name or IP address of the service provider. For example, mail.server.com or 10.1.1.1. • POP3 port – if needed, change the number of the port used by the POP3 protocol. • Mailbox – enter a user name for your e-mail account. • Password – enter a password for your e-mail account. • SMTP server – enter the name or IP address of the SMTP server to be able to send e-mail messages. • SMTP port – if needed, change the number of the port used by the SMTP protocol.
Messaging 3. Enter the number, including the international “+” sign and country code, YES. B A e s ns U l tio a i a rc nic e m mu m o om C or ile C f t o N Mob on s s c i Er Your phone supports messaging services text messages and e-mail. Please contact your service provider for details on which services you can use. Text messages Text messages can be sent to one person, or to a group of recipients that you have saved in the phone book.
Text formatting You can change the style, size and alignment of the text, and create new paragraphs, in a text message. 1. 2. 3. 4. When you have read the text message, press YES to select one of the following options, for example, Reply, Forward or Delete the text message. Press NO to close the text message. B A e s ns U l tio a i a rc nic e m mu m o om C or ile C f t o N Mob on s s c i Er To format the text in a text message Scroll to Messages, YES, SMS, YES, Write new, YES.
• To turn long messages on or off, select Long messages from the Messages/Options/SMS menu. • Validity Period – If your message cannot be delivered, for example, if the recipient has turned off the phone, your service centre can save the message to send it later. • Request reply – Include a reply request if you want the recipient of your message to reply. • Status request – Check if a message has been delivered.
Area information Area information is a type of text message that is sent to all subscribers in a certain network area, for example, a local traffic report. When you receive an area information message, the message automatically appears in the display. You cannot save area messages. Please consult your service provider for more information about area information codes. • To turn area information on or off, scroll to Messages/ Options/SMS/Area info/Reception.
• Send now – The e-mail message is sent. • Send now with attachment – You can attach a picture from a digital camera connected via IR. Select a picture and press YES to send. • Save to outbox – The e-mail message is saved in the Outbox. • Save to drafts? – The e-mail message is saved in Drafts. 1. 2. 3. 4. 5. To reply to an e-mail message Open the e-mail message. Place the cursor in the text and press . Select Reply or Reply all, YES. Select Write new or Include this msg, press YES. Write a message, YES.
Using mobile Internet Using the WAP browser B A e s ns U l tio a i a rc nic e m mu m o om C or ile C f t o N Mob on s s c i Er Your phone has a WAP (Wireless Application Protocol) browser and e-mail messaging which are designed to bring a modified Internet to your mobile phone. A wide range of services are available, for example, news, entertainment, timetables, reservations, banking, e-commerce, positioning and e-mail.
• • • • • • Options when browsing When you have started browsing, you can reach different browsing options by pressing . The options menu is dynamic. Its content may vary depending on which WAP site you are visiting. The options menu always contains the following: Go to the homepage set for the current WAP profile. Bookmarks – Add the site you are currently browsing to your list of bookmarks, or see the list of bookmarks for the current profile.
There are two kinds of push messages: • Text messages that inform you about WAP services, by sending a link. To go to the WAP service, click the link. • Updated information from a WAP service is sent to appear in the WAP browser. • Load – The browser starts and loads the WAP site so that you can see the push content. • Delete – Deletes the push message. • Postpone – Save the message, to be loaded later.
Transferring and exchanging information Before you start To communicate with another Bluetooth device, you first need to pair your phone with the device – you do this by adding the device to a list of paired devices in your phone. To synchronize with your PC, and to browse the Internet, you also need to download and install software from the Ericsson Consumer web site www.ericsson.com/consumers. You can exchange items or play games without having to pair your phone with the other device.
2. The phone searches for Bluetooth devices. A list of available devices of the type you selected then appears in the display. Select a device, YES. 3. Enter a passkey (up to 16 digits) for the device, both in the phone and, for example, in the PC. (If a passkey does not come with the Bluetooth device when you buy it, you need to create one yourself.) 4. When the pairing has been completed, you can edit the name tag for the device and press YES. Select Edit order, YES.
Note: In countries where the use of Bluetooth wireless technology is not allowed, you must ensure that the Bluetooth function is set to Off. The Discoverable and On modes reduce the standby time and talk time. Sending and receiving To send an item using Bluetooth wireless technology, you need to make sure that the devices are within 10 meters range of each other and that the operation mode is set to Automatic or On.
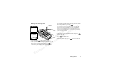
Light signals • Steady blue light – the Bluetooth function is on and the phone is charging. • Blue light flashing slowly – the Bluetooth function is on but no GSM network is within range. • Blue light flashing rapidly – the Bluetooth function is on and you are receiving an item or a pairing request. • Green and blue light alternating slowly – the Bluetooth function is on and a GSM network is within range. To connect two devices 1. Place your phone as in the picture.
PC, PDA or mobile phone and with similar programs on the Internet. Internet synchronization You can synchronize the calendar and contacts in your phone with similar programs on the Internet, using WAP. Contact your network operator for more information about these programs on the Internet and to receive user id, password and addresses for the different programs. You must also have a WAP profile set in your mobile phone. See “WAP profile settings” on page 44.
7. Select Phonebook path, YES. Enter the Internet address, user id and password for your phone book on the Internet. To receive a fax or data call (separate numbers) 1. Connect your phone to a computer. 2. Answer the call from within the software program (if it does not answer automatically). You cannot answer a fax or data call by pressing the YES key on the phone.
More features Stopwatch Scroll to Organizer, YES, Stopwatch, YES. To start, stop or re-start the stopwatch, press YES. To save up to nine lap times, press . To check saved lap times, scroll using the joystick. To reset the stopwatch, press . B A e s ns U l tio a i a rc nic e m mu m o om C or ile C f t o N Mob on s s c i Er Alarm clock The alarm can be set to ring at a specific time within 24 hours, or recurrently at a specific time on several days. You can have both these alarms set at the same time.
in the code memo in your phone. Then all you need to remember is the password to open the code memo. You can save a maximum of 10 codes in the code memo. 2. 3. 4. 5. Press YES. Enter a four-digit password to open Code memo, YES. Re-enter the new password to confirm. Enter a checkword (maximum 15 characters), YES. The checkword can consist of both letters and numbers. To enter a number, press and hold the key.
4. Re-enter the new password, YES. 5. Enter a checkword, YES. You can choose to add a new appointment or task, or to use an old appointment or task as a template by copying and editing it. B A e s ns U l tio a i a rc nic e m mu m o om C or ile C f t o N Mob on s s c i Er Forgot your password? If you forget your password, just enter any password to access the Code memo function. The checkword and codes that are then shown are incorrect. You must now reset the Code memo. To reset code memo 1.
5. If you want to set a reminder for your appointment, select a reminder, YES. Confirm with Save and close, YES. Calendar settings • Select Options from the Organizer/Calendar menu and then select one of the options: • Status – Use this to check when you last synchronized your calendar, how much space is left for new appointments and tasks. • Class view – You can choose whether to see only the private calendar entries, only the public ones or both.
Tip: To delete all appointments and tasks in your calendar, select Delete all in the Options menu. The recordings are saved in your mobile phone and can be accessed even if you change your SIM card. Exchanging calendar entries You can send and receive appointments and tasks using Bluetooth wireless technology or the infrared port. Note: In some countries or states it is required by law that you inform the other person before recording the call.
Listening to recordings You can listen to your recordings at any time, except during a call. 1. 2. 3. 4. Settings You can choose to show the date and time or length of the recording, or both. B A e s ns U l tio a i a rc nic e m mu m o om C or ile C f t o N Mob on s s c i Er To listen to your recordings Scroll to Organizer, YES, Voice memo, YES. Scroll to the recording you wish to hear, YES If you want to: • Pause, press YES. Press YES again to play.
How to control the games: Use the joystick to move up, down, left or right and to select an item, or use the keys as follows: = undo = reset B A e s ns U l tio a i a rc nic e m mu m o om C or ile C f t o N Mob on s s c i Er = up = left = pause = save and quit = down = right = select/deselect = confirm Erix The aim of Erix is to black out the display, without being hit by a ball. GAME The aim of GAME is to shoot the alien invaders before they kidnap and kill all humans on the planet.
Security Note: If the message “Codes do not match” appears, you entered the new PIN incorrectly. If the message “Wrong PIN” appears, followed by “Old PIN:”, you entered your old PIN incorrectly. B A e s ns U l tio a i a rc nic e m mu m o om C or ile C f t o N Mob on s s c i Er SIM card lock The SIM card lock protects your subscription, but not your phone itself, from unauthorized use. If you change SIM cards, the phone still works with the new SIM card. Most SIM cards are locked at the time of purchase.
Phone lock on If the phone lock is on, the message Phone locked appears each time you turn on the phone. You have to enter your code followed by YES to use your phone. Troubleshooting B A e s ns U l tio a i a rc nic e m mu m o om C or ile C f t o N Mob on s s c i Er Automatic If the phone lock is set to automatic, you do not need to enter your phone lock code until a different SIM card is inserted in the phone. • To edit your phone lock code, scroll to Settings/Locks/ Phone lock/Change code.
Grey menu options Grey text indicates a function that is temporarily unavailable, for example due to your subscription or due to a certain setting which has not been turned on. No network There is no network within range or the received signal is too weak. You have to move to get a signal that is strong enough. B A e s ns U l tio a i a rc nic e m mu m o om C or ile C f t o N Mob on s s c i Er Error messages Insert SIM There is no SIM card in the phone or you may have inserted it incorrectly.
Phone locked The phone is locked. To unlock the phone, see “Phone lock” on page 69. Additional information B A e s ns U l tio a i a rc nic e m mu m o om C or ile C f t o N Mob on s s c i Er Phone lock code: Your phone comes with the phone lock code, 0000. You can change it to any four- to eight-digit code. See “Phone lock” on page 69. Number not permitted The Fixed Dialling function is on and the number you have dialled is not on your fixed numbers list. See “Fixed dialling” on page 38.
Guidelines for Safe and Efficient Use Please read this information before using your mobile phone. product failures which have been caused by use of nonEricsson original accessories. • Treat your product with care, keep it in a clean and dust-free place. B A e s ns U l tio a i a rc nic e m mu m o om C or ile C f t o N Mob on s s c i Er Your mobile phone is a highly sophisticated electronic device.
• If your mobile phone is equipped with an infrared eye, never direct the infrared ray at anyone’s eye and make sure that it does not disturb any other infrared units. This is because the phone is designed to use the minimum power required to reach the network. Therefore, the closer you are to a base station, the more likely it is that the actual SAR level will decrease. Variations in SAR below the radio frequency exposure guidelines do not mean that there are variations in safety.
• FCC Report and Order, ET Docket 93-62, FCC 96-326, Federal Communications Commission (FCC), August 1996. • Radiocommunications (Electromagnetic Radiation Human Exposure) Standard 1999, Australian Communications Authority (ACA), May 1999. Vehicles Equipped with an Air Bag An air bag inflates with great force. Do not place objects, including either installed or portable wireless equipment, in the area over the air bag or in the air bag deployment area.
mobile phone. Contact your cardiologist for more information. If you use any other personal medical device, consult the manufacturer of your device to determine if it is adequately shielded from external RF energy. Turn your mobile phone off in any facility where posted notices so require. Do not transport or store flammable gas, liquid, or explosives in the same compartment of your vehicle that contains your mobile phone and accessories.
COULD BE DETACHED AND CREATE A CHOKING HAZARD. The battery can only be charged in temperatures between +5°C (+41°F) and +45°C (+113°F). DISPOSING OF THE PRODUCT BATTERY USE AND CARE The product should never be placed in municipal waste. Please check local regulations for disposal of electronic products. A rechargeable battery has a long service life if treated properly. A new battery or one that has not been used for a long time could have reduced capacity the first few times it is used.
• Do not expose the battery to open flames. This could cause the battery to explode. • Do not expose the battery to liquid. • Do not allow the battery to be put into the mouth. Battery electrolytes may be toxic if swallowed. time of its original purchase by a consumer, and for a subsequent period of one (1) year.
3. 4. 5. 6. 7. equivalent reconditioned units. Replaced faulty parts or components will become the property of Ericsson. This warranty does not cover any failure of the Product due to normal wear and tear, or due to misuse, including but not limited to use in other than the normal and customary manner, in accordance with Ericsson’s instructions for use and maintenance of the Product.
Declaration of Conformity B A e s ns U l tio a i a rc nic e m mu m o om C or ile C f t o N Mob 0682 on s s c i Er We, Ericsson Mobile Communications AB of Torshamnsgatan 27 S-164 80 Stockholm, Sweden declare under our sole responsibility that our product Ericsson type 113 0201-BV and in combination with our accessories, to which this declaration relates is in conformity with the appropriate standards 3GPP TS 51.
Icons Description Tells you the strength of the GSM network signal. B A e s ns U l tio a i a rc nic e m mu m o om C or ile C f t o N Mob on s s c i Er The table below shows icons which may appear in standby or in the menus. Icon Icon Description Your personal phone book. Handling of text and voice messages. GPRS is within range. GPRS is within range and can be used. You cannot receive any incoming calls. Tells you the status of the battery.
Icon Description Icon Description B A e s ns U l tio a i a rc nic e m mu m o om C or ile C f t o N Mob on s s c i Er You have received an e-mail message. A missed call in the call list. You have received a WAP push message. An answered call in the call list. The Bluetooth function is on. A dialled number in the call list. The Bluetooth function is in discoverable mode. A group of contacts in the phone book. Bluetooth communication is in progress. A text message has not been read.
Icon Description Icon Description B A e s ns U l tio a i a rc nic e m mu m o om C or ile C f t o N Mob on s s c i Er An e-mail address in the phone book. Other Bluetooth device. A voice command has been recorded for a contact name. The appointment is a meeting. You have recorded a sound. The appointment is a date. An e-mail message has not been read. The appointment is to travel. An e-mail message has been read. The appointment is a vacation.
Icon Description B A e s ns U l tio a i a rc nic e m mu m o om C or ile C f t o N Mob on s s c i Er A task of low priority. The network is preferred and can be used. The network is forbidden and cannot be used. Your home network is within range and can be used. Message with high priority. Message with low priority. Pre-defined text message template. User-defined text message template.
Index settings 65 status 65 view 65 Call costs 33 calling card 37 credit limit 34 minute minder 20 Call time 33 Calling 23 automatic re-dialling 24 call list 25 fixed dialling 38 groups 27 speed dialling 28 Calls accept 39 answer 24 divert 34 emergency 24 international 24 missed 25 put on hold 35 reject 24 restrict 38 Cell information 51 Charging 4 Code memo 62 add new code 63 checkword and security 63 password 63 reset 64 Conference calls 36 add new participants 36 end 36 join two calls 36 release a part
own greeting 21 Display icons 81 Diverting calls 34 closed user groups 39 conference calls 36 keypad 21 phone 69 SIM card 69 B A e s ns U l tio a i a rc nic e m mu m o om C or ile C f t o N Mob on s s c i Er E E-mail 51 archiving 52 read 52 reply 52 send 51 write 51 Emergency calls 24 Entering letters multitap text input 12 T9 text input 14 Ericsson Consumer web site 72 Error messages 71 F Fax, sending and receiving 61 Fixed dialling 38 G Games 67 Greeting 21 Groups 27 86 H Handsfree 21 Help texts 9
WAP profile 44 My shortcuts 22 automatic activation 23 selecting 22 PUK 69 activating/cancelling 69 Sound recorder end 66 listen 67 settings 67 start 66 Speed dialling 28 Stopwatch 62 Synchronization 59 Internet synchronization 60 sound 61 start 60 B A e s ns U l tio a i a rc nic e m mu m o om C or ile C f t o N Mob on s s c i Er N Networks 40 O Online services 10 P Passkey 57 Pause 8 Personal ring signal 19 Phone book 25 memory 28 Phone lock 69 activating/cancelling 70 changing the security code 70 P
set date 20 set time 20 Timer 62 Turn the phone on/off animation 5 greeting 5 networks 5 PIN 5 Two voice lines 36 W WAP, see Mobile Internet 53 Warranty 78 B A e s ns U l tio a i a rc nic e m mu m o om C or ile C f t o N Mob on s s c i Er V Vibrating alert 20 Voice answering 30 Voice control 29 answering 30 before voice dialling 29 changing profiles 31 dialling 30 editing voice commands 32 magic word 31 recording voice memos 31 reject 30 tips 30, 32 Voice dialling 30 Voice mail 33 Voice memo 66 88