
Specifications


Manual 89250890 5-7 SYSTEM OPERATION
SYSTEM OPERATION N7500
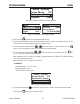
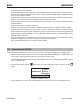
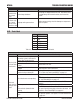
Set the “No Current Detect” option as needed. To change the setting press the “OK”
OK
button and using
the Potentiometer knob select the setting that meets your needs.
ART# A-10823_AB
Menu Setting
0.2 Sec
NoCurrent Detect
Normal
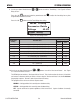
ART# A-10827_AB
Menu Setting
0.2 Sec
NoCurrent Detect
Special
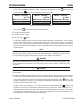
ART# A-10822_AB
Menu Setting
0.2 Sec
NoCurrent Detect
OFF
Figure 5-11: No Current Detect screens
Press the “OK”
OK
button again to retain the setting chosen.
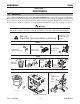
11. Turn ON the compressed air.
12. Turn ON the Power Supply.
13. Press the “Start”
START
button.
The DC Power Supply contactor closes and the electrode will feed down to the work piece. The air solenoid
inside the Control Box will open to release compressed air to the Torch Head air nozzle. An arc will be
struck as soon as the tip of the electrode reaches the work piece. The proper arc gap will be maintained,
even while the electrode feeds downward. Once the electrode reaches the target depth, the travel system
will be energized.
NOTE
If a short out interrupts the operation; check the air nozzle and the electrode guide block in the Torch
Head for signs of arcing. If arcing is evident make appropriate repairs. If NO signs of arcing are pres-
ent, retry starting the gouge procedure by pressing the “Start” button on the Pendant.
WARNING
Wear protective gear and be sure the work area is clear. The system is ready to begin gouging. If the
unit is attached to a travel system, be sure the travel system is ready to operate. Stand clear of the
Torch Head.
CAUTION
If the unit doesn’t respond, turn OFF the Power Supply and Control Box power. Refer to the Trouble-
shooting Guide.
14. To adjust arc voltage while operating in “CC” mode, push down on the rotary dial while turning clockwise
to increase or counterclockwise to decrease the arc voltage under load. Range of adjustment is +/- 5 volts
from initial arc voltage value shown on the Remote Pendant before pressing the “Start”
START
button. If the
gouging is stopped for any reason, the arc voltage value displayed at that point will be the new value that
can be increased or decreased by 5 volts.
To adjust current while operating in “CV” mode, push down on the potentiometer dial while turning
clockwise to increase or counterclockwise to decrease the current under load. Range of adjustment is +/-
100 amperes from initial current value shown on the Remote Pendant before pressing the “Start” button.
If the gouging is stopped for any reason, the current value displayed at that point will become the new
value that can be increased or decreased by 100 amperes.