Eclipse Scholar User Manual © Copyright Ash Technologies Limited, 2006. Revision 1.0 English August 2006 Page 1 Rev1.
Important Safety Information Please read all of the following instructions before setting up your Eclipse. Failure to follow these instructions properly could lead to physical injury. • The Eclipse must be used on a flat, level table. Never attempt to use it on a sloping surface or on a table that cannot accommodate the full footprint of the unit. • The front of the Eclipse must be placed at least 10cms or 4 inches back from the edge of the table.
Table of Contents Important Safety Information ................................................................... 2 Using the Eclipse Scholar........................................................................ 4 1. Setting up ......................................................................................... 4 2. Folding down and moving ................................................................ 4 3. The Front Panel ............................................................................
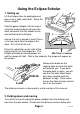
Using the Eclipse Scholar 1. Setting up Lift the Eclipse from its packaging and place it on a solid, level desk. Raise the screen upright. Plug the power adapter into the mains using the lead provided and insert the other connector into the socket on the rear bulkhead of the Eclipse. Ensure the unit is placed at least 10cms (4 inches) back from the edge of the desk. Sit in front of the unit. Press the red button on the right of the front panel to turn the Eclipse on.
remove the camera from the bracket. Remove all material from the reading table, park the table centrally between its legs and apply the brakes. Fold the screen back. 3. The Front Panel Focus Zoom Brightness Mode Function buttons Power The front panel has eight buttons that control the various function of the Eclipse. Throughout this manual the buttons will be referred to with symbols.
Symbol Name Overview Line marker & Shutters Semi-colours Brightness Mode Basic function Overview mode zooms out to allow you to find your place on the reading material and then returns to the previous zoom level. Places a guiding line on the screen or dims off the top and bottom of the screen. Allows the use of different ink and paper colours. Pressing this button on the right or left increases and decreases the brightness or contrast of the image.
The brakes on the table can be used to restrict the table’s movement: • The rotary knob locks the side-to-side movement. • The sliding knob locks the in-out movement. Both brakes operate independently and you may find that locking one or other allows you to scan a line of text or a column of numbers easily. Locking both brakes facilitates writing under the unit. 4B. Power button Press the power button to turn on the unit.
If you allow a 2 to 3 second interval between presses of the mode button, Eclipse will switch from your current reading mode to picture mode and back to your last used reading mode. This sounds complicated, but in normal use, you will generally switch from your chosen reading mode to picture mode to view an image, then you will switch back to reading mode to continue reading. 4E. Brightness Control You can press either side of the brightness control at any time to adjust the image.
another of the function buttons. To accomplish this, power off the unit, press and hold the “F” button with the function button to now be used as the camera select button and power on the unit, holding both buttons until the camera’s image appears on the screen. The new function button will be remembered from then on. 5C. Line marker and Blanking shutters By default, this function is superseded by the camera select function described in section 5B above. To enable this function please read section 5B.
5D. Colours (User Defined) Some users may benefit from setting the ink and paper to colours other than black and white. The Eclipse offers four of the most commonly used preset colour options and one user-definable option where the ink and paper colours may each be chosen from any of eight fore- and background colours. The colour options are only available in reading mode. Pressing the assigned function button will cycle through the options available (including the user-defined option).
Use the Zoom buttons to move the highlight up and down. Press the Focus button to proceed when you have highlighted the desired item. You can press the Mode button at any time to exit the menu. The various menu choices are explained below. 6A. The Video Controls menu The items in the Video Controls menu VIDEO CONTROLS are explained below. Selecting a BACKLIGHT control item by pressing will clear the BRIGHTNESS menu and bring up an indicator at the bottom CONTRAST of the screen.
Generally, this control should be left as supplied but with bright external lighting it may be necessary to turn it down to avoid glare from bright paper. This control does not appear on the menu when using an external video source. 6B. The Focus Mode menu You can choose from three different methods to focus the Eclipse. FOCUS MODE AUTOFOCUS PUSH FOCUS MANUAL FOCUS Autofocus: In this mode the camera constantly monitors the image and refocuses automatically if necessary.
If, for some reason, you cannot see the menu to choose Factory Defaults then perform the following sequence of button presses: • Power the unit off then on again. Wait for a few seconds to allow the start-up sequence to complete. • Press and hold the mode button until the beep is heard. • Press Zoom-Up once. • Press Focus once. • Press the middle function button and the factory defaults should be restored. 7.
Note that all settings that are used by the distance camera (e.g. brightness, colours, etc.) are stored and used separately from those of the internal camera. 7A. Distance camera controls Top Button: Press to zoom in. The minimum working distance at the fully zoomed-in position is 1 metre. If an object is brought closer than this the camera will not be able to focus properly. Middle Button: Press and release for overview mode (or other programmed function).
WHITE YELLOW VIOLET RED CYAN GREEN BLUE EXIT SUBMENU USER SETTINGS... SAVE SETTINGS LOAD SETTINGS FACTORY SETTINGS EXIT SUBMENU EXIT MENU 7C. Description of menu commands Button Function ... Selects the function of the middle button in normal operation. Overview: When selected, pressing the middle button brings the camera into a low zoom position, allowing you to orientate yourself with the scene. Press any button to restore previous zoom level.
Full Auto Focus: When selected the camera will constantly monitor and adjust its focus without the user’s intervention. Push To Focus: When selected the camera will only adjust the focus position when Zoom In or Zoom Out buttons are pressed. The hand symbol will flash to indicate that the camera is still focussing on the image. When this symbol is not flashing the focus position is fixed until the Zoom buttons are pressed. F Menu Color...
Changing the lamps If either of the lamps begins to dim or fails to start, they will need to be changed. You should replace both lamps at the same time to maintain a good image. Before starting to replace the lamps you must unplug the power cord from the back of the unit. You will require a small crosshead screwdriver to unscrew the lamp covers. Refer to the diagrams across and follow the sequence of operations.
Specifications Dimensions: Power: Display: Modes of Operation: Advanced features: Focus modes: Ergonomics: Magnification: Temperature: Table footprint: 45cm x 42cm (17.7” x 16.5”) Folded height: 18.5cm (7.3”) Upright height: 54cm (21”) Height to screen centre: 38cm (15”) Weight: 9.8kg (21.5 pounds) 12V 3A from the power supply provided. Wide input voltage (100V to 240V, 50-60Hz) 15.
Warranty Ash Technologies warrants the equipment, when purchased new, to be free from defects in material and workmanship and will repair or replace at Ash Technologies' discretion, any equipment which exhibits such defects; provided that the equipment has been operated under the proper conditions of installation and has not been tampered with by any persons not authorized by Ash Technologies or its agents and that it is solely serviced by Ash Technologies or its agents.
DECLARATION OF CONFORMITY We, Ash Technologies Ltd.