
Product Manual
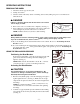


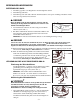


3. Maintain the bead breaker, so that it is nearly perpendicular
(90°) to the rim.(See Fig. 5.) If necessary, adjust the
position of the bead breaker.
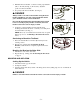
4. Step away from the bead breaker. (See Fig. 6.)
A DANGER
Always stand to one side of the rim when using the bead
breaker. Standing to one side of the bead breaker allows
you to maintain control of the bead breaker.
Do not hold the bead breaker when breaking the tire bead.
If it is not seated properly and flies off the rim, the bead
breaker could cause serious injury or death.
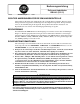
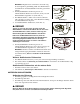
5. Continue to apply hydraulic pressure until the bead
breaking ram extends about 1/2 - 3/4 inch [13-19 mm] from
the bead breaker. (See Fig. 7.)
NOTE: Never try to break the tire bead with only one push.
Instead, proceed to “Continuing to Break the Tire Bead”
below.
Continuing to Break the Tire Bead
1. Move the bead breaker 8-12 inches [0,2-0,3 m] from its
current position.
2. Repeat steps, starting with “Positioning the Bead
Breaker”, until the rim is completely separated from the
tire bead.
Breaking the Bead on the Other Side
1. Turn the tire over on the other side.
2. Repeat all steps, starting with “Positioning the Tire Bead”
on page 2.
MOUNTING AND INFLATION
Jacking Up the Vehicle
1. Chock the wheels opposite the jack.
2. Jack up the vehicle.
3. Crib the vehicle with safety stands or blocking devices after jacking it up. Do not work under an
unblocked load.
A DANGER
Failure to chock the wheels and crib the vehicle can result in serious injury or death.
- 3 -
Figure 6
Figure 7
Figure 5