NOD32 Installation Guide Version 2.
NOD32 Installation Guide Copyright © 1997 – 2007 ESET LLC. All rights reserved. No part of this document may be reproduced or transmitted in any form or by any means electronic or mechanical, for any purpose without the express written permission of ESET LLC. Information in this document is subject to change without prior notice. Certain names of program products and company names used in this document might be registered trademarks or trademarks owned by other entities.
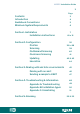
NOD32 Installation Guide Contents Introduction Guidebook Conventions Minimum System Requirements Section 1: Installation Installation instructions Section 2: Configuration Profiles Scanning On-Demand Scanning On-Access Scanning Updating Heuristics Section 3: Dealing with alerts & virus incidents Dealing with an alert Sending a sample to ESET Section 4: Troubleshooting & Information Appendix A: Troubleshooting Appendix B: Installation types Appendix C: Unins
NOD32 Installation Guide Introduction Congratulations, you have just purchased NOD32, the most advanced antivirus solution available. NOD32 is very simple to use and you will probably not even need to read through this guide... however, the following information will help you to get a better understanding of the many features of NOD32, so that you get the best protection possible.
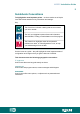
NOD32 Installation Guide Guidebook Conventions To highlight the most important points – we have used a set of simple icons which draw attention to key information and settings. Key: The Check Icon indicates a setting that we recommend you use or enable The Info Icon higlights important facts and information about NOD32, to help you make better use of the program The Hazard Icon highlights areas where potential problems can arise, or misconfigurations occur, to help you avoid damage or loss of data.
NOD32 Installation Guide Minimum System Requirements Please make sure that the computer on which you plan to install NOD32 meets the minimum system requirements for the program to run: Operating system CPU RAM 133 MHz/150 MHz 32 MB Windows NT4/2000 133 MHz 32 MB/64 MB Windows XP/2003/XP 64 or 32-bit 300 MHz 128 MB Windows Vista 800 MHz 512 MB Windows 98/ME Disk Space: Graphics: 30MB free disk space VGA video card.
NOD32 Installation Guide Installation
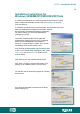
NOD32 Installation Guide Installation Instructions for Windows 95/98/ME/NT/2000/2003/XP/Vista To install from the NOD32 CD, simply insert the CD into the drive. If setup does not begin automatically, you will need to run NOD32.exe from the CD’s root directory. To install the download version (recommended, as it will be the most up-todate), first download the installer from the ESET website: http://www.ESET.com/download/registered_software.
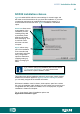
NOD32 Installation Guide Whether from a CD or from a download, the installation instructions from this point are the same. You will see this screen: Click Extract to begin the installation process. The extraction path can be changed in the "Extract to" box. This will not affect the final installation directory, only where the installation files are put during setup. These files can be removed after NOD32 setup completes.
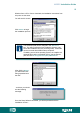
NOD32 Installation Guide 10 NOD32 Installation choices Typical installs NOD32 with the correct settings for normal usage, and will make most of the decisions for you about the installation. If you have no particular requirement to install NOD32 with specific settings, it is recommended to choose this route. Typical installation is the default option. Advanced allows some customisation of the installation process, including being able to password protect settings and enable silent messaging.
NOD32 Installation Guide 11 End User Licence Agreement In all installation modes, the next screen will be the End User License Agreement, on which you must choose I accept and click Next> to continue installation. You may also Print the license agreement for future reference. You are advised to read the terms of the license carefully before proceeding with the installation. If you decline the license terms, the installation cannot proceed.
NOD32 Installation Guide 12 Program Destination Folder At this point the Advanced and Expert Installations allow you to change the destination folder of NOD32, if you have a specific reason for doing so. During Typical install, this screen will not be shown.
NOD32 Installation Guide 13 Configuring Automatic Updates At this point the Typical, Advanced and Expert installations converge. You will now be presented with a screen asking you to choose your update server. We strongly recommend that you use the setting This ensures that updates will be delivered most efficiently. If you do not enter a username and password at this point, the product will not receive automatic updates until you enter them.
NOD32 Installation Guide 14 Configuration of Internet Settings You will now be asked about your Internet Connection settings. If you use a dial-up modem (not broadband or networked) then you need to check the I use dial-up (modem) Internet connection option. This will set NOD32 to update when an internet connection is detected. You will also be asked whether you use a proxy server, if you don’t or are unsure, just accept the default setting, as shown, and NOD32 will work it out for you.
NOD32 Installation Guide 15 Proxy Servers If you know that you use a proxy server, and chose the I use a proxy server option, you will be presented with a screen in which you can fill out your proxy details.... Your network administrator or ISP (Internet Service Provider) should supply you with the username and password for the proxy, if required. Do NOT put your NOD32 username and password into these fields. When you have finished, click Next> to continue the installation.
NOD32 Installation Guide 16 Configuring Updates The Advanced and Expert installation routes allow you to configure updating options at this point. Clicking on the Change button will give control over program and signature options, all of which can be configured after installation. It’s recommended that you leave these options as they are.
NOD32 Installation Guide 17 General Setup Advanced and Expert mode installation now give several other options. The Silent mode option can be set, so that only an administrator (set later) is sent messages that do not require some user intervention.
NOD32 Installation Guide 18 Disabling ESET’s custom graphics & the NOD32 splash screen At this point, Expert mode will also give you the option to use a standard windows interface rather than the NOD32 default, and to disable the “Splash Screen” (a banner with NOD32 information on it) that comes up each time you log onto Windows.
NOD32 Installation Guide 19 Warning distribution If you wish to send a notification message to an administrator for example, this window gives you 2 options: to send a warning message by email and/or by Windows Messenger system. If you are a single-user, there is no need to check these boxes. In the next window, you will be able to enter the details of the recipients....
NOD32 Installation Guide 20 SMTP / Messaging Options If your SMTP server requires authentication you may configure that once the NOD32 installation has completed. At this point, you will only be able to enter the addressing information. Expert mode now allows you to configure alerting and messaging options. NOD32 has several configurable messaging options, which are particularly useful for networked computers, where an administrator looks after several machines.
NOD32 Installation Guide 21 ThreatSense.Net™ Early Warning System At this point the Typical, Advanced and Expert installations converge. This is a system for automatic evaluation of files requiring further analysis in ESET’s labs and enables their automatic submission. If you choose to enable ThreatSense.Net™, it will also collect and submit anonymous, statistical data about detected infiltrations, which enables ESET to watch and evaluate the progress and severity of specific spreading threats.
NOD32 Installation Guide 22 Detection of potentially unwanted applications Some advertising and activity tracking companies complain about detection that terms their software as Adware or explicitly calls it Spyware. NOD32 2.7 includes the detection of “potentially unwanted applications”. This setting includes some Adware and other not necessarily malicious applications. Though not always malicious, some Adware will often fill a computer with a larger amount of file and memory baggage.
NOD32 Installation Guide 23 Access MONitor (AMON) Configuration AMON (Access MONitor) is a memory-resident (always running when computer is on) file scanning program. Automatic starting of AMON after computer restart is a fundamental defense against malicious code. Quitting AMON is not recommended and should only be done under special circumstances.
NOD32 Installation Guide 24 Options for On-Demand Scanner Configuration of On-demand scanning integration is available in the Expert and Advanced routes at this point. To allow easy access to the NOD32 On-Demand scanner, an icon can be placed on the desktop during installation, if this is not desirable, this action can be prevented here. Context menu scanning (Enable on-demand scanner using mouse) allows the user to right click on a file or folder in Windows, and choose to scan it with NOD32.
NOD32 Installation Guide 25 Document MONitor (DMON) Configuration Microsoft Office documents (Word, Excel, etc.) can sometimes contain viruses which infect other files when the document is opened. Document MONitor (DMON) provides protection against this sort of threat. Later versions of Internet Explorer allow Microsoft Office documents to be opened within the browser, directly from the internet. DMON will monitor these documents and prevent infiltration of a virus should an infected document be opened.
NOD32 Installation Guide 26 Internet MONitor (IMON) Configuration While the role of AMON is to provide real-time, resident, anti-virus monitoring of a system and user actions, the IMON module protects your computer from email and internet threats. To allow scanning of POP3 email and while also using the internet, we recommend having IMON enabled. IMON is enabled by default in all installation modes, but can be disabled if desired in Advanced and Expert modes.
NOD32 Installation Guide 27 IMON Configuration (email) IMON will work correctly with most POP3 email clients, however there may be cases where some incompatibility occurs, in which case, you can reduce the efficiency of IMON, to ensure that it works correctly. Notifications of checking can be added to email, and this option can be configured here (in Advanced and Expert routes) Reducing the efficiency of IMON may mean that some features are disabled, or that the performance may be affected.
NOD32 Installation Guide 28 IMON Configuration (HTTP) IMON can also check for infiltrations coming through the internet browser. The default option is to offer a choice of actions to the user when an undesirable object is detected. IMON can also be configured to automatically deny the download of the infected file. HTTP checking is enabled by default, but can be disabled during Advanced and Expert installations.
NOD32 Installation Guide 29 Email MONitor (EMON) Configuration EMON (Email MONitor), a complementary resident module, scans emails incoming via MAPI interface. The MAPI interface hooks into the different interfaces of Microsoft Outlook. MAPI interface is used also when receiving emails from the Microsoft Exchange Mail Server via the Exchange protocol. Even if the MAPI Interface is not used on the computer, EMON will still be installed. E-mails incoming via the POP3 protocol will be checked by IMON.
NOD32 Installation Guide 30 Completion of Setup Configuration At this point all installation tracks reconverge, and the configuration phase is complete. This is the last point at which changes can be made to the selected installation options, before the files are copied and the configuration completed. If you wish to change any configuration parameters, use the Back button now.
NOD32 Installation Guide 31 After installation has completed you will be required to restart your machine. You should ensure that no other anti-virus scanner will load at restart, save any active work, and click Finish to restart the machine. If you do not wish to restart immediately, choose Restart later. NOD32 may not function correctly, and your computer may not be protected from viruses until you have restarted your computer.
NOD32 Installation Guide 32 Configuration ...
NOD32 Installation Guide 33 Configuring Profiles for manual or ‘On-Demand’ scanning The first thing you might want to do is review the default profiles so that NOD32 is scanning exactly what you want, when you want. Open the Control Centre by clicking this icon in the bottom right hand corner of your screen (in the system tray near the clock). Then under the section ‘Threat Protection Modules’ click ‘NOD32’ and in the resulting right hand window, click ‘Run NOD32’.
NOD32 Installation Guide 34 Scanning Targets After a few seconds, you will be presented with the Scanning Targets window where you can choose which drives are scanned (the ones selected will have a red check mark through their icon).
NOD32 Installation Guide 35 Setup Next, move to the Setup tab where you can alter the default settings to suit your personal preferences of what is scanned when running NOD32 for an ‘On-demand scan’. You can add or exclude certain file types if desired and you can send messages of warnings to another machine or an administrator. Details for the latter need to be entered in the NOD32 System Setup > Notifications area.
NOD32 Installation Guide 36 Actions Then move to the Actions tab where you can change the default settings if you wish. You can select: • Files • Boot sectors • Archives • Self-extracting archives • Runtime packers • Email • Email folders • Operating memory (depending on your selections in the next section: ‘Setup’)…… and choose what actions you would like NOD32 to perform if an infiltration is detected.
NOD32 Installation Guide 37 Profile saving The last tab in this section is for Profiles. By default, the program will use the Control Center Profile. If you’ve made some changes on the previous tabs, you can now save them to Control Center Profile, or to My Profile if you wish. There are also some pre-set Profile headings for Floppy Disk, In-Depth Analysis and Local Disk scanning, so there are numerable variations for On-Demand Scanning options.
NOD32 Installation Guide 38 Finally, the Scanning Log tab shows exactly what’s going on when a scan is invoked. Scan button This will invoke a scan of your selected drives (as you’ve specified in Scanning Targets) and you will see all the files being scanned in the window. If the On-demand scanner finds an infiltration or potential infiltration, it will be displayed in red in this window.
NOD32 Installation Guide 39 Scanning The Scanning Log window does not need to be watched in real time….you can wait until it’s finished to review the complete log entries. The scan can take a few seconds or several minutes, depending on what you have asked to be scanned and in how much depth. When finished, you can review the scanning log. Any suspicious files will be shown in red and the path will be shown of where they are residing on your machine.
NOD32 Installation Guide 40 On-demand scanning So, you’ve setup the scanning profiles to your liking, or maybe you’ve chosen to stick with the default settings, and run a scan of your PC. Now you can instigate a scan of a specific drive on your computer, or specific files, or a Floppy disk or CD, etc. using your pre-defined setups saved under the Profiles tab. This is called an On-demand scan.
NOD32 Installation Guide 41 On-access scanning (AMON) This is when you attempt to open a file and NOD32 will automatically check it for you first via AMON (the Access MONitor). By default, AMON will be the resident scanner on your machine, always vigilant, always in the background, always ready to warn you of an infiltration. On-access scanning (DMON) DMON is a plug-in for NOD32 that serves for scanning Microsoft Office documents and files downloaded automatically by Internet Explorer (e.g.
NOD32 Installation Guide 42 Updating By default, NOD32 will check for Virus Signature Database updates automatically. These are the descriptions that our analysers have created, of the many viruses, worms and trojans. You can also manually check for updates, if you wish, by clicking the ‘Update now’ button in the Update section. The upper right hand window will give you information on the last time you received an update and the version number of the VSD (Virus Signature Database).
NOD32 Installation Guide 43 Updating with a dial-up connection If you have a dial-up connection to the internet, NOD32 will check for updates as soon as you connect and will keep checking every hour, assuming you stay online for a long while of course.
NOD32 Installation Guide 44 ThreatSense Heuristics This is something that NOD32 is particularly good at: scanning for possible malware, enabling detection of new malicious software without having to wait for updates. The heuristic capability contains sophisticated algorithms which allow proactive detections, meaning that protection against new malware is available immediately.
NOD32 Installation Guide 45 Dealing with alerts & virus incidents
NOD32 Installation Guide 46 Dealing with alerts and virus incidents Basic rules to follow if a virus is detected: • Trojans can only be deleted as they do not infect other files and contain only their own code • Worms in email attachments should be deleted as they contain only the viral code • If the IMON’s HTTP scanner detects a virus, choose to terminate the connection to prevent it from saving to the disk.
NOD32 Installation Guide 47 Submitting a sample file to ESET NOD32 uses ThreatSense.Net™ Early Warning System. This system enables the evaluation of files which may have been flagged as suspicious by NOD32. It assists the user to submit such files to ESET’s analysts, if this is desirable. ThreatSense.Net™ is enabled by default, but will prompt the user before submitting any files. The process can also be completely automated, or disabled if not required.
NOD32 Installation Guide 48 Troubleshooting
NOD32 Installation Guide 49 Appendix A: Troubleshooting Q: My username or password doesn’t work A: If a dialog box pops up asking for your username and password, it’s most likely because they were entered incorrectly during setup, or that your NOD32 license has expired. If you are sure your license is still valid, click Setup on the popup screen to re-enter the username and password as sent to you in the email from your vendor.
NOD32 Installation Guide 50 Appendix B: Installation Types Typ. = Typical Installation (Recommended for most users) Adv. = Advanced Installation (Partially customised installation) Exp. = Expert (Fully customised installation) Post = Option can be configured post install Option NOD32 Destination folder Silent Mode / Password protect settings GUI type / NOD32 Splash screen Send warnings by email or Win.
NOD32 Installation Guide 51 Appendix C: Uninstalling NOD32 To uninstall NOD32, go to ‘Start’ in the lower left hand corner of your computer screen and select ‘Programs’ or ‘All Programs’ and then the ‘ESET’ folder. Inside that folder is a file named ‘Uninstall’. Click on this file to invoke the uninstallation process. This takes a few seconds. When finished, reboot your machine as prompted and after the PC re-starts, check that the ESET folder has been removed from C:\Program Files.
NOD32 Installation Guide 52 Glossary AMON On-Access Scanning Monitor - scans all files on your computer as soon as you try to run or access them. Archives Compressed or stuffed files: can be used to save a lot of disk space and transfer larger files via the internet more quickly. For instance .zip and .rar are archive files. Boot Sectors The boot sector is the first sector on a floppy disk. On a hard disk it is the first sector of a partition.
NOD32 Installation Guide 53 Operating Memory The area of memory used by the system to run itself and any loaded programs. Some Operating memory (also called System Memory) on the disk in a “swapfile”, which is a type of Cache, and the rest in the RAM chips on the computer. Viruses try to load themselves into Operating Memory so that they remain active while the computer is switched on. Password Your password, secret word or code used to access information.