ESET SMART SECURITY 6 User Guide (intended for product version 6.
ESET SMART SECURITY Copyright 2013 by ESET, spol. s r. o. ESET Smart Security was developed by ESET, spol. s r. o. For more information visit www.eset.com. All rights reserved. No part of this documentation may be reproduced, stored in a retrieval system or transmitted in any form or by any means, electronic, mechanical, photocopying, recording, scanning, or otherwise without permission in writing from the author. ESET, spol. s r. o.
Contents 1. ESET Smart Security 6 ..................................................5 1.1 What's ........................................................................5 new 1.2 System ........................................................................6 requirements 1.3 Prevention ........................................................................6 2. Installation ..................................................8 2.1 Live installer ............................................................
.6.10 4.6.11 4.6.11.1 4.6.12 4.6.13 Proxy .................................................................................79 server setup Alerts .................................................................................79 and notifications Message .............................................................................80 format Submission .................................................................................80 of files for analysis System ...........................................
1. ESET Smart Security 6 ESET Smart Security 6 represents a new approach to truly integrated computer security. The most recent version of the ThreatSense® scanning engine, combined with our custom Personal firewall and Antispam module, utilizes speed and precision to keep your computer safe. The result is an intelligent system that is constantly on alert for attacks and malicious software that might endanger your computer.
Rollback previous virus signature database If you suspect that a virus signature database or product module update may be unstable or corrupt, you can roll back to the previous version and disable updates for a set period of time. Improved Anti-Phishing protection ESET Smart Security will display a warning notification with several options when a web browser attempts to access websites or domains catalogued in the ESET malware database.
applications to appear and release security updates to eliminate potential threats on a regular basis. It is important to download these security updates as they are released. Microsoft Windows and web browsers such as Internet Explorer are two examples of programs for which security updates are released on a regular schedule.
2. Installation There are several methods for installing ESET Smart Security on your computer. Installation methods may vary depending on country and means of distribution: Live installer can be downloaded from the ESET website. The installation package is universal for all languages (choose a desired language). Live installer itself is a small file; additional files required to install ESET Smart Security will be downloaded automatically.
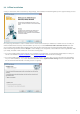
2.2 Offline installation Once you launch the offline installation (.msi) package, the installation wizard will guide you through the setup process. First, the program checks to see if a newer version of ESET Smart Security is available. If a newer version is found you will be notified in the first step of the installation process. If you select Download and install new version, the new version will be downloaded and installation will continue. Next, the End-User License Agreement will be displayed.
2.2.1 Typical installation Typical installation mode provides configuration options appropriate for most users. These settings provide excellent security, easy setup and high system performance. Typical installation mode is the default option and is recommended for users who do not require specific settings. For more instructions about installation steps, ESET Live Grid and Detection of potentially unwanted applications, follow the instructions in the aforementioned section (see “Live installer”).
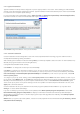
The next installation window offers the option to set a password to protect your program settings. Select Protect configuration settings with a password and enter your password into the the New password and Confirm new password fields. This password will be required to change or access the settings of ESET Smart Security. When both password fields match, click Next to continue.
2.5 Upgrading to a more recent version New versions of ESET Smart Security are issued to implement improvements or fix issues that cannot be resolved by automatic updates to program modules. Upgrading to a more recent version can be accomplished in several ways: 1. Automatically, by means of a program update.
3. Beginner's guide This chapter provides an initial overview of ESET Smart Security and its basic settings. 3.1 Introducing user interface design The main program window of ESET Smart Security is divided into two main sections. The primary window on the right displays information that corresponds to the option selected from the main menu on the left. The following is a description of options within the main menu: Home – Provides information about the protection status of ESET Smart Security.
change the status of individual modules, click Setup and select the desired module. The red icon signals critical problems – maximum protection of your computer is not ensured.
will respond quickly to your questions and help find a resolution. 3.2 Updates Updating the virus signature database and updating program components is an important part of protecting your system against malicious code. Pay careful attention to their configuration and operation. In the main menu, click Update and then click Update virus signature database to check for a virus signature database update.
The Advanced setup window (click Setup in the main menu and then click Enter advanced setup..., or press F5 on your keyboard) contains additional update options. Click Update in the Advanced setup tree to the left. The Update server drop-down menu is greyed out and set to Choose automatically. To configure advanced update options such as update mode, proxy server access and LAN connections, click Setup... . 3.
communication enabled and have remote desktop sharing available. 3.4 Anti-Theft To protect your computer in case of a loss or theft, choose from the following options to register your computer with the ESET Anti-Theft system. 1. After a successful activation click Enable Anti-Theft to activate ESET Anti-Theft features for the computer you just registered. 2. If you see the ESET Anti-Theft is available message in the Home pane of ESET Smart Security, consider activating this feature for your computer.
4. Work with ESET Smart Security The ESET Smart Security setup options allow you to adjust the protection levels of your computer and network. The Setup menu contains following: Computer Network Web and Email Parental control Click any component to adjust the advanced settings of the corresponding protection module.
Web and Email protection setup allows you to enable or disable the following components: Web access protection – If enabled, all traffic through HTTP or HTTPS is scanned for malicious software. Email client protection – Monitors communication received through POP3 and IMAP protocol. Antispam protection – Scans unsolicited email, i.e., spam. Anti-Phishing protection – Filters websites suspected of distributing content intended to manipulate users into submitting confidential information.
confirm. Computer scan setup... – Click to adjust the parameters of the on-demand scanner (manually executed scan). 4.1.1 Antivirus and antispyware Antivirus and antispyware protection guards against malicious system attacks by controlling file, email and Internet communication. If a threat with malicious code is detected, the Antivirus module can eliminate it by first blocking it, and then cleaning, deleting or moving it to quarantine. Scanner options for all protection modules (e.g.
By default, Real-time file system protection launches at system startup and provides uninterrupted scanning. In special cases (e.g., if there is a conflict with another real-time scanner), real-time protection can be terminated by deselecting Start Real-time file system protection automatically. Media to scan By default, all types of media are scanned for potential threats: Local drives – Controls all system hard drives. Removable media – Diskettes, CD/DVDs, USB storage devices, etc.
requirements. While the Advanced heuristics on executing files from removable media option is enabled, if you wish to exclude some removable media (USB) ports from being scanned by advanced heuristics on file execution, click Exceptions... to open the removable media drive exclusions window. In this window, you can customize the settings by selecting or deselecting the checkboxes that represent each port. 4.1.1.1.2 Cleaning levels Real-time protection has three cleaning levels (to access, click Setup...
4.1.1.1.4 Checking real-time protection To verify that real-time protection is working and detecting viruses, use a test file from eicar.com. This test file is a harmless file detectable by all antivirus programs. The file was created by the EICAR company (European Institute for Computer Antivirus Research) to test the functionality of antivirus programs. The file is available for download at http:// www.eicar.org/download/eicar.
malware and other potential threats. This type of scan can be also initiated by clicking Custom scan, and then selecting Removable media from the Scan targets drop-down menu and clicking Scan. See Scan progress for more information about the scanning process. We recommend that you run a computer scan at least once a month. Scanning can be configured as a scheduled task from Tools > Scheduler. 4.1.1.2.
currently logged user doesn't have enough privileges to access the appropriate files to be scanned. Note that this button is not available if currently logged user cannot call UAC operations as Administrator. 4.1.1.2.2 Scan progress The scan progress window shows the current status of the scan and information about the number of files found that contain malicious code. NOTE: It is normal that some files, such as password protected files or files being exclusively used by the system (typically pagefile.
4.1.1.2.3 Scan profiles Your preferred scan parameters can be saved for future scanning. We recommend that you create a different profile (with various scan targets, scan methods and other parameters) for each regularly used scan. To create a new profile, open the Advanced setup window (F5) and click Computer > Antivirus and antispyware > Computer scan > Profiles....
4.1.1.4 Idle-state scanning Idle scanner can be configured and enabled in Advanced setup under Computer > Antivirus and antispyware > Idlestate scanning. When the computer is in idle state, then a silent computer scan is performed on all local drives. See also Idle state detection triggers (e.g. screen saver, user logoff), which must be met in order to run the Idle scanner. By default, Idle scanner does not run when the computer (notebook) is powered from the battery and is not connected to the power grid.
Path – Path to excluded files and folders. Threat – If there is a name of a threat next to an excluded file, it means that the file is only excluded for the given threat, not completely. If that file becomes infected later with other malware, it will be detected by the antivirus module.
4.1.1.6.2 Options Use the Options section to select the methods used when scanning the system for infiltrations. The following options are available: Heuristics – A heuristic is an algorithm analyzing the (malicious) activity of programs. The main advantage is the ability to identify malicious software which did not exist, or was not identified by previous virus signatures databases. The disadvantage is the small probability of false alarms.
4.1.1.6.5 Limits The Limits section allows you to specify the maximum size of objects and levels of nested archives to be scanned: Maximum object size – Defines the maximum size of objects to be scanned. The given antivirus module will then scan only objects smaller than the size specified. This option should only be changed by advanced users who may have specific reasons for excluding larger objects from scanning. Default value: unlimited. Maximum scan time for object (sec.
Each uses the standard cleaning level and will attempt to clean the file and move it to Quarantine or terminate the connection. A notification window is displayed in the notification area at the bottom right corner of the screen. For more information about cleaning levels and behavior, see Cleaning. Cleaning and deleting If there is no predefined action to take for Real-time file system protection, you will be prompted to select an option in the alert window.
4.1.1.8 Document protection The Document protection feature scans Microsoft Office documents before they are opened, as well as files downloaded automatically by Internet Explorer such as Microsoft ActiveX elements. Document protection provides a layer of protection in addition to Real-time file system protection, and can be disabled to enhance performance on systems that are not exposed to a high volume of Microsoft Office documents. Integrate into system activates the protection system.
4.1.2.1 Filtering rules The Filter device access window displays existing extended rules for removable media. Category – Removable media type (CD/DVD/USB...). Description – Filter device rules description. Rights – Associated permissions of given devices, that match the criteria set by filter. New – Create a new filtering removable media rule. Edit – Select one row and click this button to change the existing rule. Delete (Del) – Removes the selected rule. 4.1.2.
Note: Filtering parameters in all text fields are handled case-sensitive and no wildcards (*, ?) are supported. They have to be written exactly as delivered by the vendor. Click the Populate with connected device parameters... option to choose/fill with removable media device parameters for devices connected to your computer. Rights Deny access – Access to the device will not be granted. A device blocking information window will appear when an attempt to access a device will be performed.
If you select Ask as the default action, ESET Smart Security will display a dialog window every time an operation is run. You can choose to Deny or Allow the operation. If you do not choose an action, an action will be selected based on the pre-defined rules. The Allow access to another application dialog window allows you to create a rule based on any new action that HIPS detects and then define the conditions under which to allow or deny that action.
4.2 Network The Personal firewall controls all network traffic to and from the system. This is accomplished by allowing or denying individual network connections based on specified filtering rules. It provides protection against attacks from remote computers and enables blocking of some services. It also provides antivirus protection for HTTP, POP3 and IMAP protocols. This functionality represents a very important element of computer security.
4.2.1 Filtering modes Five filtering modes are available for the ESET Smart Security Personal firewall. Filtering modes can be found in Advanced setup (F5) by clicking Network > Personal firewall. The behavior of the firewall changes based on the selected mode. Filtering modes also influence the level of user interaction required. Filtering can be performed in one of five modes: Automatic mode – The default mode.
deny a specific service associated with a standard port number (HTTP – 80, POP3 – 110, etc.) Add remote IP address / Trusted zone – A remote IP address or zone can be used as a parameter for new rules defining all network connections between the local system and that remote address / zone. This option is suitable if you want to define actions for a certain computer or a group of networked computers.
your computer. Many infiltrations try to obtain and send private data, or download other malicious applications to host workstations. The Personal firewall allows you to detect and terminate such connections. Display information about application allows you to define how applications will be displayed in the list of rules. The following options are available: Full path – Full path to the application’s executable. Description – Description of the application. Name – Name of the application's executable.
4.2.3.1.1 Detailed view of all rules To see the following information in the Zone and rule setup window, click Toggle detailed view of all rules. Name – Name of rule, checkbox must be selected to activate the rule. Action – Shows the direction of communication and action.
4.2.3.2 Editing rules Modification is required each time any of the monitored parameters are changed. In this case, the rule cannot fulfill the conditions and the specified action cannot be applied. If parameters have changed, the given connection may be refused, which can result in problems with operation of the application in question. An example is a change of network address or port number for the remote side.
4.2.4.1.1 Zone authentication - Client configuration In the Zone and rule setup window, click the Zones tab and create a new zone using the name of the zone authenticated by the server. Then click Add IPv4 address and select the Subnet option to add a subnet mask that contains the authentication server. Click the Zone authentication tab. Each zone can be set to authenticate to the server. The zone (its IP address and subnet) will be valid after it is successfully authenticated – e.g.
To test your settings, click the Test button. If authentication is successful, a Server authentication successful notification will appear. If authentication is not configured properly, one of the following error messages will appear: Server authentication failed. Maximum time for authentication elapsed. The authentication server is inaccessible. Check the server name/IP address and/or verify the Personal firewall settings of the client as well as the server section.
4.2.4.1.2 Zone authentication - Server configuration The authentication process can be executed by any computer/server connected to the network that is to be authenticated. The ESET Authentication Server application needs to be installed on a computer/server that is always accessible for authentication whenever a client attempts to connect to the network. The installation file for the ESET Authentication Server application is available for download on ESET’s website.
4.2.5 Establishing connection - detection The Personal firewall detects each newly-created network connection. The active firewall mode determines which actions are performed for the new rule. If Automatic mode or Policy-based mode is activated, the Personal firewall will perform predefined actions with no user interaction. Interactive mode displays an informational window which reports detection of a new network connection, supplemented with detailed information about the connection.
4.2.7 System integration The ESET Smart Security Personal firewall can operate at several levels: All features active – The Personal firewall is fully integrated and its components are active by default. If your computer is connected to a large network, or to the internet, we recommend that you leave this option enabled. This is the most secure Personal firewall setting and offers a high level of protection.
It is possible to disable the web/email/antispam protection module temporarily by clicking Enabled. Configure ... – Opens web/email/antispam protection advanced settings. User's Whitelist – Opens a dialog window where you can add, edit or delete email addresses that are considered safe. Email messages received from addresses listed in the Whitelist will not be scanned for spam. User's Blacklist – Opens a dialog window where you can add, edit or delete email addresses that are considered unsafe.
4.3.1.1.1 Email client protection configuration The Email client protection module supports the following email clients: Microsoft Outlook, Outlook Express, Windows Mail, Windows Live Mail and Mozilla Thunderbird. Email protection works as a plug-in for these programs. The main advantage of the plug-in control is that it is independent of the protocol used. When the email client receives an encrypted message, it is decrypted and sent to the virus scanner.
4.3.1.3 POP3, POP3S filter The POP3 protocol is the most widespread protocol used to receive email communication in an email client application. ESET Smart Security provides protection for this protocol regardless of the email client used. The protection module providing this control is automatically initiated at system startup and is then active in memory.
methods) and the resulting index value determines whether a message is spam or not. Antispam protection in ESET Smart Security allows you to set different parameters to work with mailing lists. Options are as follows: Start email client antispam protection automatically – Activates/deactivates email client antispam protection. Message processing Add text to email subject – Enables you to add a custom prefix string to the subject line of messages that have been classified as spam. The default is "[SPAM]".
4.3.2 Web access protection Internet connectivity is a standard feature in a personal computer. Unfortunately, it has also become the main medium for transferring malicious code. Web access protection works by monitoring communication between web browsers and remote servers, and complies with HTTP (Hypertext Transfer Protocol) and HTTPS (encrypted communication) rules. We strongly recommend that Web access protection is enabled.
4.3.2.1.1 Active mode for web browsers ESET Smart Security also contains the Active mode submenu, which defines the checking mode for web browsers. Active mode is useful because it examines data transferred from applications accessing the Internet as a whole, regardless of whether they are marked as web browsers or not (for more information, see Web and email clients). If Active mode is disabled, communication from applications is monitored gradually in batches.
Remove/Remove all – Click Remove to delete the selected address from the list. To delete all addresses, select Remove all. Export... – Save addresses from the current list to a simple text file. 4.3.3 Protocol filtering Antivirus protection for the application protocols is provided by the ThreatSense scanning engine, which seamlessly integrates all advanced malware scanning techniques. The control works automatically, regardless of the Internet browser or email client used.
4.3.3.2 Excluded applications To exclude communication of specific network-aware applications from content filtering, select them in the list. HTTP/ POP3/IMAP communication of the selected applications will not be checked for threats. We recommend using this option only for applications that do not work properly with their communication being checked. Running applications and services will be available here automatically. Click the Add...
4.3.3.3 Excluded IP addresses The entries in the list will be excluded from the protocol content filtering. HTTP/POP3/IMAP communication from/to the selected addresses will not be checked for threats. We recommend using this option only for addresses that are known to be trustworthy. Add IPv4/IPv6 address – This options allows you to add an IP address/address range/subnet of a remote point for which the rule is to be applied. Remove – Remove selected entries from the list. 4.3.3.3.
4.3.3.4 SSL protocol checking ESET Smart Security enables you to check protocols encapsulated in SSL protocol. You can use various scanning modes for SSL protected communications using trusted certificates, unknown certificates, or certificates that are excluded from SSL-protected communication checking. Always scan SSL protocol – Select this option to scan all SSL protected communications except communications protected by certificates excluded from checking.
4.3.3.4.1.2 Excluded certificates The Excluded certificates section contains certificates that are considered safe. The content of encrypted communications utilizing the certificates in the list will not be checked for threats. We recommend only excluding web certificates that are guaranteed to be safe and the communication utilizing the certificates does not need to be checked. To delete selected items from the list, click the Remove button.
NOTE: Potential phishing websites that have been whitelisted will expire after several hours by default. To allow a website permanently, you can use the URL address management tool. From the Advanced setup (F5) click Web and email > Web access protection > URL address management and from the URL address management drop-down menu select List of allowed addresses and add your website to this list.
If you click Parental control in the Setup pane from the main product window of ESET Smart Security, you will see that the main window is divided into three sections. 1. Parental control After deselecting Enabled on the right, a Temporarily disable protection window will appear. Here you can set the time interval for which protection is disabled. The option then changes to Disabled and all following settings will be hidden. It is important to protect the settings in ESET Smart Security with a password.
1. Open User Accounts by clicking the Start button (located at the bottom left side of your desktop), clicking Control Panel and then clicking User Accounts. 2. Click Manage another account. If you are prompted for an administrator password or confirmation, type the password or provide confirmation. 3. Click Create a new account. 4. Type the name you want to give the user account, click an account type, and then click Create Account. 5.
4.4.1 Web page content filtering If the check box next to a category is selected, it is allowed. Deselect the check box next to a specific category to block it for the selected account. Moving the mouse over a category will show you a list of web pages that fall into that category. Here are some examples of categories (groups) that users might not be familiar with: Miscellaneous – Usually private (local) IP addresses such as intranet, 127.0.0.0/8, 192.168.0.0/16, etc.
4.4.2 Blocked and allowed web pages Enter a URL address into the blank field under the list, select Allow or Block and click Add to add it to the list. To delete an URL address from the list, click the remove button . In the URL address list, the special symbols * (asterisk) and ? (question mark) cannot be used. For example, web page addresses with multiple TLDs must be entered manually (examplepage.com, examplepage.sk, etc.).
Last successful update – The date of the last update. If you do not see a recent date, your virus signature database may not be current. Virus signature database version – The virus signature database number, which is also an active link to ESET’s website. Click it to view a list of all signatures added within the given update. Click Check to detect the latest available version of ESET Smart Security. Update process After clicking Update virus signature database, the download process begins.
Important: Under normal circumstances, when updates are downloaded properly the message Update is not necessary – Virus signature database is up to date will appear in the Update window. If this is not the case, the program is out of date and more vulnerable to infection. Please update the virus signature database as soon as possible.
4.5.1 Update setup Update setup options are available from the Advanced setup tree (F5 key) by clicking Update > Update. This section specifies update source information, such as the update servers and authentication data for these servers. By default, the Update server drop-down menu is set to Choose automatically to ensure that update files will automatically download from the ESET server with the least network traffic.
Pre-release updates (the Pre-release update option) are updates which have gone through thorough internal testing and will be generally available soon. You can benefit from enabling pre-release updates by having access to the most recent detection methods and fixes. However, pre-release updates might not be stable enough at all times and SHOULD NOT be used on production servers and workstations where maximum availability and stability is required.
will display a notification. The Regularly check for latest product version option will enable the Regular checking for latest product version scheduled task (see Scheduler). 4.5.1.2.2 Proxy server To access the proxy server setup options for a given update profile, click Update in the Advanced setup tree (F5) and then click the Setup... button to the right of Advanced update setup.
4.5.1.3 Update rollback If you suspect that a new update of the virus database and/or program modules may be unstable or corrupt, you can roll back to the previous version and disable updates for a set period of time. Alternatively, you can enable previously disabled updates if you had postponed them indefinitely. ESET Smart Security records snapshots of virus signature database and program modules for use with the rollback feature.
4.5.2 How to create update tasks Updates can be triggered manually by clicking Update virus signature database in the primary window displayed after clicking Update from the main menu. Updates can also be run as scheduled tasks. To configure a scheduled task, click Tools > Scheduler. By default, the following tasks are activated in ESET Smart Security: Regular automatic update Automatic update after dial-up connection Automatic update after user logon Each update task can be modified to meet your needs.
Submit file for analysis – Allows you to submit a suspicious file for analysis to the ESET Virus Lab. The dialog window displayed after clicking this option is described in the Submission of files for analysis section. ESET SysRescue – Launches the ESET SysRescue creation wizard. Note: ESET SysRescue is currently not available in ESET Smart Security version 6. We recommend that you create an ESET SysRescue disk on another version of Microsoft Windows or with ESET products version 5.x.
4.6.1.1 Log maintenance The Logging configuration of ESET Smart Security is accessible from the main program window. Click Setup > Enter advanced setup... > Tools > Log files. The logs section is used to define how the logs will be managed. The program automatically deletes older logs in order to save hard disk space.
4. Depending on the timing option you choose in the previous step, one of the following dialog windows will be displayed: Once – The task will be performed at the predefined date and time. Repeatedly – The task will be performed at the specified time interval. Daily – The task will run repeatedly each day at the specified time. Weekly – The task will be run on the selected day and time. 5.
4.6.4 Watch activity To see the current File system activity in graph form, click Tools > Watch activity. At the bottom of the graph is a timeline which records File system activity real-time based on the selected time span. To change the time span, click the Step: 1... option located at the bottom-right of the window.
The following actions are available: Compare – Compares two existing logs. Create... – Creates a new log. Please wait until the ESET SysInspector log is complete (Status shown as Created). Delete – Removes selected logs from the list. After right-clicking one or more selected logs, the following options are available from the context menu: Show – Opens the selected log in ESET SysInspector (same function as double-clicking a log). Delete all – Deletes all logs. Export... – Exports the log to an .
you if further information is required for analysis. Please note that you will not receive a response from ESET unless more information is needed. Select the Enable logging option to create an event log to record file and statistical information submissions. It enables logging to the Event log when files or statistics are sent. 4.6.7 Running processes Running processes displays the running programs or processes on your computer and keeps ESET immediately and continuously informed about new infiltrations.
By clicking a given application at the bottom, the following information will appear at the bottom of the window: File – Location of an application on your computer. File size – File size in B (bytes). File description – File characteristics based on the description from the operating system. Company name – Name of the vendor or application process. File version – Information from the application publisher. Product name – Application name and/or business name.
Open in a new window – Displays information in a separate window. The Configure connection view... option in the Network connections screen enters the advanced setup structure for this section, enabling you to modify connection view options: Resolve host names – If possible, all network addresses are displayed in DNS format, not in the numeral IP address format. Only show TCP protocol connections – The list only displays connections which belong to the TCP protocol suite.
4.6.9 Quarantine The main function of the quarantine is to safely store infected files. Files should be quarantined if they cannot be cleaned, if it is not safe or advisable to delete them or if they are being falsely detected by ESET Smart Security. You can choose to quarantine any file. This is advisable if a file behaves suspiciously but is not detected by the antivirus scanner. Quarantined files can be submitted for analysis to ESET’s Virus Lab.
4.6.10 Proxy server setup In large LAN networks, the connection of your computer to the Internet can be mediated by a proxy server. If this is the case, the following settings need to be defined. Otherwise the program will not be able to update itself automatically. In ESET Smart Security, proxy server setup is available in two different sections within the Advanced setup tree. First, proxy server settings can be configured in Advanced setup under Tools > Proxy server.
receive notifications via the Windows® messaging service. Interval between sending messages (sec.) – To change the length of the interval between notifications sent via LAN, enter the desired time interval in seconds. Minimum verbosity for notifications – Specifies the minimum verbosity level of notifications to be sent. Edit format... – Communications between the program and a remote user or system administrator are done via emails or LAN messages (using the Windows® messaging service).
4.6.13 System updates The Windows update feature is an important component of protecting users from malicious software. For this reason, it is vital to install Microsoft Windows updates as soon as they become available. ESET Smart Security notifies you about missing updates according to the level you specify. The following levels are available: No updates – No system updates will be offered for download. Optional updates – Updates marked as low priority and higher will be offered for download.
4.7.2 Alerts and notifications The Alerts and notifications section under User interface allows you to configure how threat alerts and system notifications (e.g. successful update messages) are handled by ESET Smart Security. You can also set display time and the level of transparency of system tray notifications ( applies only to the systems supporting system tray notifications). Deselect the check box next to Display alerts to cancel all alert windows. This is only suitable in certain situations.
4.7.5 Program menu Some of the most important setup options and features are available in the main program menu. Frequently used – Displays the most frequently used parts of ESET Smart Security. You can quickly access these from the program menu. Temporarily disable protection – Displays the confirmation dialog box that disables Antivirus and antispyware protection, which guards against malicious system attacks by controlling file, web and email communication.
4.7.6 Context menu The context menu is displayed after right-clicking an object. The menu lists all options available to perform on the object. It is possible to integrate ESET Smart Security control elements into the context menu. More detailed setup options for this functionality are available in the Advanced setup tree under User Interface > Context menu. Integrate into the context menu – Integrate the ESET Smart Security control elements into the context menu.
5. Advanced user 5.1 Profile manager Profile manager is used in two places within ESET Smart Security – in the Computer scan section and in the Update section. Computer scan Your preferred scan parameters can be saved for future scanning. We recommend that you create a different profile (with various scan targets, scan methods and other parameters) for each regularly used scan.
5.3 Diagnostics Diagnostics provides application crash dumps of ESET's processes (e.g. ekrn). If an application crashes, a dump will be generated. This can help developers to debug and fix various ESET Smart Security problems. Two dump types are available: Complete memory dump – Records all the contents of system memory when the application stops unexpectedly. A complete memory dump may contain data from processes that were running when the memory dump was collected.
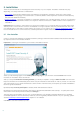
5.6 ESET SysInspector 5.6.1 Introduction to ESET SysInspector ESET SysInspector is an application that thoroughly inspects your computer and displays gathered data in a comprehensive way. Information like installed drivers and applications, network connections or important registry entries can help you to investigate suspicious system behavior be it due to software or hardware incompatibility or malware infection.
5.6.2 User Interface and application usage For clarity the main program window is divided into four major sections – Program Controls located on the top of the main program window, Navigation window to the left, the Description window to the right and the Details window at the bottom of the main program window. The Log Status section lists the basic parameters of a log (filter used, filter type, is the log a result of a comparison etc.). 5.6.2.
with. In "Basic" mode, you have access to information used to find solutions for common problems in your system. In the "Medium" mode, the program displays less used details. In "Full" mode, ESET SysInspector displays all the information needed to solve very specific problems. Item filtering Item filtering is best used to find suspicious files or registry entries in your system. By adjusting the slider, you can filter items by their Risk Level.
its hash. Important Registry Entries Contains a list of selected registry entries which are often related to various problems with your system like those specifying startup programs, browser helper objects (BHO), etc. In the Description window you may find which files are related to specific registry entries. You may see additional details in the Details window. Services The Description window Contains a list of files registered as windows Services.
View Ctrl+5 Ctrl+6 Ctrl+7 Ctrl+3 Ctrl+2 Ctrl+1 BackSpace Space Ctrl+W Ctrl+Q view by vendor, all vendors view by vendor, only Microsoft view by vendor, all other vendors displays full detail displays medium detail basic display moves one step back moves one step forward expands tree collapses tree Other controls Ctrl+T Ctrl+P Ctrl+A Ctrl+C Ctrl+X Ctrl+B Ctrl+L Ctrl+R Ctrl+Z Ctrl+F Ctrl+D Ctrl+E goes to the original location of item after selecting in search results displays basic information about an ite
marked by a were present only in the opened log and are missing in the active one.
5.6.4 Service Script Service script is a tool that provides help to customers that use ESET SysInspector by easily removing unwanted objects from the system. Service script enables the user to export the entire ESET SysInspector log, or its selected parts. After exporting, you can mark unwanted objects for deletion. You can then run the modified log to delete marked objects. Service Script is suited for advanced users with previous experience in diagnosing system issues.
Example: 02) Loaded modules: - c:\windows\system32\svchost.exe - c:\windows\system32\kernel32.dll + c:\windows\system32\khbekhb.dll - c:\windows\system32\advapi32.dll [...] In this example the module khbekhb.dll was marked by a “+”. When the script runs, it will recognize the processes using that specific module and end them. 03) TCP connections This section contains information about existing TCP connections. Example: 03) TCP connections: - Active connection: 127.0.0.1:30606 -> 127.0.0.
Example: 06) Important registry entries: * Category: Standard Autostart (3 items) HKLM\SOFTWARE\Microsoft\Windows\CurrentVersion\Run - HotKeysCmds = C:\Windows\system32\hkcmd.exe - IgfxTray = C:\Windows\system32\igfxtray.exe HKCU\SOFTWARE\Microsoft\Windows\CurrentVersion\Run - Google Update = “C:\Users\antoniak\AppData\Local\Google\Update\GoogleUpdate.exe” /c * Category: Internet Explorer (7 items) HKLM\Software\Microsoft\Internet Explorer\Main + Default_Page_URL = http://thatcrack.com/ [...
5.6.4.3 Executing Service scripts Mark all desired items, then save and close the script. Run the edited script directly from the ESET SysInspector main window by selecting the Run Service Script option from the File menu. When you open a script, the program will prompt you with the following message: Are you sure you want to run the service script “%Scriptname%”? After you confirm your selection, another warning may appear, informing you that the service script you are trying to run has not been signed.
What is Anti-Stealth technology ? Anti-Stealth technology provides effective rootkit detection. If the system is attacked by malicious code that behaves as a rootkit, the user may be exposed to data loss or theft. Without a special anti-rootkit tool, it is almost impossible to detect rootkits.
5.7.1 Minimum requirements ESET SysRescue works in the Microsoft Windows Preinstallation Environment (Windows PE) version 2.x, which is based on Windows Vista. Windows PE is part of the free Windows Automated Installation Kit (Windows AIK) or Windows Assesment and Deployment Kit (WADK) and therefore Windows AIK or WADK must be installed before creating ESET SysRescue ( http://go.eset.eu/AIK, http://www.microsoft.com/en-us/download/details.aspx?id=30652).
5.7.4 Settings Before initiating ESET SysRescue creation, the install wizard displays compilation parameters. These can be modified by clicking the Change... button. The available options include: Folders ESET Antivirus Advanced Internet protocol Bootable USB device (when the target USB device is selected) Burning (when the target CD/DVD drive is selected) The Create option is inactive if no MSI installation package is specified, or if no ESET Security solution is installed on the computer.
introduced into the compilation so you do not need to look for it later. 5.7.4.4 Internet protocol This section allows you to configure basic network information and set up predefined connections after running ESET SysRescue. Select Automatic private IP address to obtain the IP address automatically from DHCP (Dynamic Host Configuration Protocol) server. Alternatively, this network connection can use a manually specified IP address (also known as a static IP address).
5.7.5.1 Using ESET SysRescue Suppose that computers in the network have been infected by a virus which modifies executable (.exe) files. ESET Security solution is capable of cleaning all infected files except for explorer.exe, which cannot be cleaned, even in Safe mode. This is because explorer.exe, as one of the essential Windows processes, is launched in Safe mode as well. ESET Security solution would not be able to perform any action with the file and it would remain infected.
/no-unsafe /unwanted /no-unwanted /pattern /no-pattern /heur /no-heur /adv-heur /no-adv-heur /ext=EXTENSIONS /ext-exclude=EXTENSIONS /clean-mode=MODE /quarantine /no-quarantine do not scan for potentially unsafe applications (default) scan for potentially unwanted applications do not scan for potentially unwanted applications (default) use signatures (default) do not use signatures enable heuristics (default) disable heuristics enable Advanced heuristics (default) disable Advanced heuristics scan only EXTE
6. Glossary 6.1 Types of infiltration An Infiltration is a piece of malicious software trying to enter and/or damage a user’s computer. 6.1.1 Viruses A computer virus is a piece of malicious code that is pre-pended or appended to existing files on your computer. Viruses are named after biological viruses because they use similar techniques to spread from one computer to another. As for the term “virus”, it is often used incorrectly to mean any type of a threat.
6.1.4 Rootkits Rootkits are malicious programs that grant Internet attackers unlimited access to a system, while concealing their presence. Rootkits, after accessing a system (usually exploiting a system vulnerability), use functions in the operating system to avoid detection by antivirus software: they conceal processes, files and Windows registry data. For this reason, it is almost impossible to detect them using ordinary testing techniques. There are two levels of detection to prevent rootkits: 1.
6.1.8 Potentially unsafe applications There are many legitimate programs whose function is to simplify the administration of networked computers. However, in the wrong hands, they may be misused for malicious purposes. ESET Smart Security provides the option to detect such threats. Potentially unsafe applications is the classification used for commercial, legitimate software.
6.2.4 Port scanning Port scanning is used to determine which computer ports are open on a network host. A port scanner is software designed to find such ports. A computer port is a virtual point which handles incoming and outgoing data – this is crucial from a security point of view. In a large network, the information gathered by port scanners may help to identify potential vulnerabilities. Such use is legitimate. Still, port scanning is often used by hackers attempting to compromise security.
6.3 Email Email, or electronic mail, is a modern form of communication with many advantages. It is flexible, fast and direct, and played a crucial role in the proliferation of the Internet in the early 1990‘s. Unfortunately, with a high level of anonymity, email and the Internet leave room for illegal activities such as spamming. Spam includes unsolicited advertisements, hoaxes and proliferation of malicious software – malware.
6.3.4 Recognizing spam scams Generally, there are a few indicators which can help you identify spam (unsolicited emails) in your mailbox. If a message fulfills at least some of the following criteria, it is most likely a spam message. Sender address does not belong to someone on your contact list. You are offered a large sum of money, but you have to provide a small sum first.
6.3.4.4 Server-side control Server-side control is a technique for identifying mass spam based on the number of received messages and the reactions of users. Each message leaves a unique digital “footprint” based on the content of the message. The unique ID number tells nothing about the content of the email. Two identical messages will have identical footprints, while different messages will have different footprints. If a message is marked as spam, its footprint is sent to the server.