ESET Smart Security 4 User Guide (intended for product version 4.
Contents 1. ESET Smart Security 4..............................4 1.1 1.2 What’s new................................................................... 4 System requirements..................................................... 5 2. Installation.............................................6 2.1 2.2 2.3 2.4 2.5 Typical installation......................................................... 6 Custom installation........................................................ 7 Using original settings................
4.2 4.3 4.4 4.5 4.6 4.7 4.8 4.9 4.10 4.11 4.1.6.3 Cleaning................................................................19 4.1.6.4 Extensions............................................................ 20 4.1.6.5 Limits................................................................... 20 4.1.6.6 Other................................................................... 20 4.1.7 An infiltration is detected...................................... 20 Personal firewall.....................................
1. ESET Smart Security 4 ESET Smart Security 4 is the first representative of a new approach to truly integrated computer security. It utilizes the speed and precision of ESET NOD32 Antivirus, which is guaranteed by the most recent version of the ThreatSense® scanning engine, combined with the tailor‑made Personal firewall and Antispam modules. The result is an intelligent system that is constantly on alert for attacks and malicious software endangering your computer.
Interactive, Policy‑based, Learning, Automatic and Automatic mode with exceptions Supersedes Integrated Windows Firewall • Users can select whether the Personal firewall actions will be executed automatically or if they want to set rules interactively. Communication in Policy‑based mode is handled according to rules predefined by the user or the network administrator. Learning mode automatically creates and saves rules and is suitable for initial configuration of the firewall.
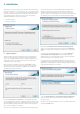
2. Installation After purchase, the ESET Smart Security installer can be downloaded from the ESET website. It comes as awn ess_nt**_***.msi (ESET Smart Security) or essbe_nt**_***.msi (ESET Smart Security Business Edition) package. Launch the installer and the installation wizard will guide you through the basic setup. There are two types of installation available with different levels of setup details: 1. System. The ThreatSense.
2.2 Custom installation Custom installation is designed for users who have experience fine‑tuning programs and who wish to modify advanced settings during installation. After selecting the installation mode and clicking Next, you will be prompted to select a destination location for the installation. By default, the program installs in C:\Program Files\ESET\ESET Smart Security\. Click Browse… to change this location (not recommended). Next, enter your Username and Password.
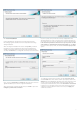
the New password and Confirm new password fields. Click Next to proceed to Configure automatic update settings. This step allows you to designate how automatic program component updates will be handled on your system. Click Change... to access the advanced settings. If you do not want program components to be updated, select the Never update program components option. Select the Ask before downloading program components option to display a confirmation window before downloading program components.
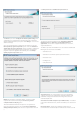
defined for a communication, ESET Smart Security prompts you to allow or deny the communication. computer scan”. Policy-based mode – Evaluates communications based on predefined rules created by an administrator. If no rule is available, the connection is automatically blocked without a warning message. We recommend that you only select Policy-based mode if you are an administrator who intends to configure network communication. Learning mode – Automatically creates and saves rules.
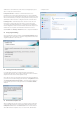
3. Beginner’s guide This chapter provides an initial overview of ESET Smart Security and its basic settings. 3.1 Introducing user interface design – modes The main program window of ESET Smart Security is divided into two main sections. The primary window on the right displays information that corresponds to the option selected from the main menu on the left.
3.3 If you are unable to solve a problem using the suggested solutions, click Help and support to access the help files or search the Knowledgebase. If you still need assistance, you can submit an ESET Customer Care support request. ESET Customer Care will respond quickly to your questions and help determine a resolution. 3.2 Trusted zone setup Trusted zone configuration is necessary to protect your computer in a network environment.
fields and click OK. This password will be required for any future modifications to ESET Smart Security settings. Warning: An incorrect trusted zone configuration may pose a security risk to your computer. NOTE: By default, workstations from a Trusted zone are granted access to shared files and printers, have incoming RPC communication enabled, and also have remote desktop sharing available. 3.
4. Work with ESET Smart Security 4.1 Antivirus and antispyware protection Antivirus protection guards against malicious system attacks by controlling file, email and Internet communication. If a threat with malicious code is detected, the Antivirus module can eliminate it by first blocking it, and then cleaning, deleting or moving it to quarantine. 4.1.1 Real‑time file system protection Real‑time file system protection controls all antivirus‑related events in the system.
If Real‑time protection does not detect and clean infiltrations 4.1.1.3 When to modify real‑time protection configuration Real‑time protection is the most essential component of maintaining a secure system. Therefore, please be careful when modifying its parameters. We recommend that you only modify its parameters in specific cases. For example, if there is a conflict with a certain application or real‑time scanner of another antivirus program.
are available through Setup > Enter entire advanced setup tree… > Miscellaneous >Email client integration. Email client integration allows you to activate integration with supported email clients. Email clients that are currently supported include Microsoft Outlook, Outlook Express, Windows Mail, Windows Live Mail and Mozilla Thunderbird. Select the Disable checking upon inbox content change option if you are experiencing a system slowdown when working with your email client.
4.1.3 Web access protection Internet connectivity is a standard feature in a personal computer. Unfortunately, it has also become the main medium for transferring malicious code. Because of this, it is essential that you carefully consider your Web access protection. We strongly recommend that the Enable web access protection option is selected. This option is located in Advanced Setup (F5) > Antivirus and antispyware > Web access protection. 4.1.3.
monitored gradually in batches. This decreases the effectiveness of the data verification process, but also provides higher compatibility for listed applications. If no problems occur while using it, we recommend that you enable active checking mode by selecting the checkbox next to the desired application. detected infiltrations. The cleaning level is automatically set to the default value. For more detailed information on types of cleaning, see section 4.1.6.3, “Cleaning”. 4.1.4.1.
to scan runtime packers or potentially unsafe applications and you also want to apply Strict cleaning. From the Configuration profiles window, click the Add... button. Enter the name of your new profile in the Profile name field, and select Smart scan from the Copy settings from profile: drop‑down menu. Then adjust the remaining parameters to meet your requirements. Block communication that uses the certificate – Terminates connection to the site that uses the certificate.
4.1.6.1 Objects setup The Objects section allows you to define which computer components and files will be scanned for infiltrations. applications are not necessarily intended to be malicious, but may affect the performance of your computer in a negative way. Such applications usually require consent for installation. If they are present on your computer, your system behaves differently (compared to the state before their installation).
Warning: In the Default mode, the entire archive file is deleted only if all files in the archive are infected. If the archive also contains legitimate files, it will not be deleted. If an infected archive file is detected in Strict cleaning mode, the entire archive will be deleted, even if clean files are present. 4.1.6.4 Extensions An extension is part of the file name delimited by a period. The extension defines the type and content of the file.
all future connections of this type will be allowed or blocked according to the rule. Policy‑based mode – Blocks all connections which are not defined by a specific rule that allows them. This mode allows advanced users to define rules that permit only desired and secure connections. All other unspecified connections will be blocked by the Personal firewall. Learning mode – Automatically creates and saves rules; this mode is suitable for initial configuration of the Personal firewall.
When the Personal firewall switches to another profile, a notification will appear in the lower right corner near the system clock. 4.2.3 Block all network traffic: disconnect network The only option for blocking all network traffic is to click Block all network traffic: disconnect network. All inbound and outbound communication is blocked by the Personal firewall with no warning displayed. Use this option only if you suspect critical security risks requiring disconnection of the system from the network.
• • Remote: This tab contains information about the remote port (port range). It also allows you to define a list of remote IP addresses or zones for a given rule. Add IPv4 address button. Local: Displays information about the local side of the connection, including the number of the local port or port range and the name of the communicating application. The Trusted zone is identified by the local IP address of the network adapter.
authentication – Server configuration”). • Encoded public key • Public key certificate (.crt) 4.2.6.1.2 To test your settings, press the Test button. If authentication is successful, a Server authentication successful message will appear. If authentication is not configured properly, one of the following error messages will appear: Server authentication failed. Maximum time for authentication elapsed. The authentication server is inaccessible.
4.2.7 Establishing connection – detection The Personal firewall detects each newly‑created network connection. The active firewall mode determines which actions are performed for the new rule. If Automatic mode or Policy-based mode is activated, the Personal firewall will perform predefined actions with no user interaction. The Interactive mode displays an informational window which reports detection of a new network connection, supplemented with detailed information about the connection.
One important principle in spam detection is the ability to recognize unsolicited email based on predefined trusted addresses (whitelist) and spam addresses (blacklist). All addresses from your contact list are automatically added to the whitelist, as well as all other addresses you mark as safe. The primary method used to detect spam is the scanning of email message properties.
purchasing ESET Smart Security. 4.4.1.2.1 4.4.1 The Update mode tab contains options related to the program component update. Update setup The update setup section specifies update source information such as the update servers and authentication data for these servers. By default, the Update server drop-down menu is set to Choose automatically to ensure that update files will automatically download from the ESET server with the least network traffic.
Selecting the Use global proxy server settings option will use the proxy server configuration options already specified within the Miscellaneous > Proxy server branch of the Advanced Setup tree. Select the Do not use proxy server option to specify that no proxy server will be used to update ESET Smart Security.
Warning: If you want to allow access to the update files via the HTTP server, the Mirror folder must be located on the same computer as the ESET Smart Security instance creating it. The first step in configuring the Mirror is to select the Create update mirror option. Selecting this option activates other Mirror configuration options such as the way update files will be accessed and the update path to the mirrored files. The methods of Mirror activation are described in detail in section 4.4.1.2.4.
4.4.1.2.4.2 Troubleshooting Mirror update problems In most cases, problems during an update from a Mirror server are caused by one or more of the following: incorrect specification of the Mirror folder options, incorrect authentication data to the Mirror folder, incorrect configuration on local workstations attempting to download update files from the Mirror, or by a combination of the reasons above.
Since Update is one of the most frequently used scheduled tasks, we will explain how to add a new update task. From the Scheduled task: drop‑down menu, select Update. Click Next and enter the name of the task into the Task name: field. Select the frequency of the task. The following options are available: Once, Repeatedly, Daily, Weekly and Event triggered. Based on the frequency selected, you will be prompted with different update parameters.
In each section, the displayed information can be directly copied to the clipboard by selecting the entry and clicking the Copy button. To select multiple entries, the CTRL and SHIFT keys can be used. 4.7.1 Log maintenance The Logging configuration of ESET Smart Security is accessible from the main program window. Click Setup > Enter entire advanced setup tree... > Tools > Log files. You can specify the following options for log files: 4.
At the top of the ESET Smart Security main program window is a Standard menu which can be activated or disabled based on the Use standard menu option. If the Show tooltips option is enabled, a short description of any option will be displayed if the cursor is placed over the option. The Select active control element option will cause the system to highlight any element which is currently under the active area of the mouse cursor. The highlighted element will be activated after a mouse click.
about your computer related to newly‑detected threats. This information may include a sample or copy of the file in which the threat appeared, the path to that file, the filename, the date and time, the process by which the threat appeared on your computer and information about your computer‘s operating system. While there is a chance that this may occasionally disclose some information about you or your computer (usernames in a directory path, etc.
4.9.3 Submission You can select how files and statistical information will be submitted to ESET. Select the By means of Remote Administrator or directly to ESET option for files and statistics to be submitted by any available means. Select the By means of Remote Administrator option to submit files and statistics to the remote administration server, which will ensure their subsequent submission to ESET’s Threat Lab.
5. Advanced user This chapter describes features of ESET Smart Security which may be useful for more advanced users. Setup options for these features are accessible only in Advanced mode. To switch to Advanced mode, click Change... in the bottom left corner of the main program window, or press CTRL + M on your keyboard. 5.1 Proxy server setup In ESET Smart Security, proxy server setup is available in two different sections within the Advanced Setup tree.
General options: – help – version – base‑dir = FOLDER – quar‑dir = FOLDER – aind show help and quit show version information and quit load modules from FOLDER quarantine FOLDER show activity indicator 0 1 10 101 102 103 – no threat found – threat found but not cleaned – some infected files remained – archive error – access error – internal error Targets: – files scan files (default) – no‑files do not scan files – boots scan boot sectors (default) – no‑boots do not scan boot sectors – arch scan archives
List – Contains functions for easier navigation within the program as well as various other functions like finding information online. NOTE: Items highlighted in red are unknown and are therefore considered potentially dangerous. If an item is in red, it does not automatically mean that you can delete the file. Before deleting, please make sure that the files are truly dangerous or not needed. Help – Contains information about the application and its functions.
tree structure section contains removed values Remove – Removes entries from the list value / file has been changed Show – Displays the selected snapshot. Alternatively, you can doubleclick the selected entry. tree structure section contains modified values / files the risk level has decreased / it was higher in the previous log Export... – Saves the selected entry in an .xml file (as well as a .zip version) the risk level has increased / it was lower in the previous log 5.4.1.
- c:\windows\system32\advapi32.dll [...] In this example the module khbekhb.dll was marked by a “+”. When the script runs, it will recognize the processes using that specific module and end them. 03) TCP connections This section contains information about existing TCP connections. Example: 03) TCP connections: - Active connection: 127.0.0.1:30606 -> 127.0.0.1:55320, owner: ekrn.exe - Active connection: 127.0.0.1:50007 -> 127.0.0.1:50006, - Active connection: 127.0.0.1:55320 -> 127.0.0.
The selected items will either be deleted or reset to their original values. 5.4.1.5.3 How to execute Service scripts 5.5.2.1 Folders Temporary folder – Working directory for files required during ESET SysRescue compilation. Mark all desired items, then save and close the script. Run the edited script directly from the SysInspector main window by selecting the Run Service Script option from the File menu.
5.5.2.4 Bootable USB device If you have selected USB device as your target medium, you can select one of the available USB media on the Bootable USB device tab (in case there are more USB devices). Warning: The selected USB device will be formatted during ESET SysRescue creation. All data on the device will be deleted. 5.5.2.5 Burn If you have selected CD/DVD as your target medium, you can specify additional burning parameters on the Burn tab. Delete ISO file – Select this option to delete .
6. Glossary 6.1 Types of infiltration infiltration not falling under any specific class of infiltration. An Infiltration is a piece of malicious software trying to enter and/or damage a user’s computer. Since this is a very broad category, it is often divided into many subcategories: 6.1.1 Downloader – A malicious program with the ability to download other infiltrations from the Internet. Viruses A computer virus is an infiltration that corrupts existing files on your computer.
to be safe than sorry.If there is a file detected as adware on your computer, it is advisable to delete it, since there is a high probability that it contains malicious code. 6.1.6 Spyware This category covers all applications which send private information without user consent/awareness. Spyware uses tracking functions to send various statistical data such as a list of visited websites, email addresses from the user‘s contact list, or a list of recorded keystrokes. 6.2.
6.2.6 SMB Relay SMBRelay and SMBRelay2 are special programs that are capable of carrying out attacks against remote computers. The programs take advantage of the Server Message Block file sharing protocol, which is layered onto NetBIOS. A user sharing any folder or directory within the LAN most likely uses this file sharing protocol. Within local network communication, password hashes are exchanged.
small sum first • You are asked to enter, under various pretenses (data verification, Financial operations), some of your personal data – bank account numbers, usernames and passwords, etc. • It is written in a foreign language • You are asked to buy a product you are not interested in. If you decide to purchase anyway, please verify that the message sender is a reliable vendor (consult the original product manufacturer). • Some of the words are misspelled in an attempt to trick your spam filter.