
Installation manual


ESI Communications Servers Hardware Installation Manual ESI-1000, ESI-600, ESI-200
F.3
“E2” port cards
Each “E2” port card must be mounted onto a “Hot Swap” Port Card Adapter (ESI part # 5000-0462)
1
prior
to being installed on the ESI Communication Server. Using “Hot Swap” Port Card Adapters allows you to
“hot-swap” port cards — i.e., replace them while the system is powered-up. However, installing a new port
card requires power-cycling the system to allow it to recognize the new card.
Important: While they are physically similar to the Port Card Adapters for the IVX X-Class system, “Hot-Swap” Port
Card Adapters are for use with only ESI Communications Servers. Similarly, you should use only “Hot-
Swap” Port Card Adapters on ESI Communications Servers.
Wear a grounding strap and avoid unnecessary movement while handling the circuit boards and
Port Card Adapters.
To install the port card on the Port Card Adapter:
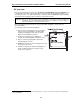
1. Place the port card’s Amphenol connector through the
opening of the Port Card Adapter’s faceplate, while
simultaneously aligning the port card’s screw holes
with the Port Card Adapter’s standoffs.
2. Screw the port card to the Port Card Adapter,
using the five provided Phillips-head machine screws.
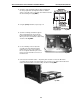
3. Plug one end of the gray flat ribbon cable into the
Port Card Adapter connector.
4. Fold the gray flat cable as shown, and plug its other end
into the port card connector.
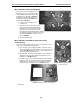
5. Install the assembled port card/Port Card Adapter into
the Base Cabinet, following the instructions under
“CS port cards,” page F.2.
1
If you’re installing an “E2” port card on an ESI-600 with a metal faceplate, you’ll need the “Hot Swap” Port Card Adapter with a metal faceplate
(ESI part # 5000-0385).