
Installation manual


ESI Communications Servers Hardware Installation Manual ESI-1000, ESI-600, ESI-200
F.4
About replacing port cards
Important: The main board, expansion board, and expansion cable cannot be removed or replaced under power. The
entire system must be powered-down when you install, remove, or replace any of these components.
Notes regarding hot-swapping:
When you replace a port card with a new one, the system will detect the port card type.
If the new port card’s type is different than that of the original port card, the newly installed port card won’t
come on-line.
If the new port card’s type is the same as that of the original port card, the system will automatically upload
software to the new port card. This upload process can take from four minutes to one hour, depending on
the type of port card and how busy the system is at the time.
Hot-swap is not supported during system boot.
If you’re hot-swapping identical cards between two slots, the upload process can take more than twice as
long as when you hot-swap one card at a time.
A port card that’s removed and inserted can’t be removed and inserted again within five minutes.
When replacing port cards, you must observe the following rules and limitations:
1. The replacement port card must be identical to the port card being removed (i.e.: an E2-612 must be
replaced with an E2-612; an ESI-DLC must be replaced with an ESI-DLC; etc.) — with the following
exception: because each “E2” card is functionally identical to its corresponding “CS” version, you could
(for example) remove an E2-684 and replace with a CS-684.
2. BEFORE you remove the port card:
• The port card must be completely idle.
• You must remove the cable from the front of the card (25-pair amphenol or Ethernet cable).
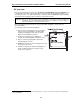
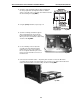
3. When removing the port card, follow the instructions under “Port card installation,” beginning on page F.2.
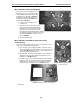
4. Before inserting a replacement port card into a slot, wait at least 15 seconds after removing the previous
port card.
5. When inserting a port card, don’t re-connect the cable to the front connector until the inserted card is on-line.