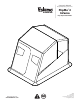
Operator's Manual Original Operating Instructions FlipMo™ 2 Inferno Flip-Style Sled Shelter GAS/OIL RATIO 50:1 Get parts online at www.GetEskimo.com 15649 ECN # 9837 Rev. 1 06/11/2013 © Copyright 2013 Ardisam, Inc. All Rights Reserved.
Operator's Manual ESKIMO® FlipMo™ 2 Inferno INTRODUCTION Eskimo® Ice Shelters are engineered with the ice fisherman in mind. We make quality and durability our priority, and we appreciate your purchase of one of our ice shelters. Follow these simple instructions and your ice shelter will provide you many years of troublefree pleasure. Save these instructions for future reference.
Operator's Manual ESKIMO® FlipMo™ 2 Inferno IMPORTANT SAFETY PRECAUTIONS This shelter is made with flame resistant fabric which meets CPAI-84 specifications. It is not fire proof. The fabric will burn if left in continuous contact with any flame source. The application of any foreign substance to the shelter fabric may render the flame resistant properties ineffective. Fuel-based heat sources burn oxygen and emit carbon monoxide (an odorless, colorless, poison gas).
Operator's Manual ESKIMO® FlipMo™ 2 Inferno ASSEMBLY INSTRUCTIONS ¼-20 X 1” bolts Hinger Riser A ¼-20 X ¾” bolt Tools needed – (2) 7/16” wrenches, a Phillips head screwdriver, rubber mallet (optional), and a cordless drill (optional). ¼” washers Assembly Note: The use of a cordless drill with socket will make assembly of your ice shelter much quicker. Be sure to set the drill speed on low so you do not over tighten any nut and bolt combination.
Operator's Manual ESKIMO® FlipMo™ 2 Inferno 6. Attach the seat rail (14818) through holes #3 and #4. As mentioned earlier you will need to remove the bolts in this step to fit the seat rail (14818) to the holes. Replace the hardware and tighten. SEE FIGURE 3 7. Attach the (4) vertical frame supports (11305) by locating the correct holes in the seat rail (14818) that are called out in Figure 4. Using (8) ¼-20 x 2¼” bolts, (16) ¼” washers and (8) ¼-20 nylock nuts.
Operator's Manual ESKIMO® FlipMo™ 2 Inferno SHELTER FRAME/SKIN INSTALLATION top cross brace 14. Insert the 3 upright poles from each hinge (68141/68142) into the (3) Top Cross Braces (68131). Push the snap button inward to allow the Top Cross Brace to slide over the upright hinge poles. Adjust the Top Cross Braces on the hinge to be in the transport position (lowest collapsed height). SEE FIGURE 9 15. Unfold the skin and locate the Eskimo® logo near the zippered door, which is in the front of the sled.
Operator's Manual ESKIMO® FlipMo™ 2 Inferno 21. In the parts box there is a bag of pole retention clips. These clips will be used in the “stow and go” position of the spreader poles. The installation of the pole retention clips involves (2) clip retainers (15708), (1) #10-24 nylock nut, (1) #10-24 x ½” bolt. Tighten hardware and repeat installation until all pole retention clips are properly attached. SEE FIGURE 15 & 16 22.
Operator's Manual ESKIMO® FlipMo™ 2 Inferno ADDITIONAL INSTALLATION skirt 14. Locate the included 8 foot tow rope that was in the hardware bag. To install the tow rope locate the two holes in the front of the sled and push each end of the rope through a hole. Tie a knot at each end of the rope to keep the rope from pulling through the holes. This tow rope is designed for manual pulling by hand only. DO NOT tow behind a motorized vehicle with rope.
Operator's Manual ESKIMO® FlipMo™ 2 Inferno PARTS EXPLOSIONS FlipMo™ 2 Inferno 10 9 14 13 4 7 12 5 8 11 1 3 6 2 FLIPMO™ 2 INFERNO PARTS LIST REF. NO. PART NO. QTY. 1 SLED DESCRIPTION 69390 1 2 PLATE CORNER MOUNT FLIPMO 3 11599 2 - WASHER 1/4” FLAT ZINC 48261 88 3 RISER HINGE A 68052 1 - NUT 1/4-20 HNYLK ZN 67538 40 4 RISER HINGE B 68053 1 - BOLT 1/4-20 X 2 1/4” HHCS GR5 ZN 48271 8 5 ASSEMBLY POLE SPREADER 19.
Operator's Manual ESKIMO® FlipMo™ 2 Inferno PARTS EXPLOSIONS FlipMo™ 2 Inferno 4 6 5 3 2 1 FLIPMO™ 2 INFERNO PARTS LIST REF. NO. 10 PART NO. QTY. 1 SEAT RAIL DESCRIPTION 14818 2 2 FRAME VERTICAL SUPPORT 11305 4 3 ASSEMBLY TABLE 12.125” X 9.125” 11331 2 4 ASSEMBLY TABLE 17.375” X 12.5” 15646 1 5 SWIVEL VERSA MOUNT 15016 2 6 SEAT VERSA TOP 15004 2 Check for parts online at www.GetEskimo.
Operator's Manual ESKIMO® FlipMo™ 2 Inferno FLIPMO™ 2 INFERNO Warranty Terms and Conditions PRODUCT WARRANTY: 1-YEAR LIMITED WARRANTY Ardisam, Inc., warrants this Eskimo® FlipMo™ 2 Inferno under a one-year limited warranty to be free from defects in materials or workmanship or both for a period not exceeding twelve consecutive months from the date of original purchase by the first retail consumer or commercial end user. “Consumer use” means personal recreational use by a retail consumer.
BOLT IDENTIFICATION CHART • ot all bolt sizes shown are included with all shelters. Bolts N shown are for size reference only. Extra hardware may be included in the parts bag. BOLT 1/4-20 X 3/4” HH GR5 ZN BOLT 1/4-20 X 1” HH GR5 ZN BOLT 1/4-20 X 1-1/4” HH GR5 ZN BOLT 1/4-20 X 1-1/2” HH GR5 ZN BOLT 1/4-20 X 2-1/4” HH GR5 ZN Eskimo®, Division of Ardisam, Inc. 1160 8th Avenue, PO Box 666 Cumberland, WI 54829 800-345-6007 | Fax 715-822-2223 Email: info@ardisam.