
Full Product Manual


Check for parts online at www.GetEskimo.com or call 800-345-6007 M-F 8-5 CDT
10
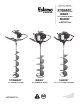
Operator's Manual
ESKIMO
®
Power Ice Auger
TRANSPORTING YOUR ICE AUGER
1. Never transport engine inside an enclosed space or vehicle.
Fuel or fuel vapors may ignite causing serious injury or death.
2. If fuel is present in the fuel tank, transport in an open vehicle
in an upright position with the gas cap facing upwards.
3. If an enclosed vehicle must be used, remove gas into an ap-
proved red fuel container. DO NOT siphon by mouth.
4. Run engine to use up the fuel in the carburetor and fuel tank.
Always run engine in a well ventilated area.
5. Wipe away any spilled fuel from engine and ice auger. Allow
to dry.
LONGTERM STORAGE
• If your ice auger will not be ran for more than one month,
prepare it for long-term storage.
Steps for Long Term Storage
1. Add fuel stabilizer according to manufacturer’s instructions.
2. Run engine for 10-15 minutes to ensure that the stabilizer
reaches the carburetor.
3. Remove the remainder of the fuel from the gas tank into an
approved fuel container.
4. Remove auger from powerhead and apply a thin layer of
grease to the output shaft.
5. Store auger and powerhead (engine) in a vertical position.
6. Remove all debris from auger and powerhead (engine).
7. Attach blade protector to bottom of auger.
SERVICE, TROUBLESHOOTING
AND REPAIR
SERVICE INFORMATION
At Ardisam, we build quality and durability into the design of
our products; but no amount of careful design by us, and careful
maintenance by you, can guarantee a repair-free life for your
unit. Most repairs will be minor, and easily xed by following the
suggestions in the troubleshooting guide in this section.
The guide will help you pinpoint the causes of common problems
and identify remedies.
For more complicated repairs, you may want to rely on your
retailer or an authorized repair center (contact your retailer for
a list of authorized mechanics in your area). A parts breakdown
can be found on our website, www.geteskimo.com.
We will always be glad to answer any questions you have, or
help you nd suitable assistance. To order parts or inquire about
warranty, call or write us at the address found on the next page,
CAUTION
AVOID INJURY! AUGER BLADES AND POINT ARE EX
TREMELY SHARP. USE CAUTION WHEN REMOVING
AND REPLACING.
PRACTICE SAFETY AT ALL TIMES. ENGINE MUST BE
TURNED OFF AND ALLOWED TO COOL, AND SPARK
PLUG WIRE MUST BE DISCONNECTED BEFORE AT
TEMPTING ANY MAINTENANCE OR REPAIR.
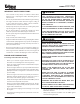
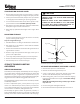
auger shaft
nut
point
holder
bolt
bolt hole
FIGURE 1
under the section “ordering repair parts”.
ICE POINT REPLACEMENT SEE FIGURE 1 ABOVE
1. Remove blade protector and both blades.
2. Remove nut and retaining bolt from point.
3. Using a locking pliers, grasp point and pull out. If holder
doesn’t come out with the point, remove with pliers.
4. With locking pliers, push in new point and holder aligning
bolt hole in point with holes in auger shaft. DO NOT damage
end of point.
NOTE: When installing holder in auger shaft, edges of holder
may shave o.
5. Insert retaining bolt and tighten with nut.
6. Re-attach both blades and put blade protector back on.