D00968120A Digital Integrated Amplifier OWNER’S MANUAL . . . . . . . . . . . . . . . 2 MANUEL DU PROPRIÉTAIRE . . .
< Do not expose this apparatus to drips or splashes. < Do not place any objects filled with liquids, such as vases, on the apparatus. CAUTION: TO REDUCE THE RISK OF ELECTRIC SHOCK, DO NOT REMOVE COVER (OR BACK). NO USERSERVICEABLE PARTS INSIDE. REFER SERVICING TO QUALIFIED SERVICE PERSONNEL.
For U.S.A. Contents CAUTION Changes or modifications to this equipments not expressly approved by TEAC CORPORATION for compliance will void the user’s warranty. Thank you for choosing Esoteric. Read this manual carefully to get the best performance from this unit. Contents. . . . . . . . . . . . . . . . . . . . . . . . . . . . . . . . . . . . . . . . . . 3 Before Use . . . . . . . . . . . . . . . . . . . . . . . . . . . . . . . . . . . . . . . . 4 Speaker Connection . . . . . . . . . . . . . . . . . . .
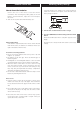
Before Use What’s in the box Please confirm that the following accessories are in the box when you open it. Remote control unit x 1 Batteries (AA, R6, SUM-3) x 2 Felt sheet x 3 Power cord x 1 Owner’s manual x 1 Warranty card x 1 Read this before operation < Be careful to avoid injury when moving the unit, on account of its weight. Get someone to help you if necessary. < To protect easily scratched furniture, you may stick the felt supplied with the unit to the feet.
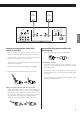
Right Speaker Left Speaker ENGLISH Connection using speaker cables with spades or bare wire 1. Turn the terminal cap counterclockwise to loosen it. The speaker terminal caps cannot be fully removed from the base. Connection using speaker cables with banana plugs Tighten the terminal cap and insert a banana plug. 2.
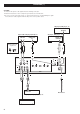
Connection (1) CAUTION: < Switch off the power to all equipment before making connection. < Read the instructions of each component you intend to use with this unit. < Be sure to insert each plug securely. To prevent hum and noise, avoid bundling the signal interconnection cables together with the AC power cord or speaker cables. CD player, DVD player, etc. DIGITAL OUT (OPTICAL) Super Audio CD player (SA-10) etc.
A Analog audio input terminals [LINE IN] Used for the input of analog 2-channel audio signals. Connect these terminals to a Super Audio CD player (SA10), cassette tape deck, tuner, etc. using commercially available XLR or RCA audio cables. C SIGNAL GND connection Use a commercially available PVC-covered cord to connect the signal ground terminal on the unit to the player’s signal ground. < Note that this is NOT an electrical safety ground (earth).
Connection (2) F Reserved slot for i.LINK (AUDIO) terminals When multiple AI-10’s (upgraded) are connected using i.LINK cables as shown below, you can enjoy surround sound from Super Audio CD, DVD-Video and DVD-Audio. The i.LINK (AUDIO) terminals (4 pin x 1, 6 pin x 1) will become available after a future hardware upgrade (charged). In addition to the digital audio from CD and DVD, the i.LINK (AUDIO) terminals can transmit the digital audio from Super Audio CDs. Connect the i.
Remote Control Unit How to insert the batteries Remove the cover of the remote control unit with a screwdriver. After checking the polarity (+/_) of two AA batteries, insert the batteries, replace the cover and replace the screws. < Take care not to pinch cables with the battery case. Restoring factory settings If you have made a lot of changes to the setup, and want to restart from a known set of options, restore the unit to the factory settings as follows: 1.
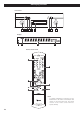
Identifying the Parts Front Panel A B C D E F G H I Display a c b d Remote Control Unit A G B F C D E Note: To simplify explanations, instructions in this manual refer to the names of the buttons and controls on the front panel only. Associated controls on the remote control will also operate similarly.
Front Panel A INPUT Turn this knob to select an input. In the setup mode, use this knob to change settings. c Message area Normally, “current input” and volume are shown on the display. “OPT” or “COAX” blinks when the unit cannot perceive the digital signal from the OPTICAL or COAXIAL terminal. B Power indicator Blue (on) The POWER button of the main unit is ON. Red (standby) When the POWER button is depressed, press the STANDBY button of the remote control unit to turn the unit standby.
Basic Operation 4 Play the source, and gradually turn up the volume to the required level by turning the VOLUME knob. 3 2 4 1 First of all, turn on the power of the connected components. To turn the unit off (standby) 2 Press the POWER button to turn the AI-10 on. power indicator To prevent sudden noise from the speakers, make sure to turn the unit off in the following way. 1. Stop the playback of the connected component. 2. Turn the AI-10 off using the POWER button.
Muting Word Sync INPUT To mute the sound temporarily, press the MUTING button. Press the MUTING button again to restore the sound. < While muting is engaged, “MUTING” and the name of the selected terminal alternately blink on the display. WORD This feature is used when you want to get your whole system locked to a single sync signal (clock) by connecting this unit to the Esoteric SA-10/UZ-1 or other devices that are capable of inputting a sync signal (word clock). knob.
Gain Setting for Analog Audio Input INPUT SETUP You can adjust the relative volume between the LINE IN terminals. Once the relative volume is set, each component connected to the AI-10 will have the approximate same volume level. 4 Press and hold the SETUP button for more than 2 seconds (or leave the unit idle for 10 seconds) to exit the Gain setup mode. 1 Select an input to be changed (LINE1, LINE2, LINE3 or LINE4/PHONO) by turning the INPUT knob.
Name and Skip Setting of the INPUT Knob INPUT SETUP The names of the inputs shown on the display can be changed. You can also set the INPUT knob to skip the input terminals that are not in use. 3 Turn the INPUT knob to change the setting. Example: When a CD player is connected to the COAX (coaxial) terminal and a DVD player to the OPT (optical) terminal Then only “CD” or “DVD” will appear on the display when you turn the INPUT knob.
Settings for Word Sync, Volume and i.LINK Available menu item and options INPUT SETUP W_OUT (Word sync output frequency) Select the frequency of the word sync signal. The factory setting is “100”. 1 If you want to change “W_OUT (Word sync output frequency)”, select an input to be changed by turning the INPUT knob. 100 a q 44.1 a q 88.2 a q 176(176.4) a q 48 a q 96 a q 192 < The word sync signal is output only when the WORD button is set to “W`_OUT” (see page 13).
“CH” and “i_RC” will become available after a future hardware upgrade (charged). CH (Channel) When the i.LINK (AUDIO) terminal is connected to a digital device, select the channels for this unit. The factory setting is L/R. L/R: front left and right channels C/LFE: center channel and LFE (subwoofer) LS/RS: surround left and right channels < The icons of the selected channels light on the display. Note When two AI-10’s are connected using i.
i.LINK (IEEE 1394) The i.LINK (AUDIO) terminals will become available after a future hardware upgrade (charged). The i.LINK is also known as IEEE 1394, an international specification. By connecting an i.LINK (AUDIO)-capable device to the i.LINK (AUDIO) terminal on this unit using an i.
Troubleshooting In case you experience any problem with this unit, please take the time to look through this chart and see if you can solve the problem yourself before you call your dealer. General No power e Check the connection to the AC power supply. Check and make sure the AC source is not a switched outlet and that, if it is, the switch is turned on. Make sure there is power to the AC outlet by plugging another item such as a lamp or fan. e Press the POWER button of the main unit to turn it on.
Specifications General Power supply Europe model. . . . . . . . . . . . . . . . . . . . . . . . . . . . . . . . . . . . . . . . . . . . . AC 230 V, 50 Hz U.S.A./Canada model . . . . . . . . . . . . . . . . . . . . . . . . . . . . . . . . . . . . . . . AC 120 V, 60 Hz Korea model . . . . . . . . . . . . . . . . . . . . . . . . . . . . . . . . . . . . . . . . . . . . . AC 220 V, 60 Hz Power consumption . . . . . . . . . . . . . . . . . . . . . . . . . . . . . . . . . . . . . . . . . . . . . . . . . .
Sommaire Nous vous remercions pour l’achat d’un appareil Esoteric. Lire ce manuel avec attention pour obtenir les meilleures performances possibles de cet appareil. Sommaire . . . . . . . . . . . . . . . . . . . . . . . . . . . . . . . . . . . . . . . . 21 Avant utilisation . . . . . . . . . . . . . . . . . . . . . . . . . . . . . . . . . . . 21 Branchement des enceintes. . . . . . . . . . . . . . . . . . . . . . . . . . . 22 Connexions. . . . . . . . . . . . . . . . . . . . . . . . . . . . . . . . . . . .
TEAC ESOTERIC COMPANY 3-7-3, Nakacho, Musashino-shi, Tokyo 180-8550, Japan Phone: (0422) 52-5132 e-mail: eso-os@tec.teac.co.jp TEAC AMERICA, INC. 7733 Telegraph Road, Montebello, California 90640 Phone: (323) 726-0303 TEAC CANADA LTD. 5939 Wallace Street, Mississauga, Ontario L4Z 1Z8, Canada Phone: (905) 890-8008 TEAC MEXICO, S.A. De C.