D00816700B Super Audio CD/CD Player Owner’s Manual . . . . . . . . . . . . . . . . . . . . 2 Manuel du Propriétaire . . . . . . . . . . . 23 Bedienungsanleitung . . . . . . . . . . . . . .
WARNING: TO PREVENT FIRE OR SHOCK HAZARD, DO NOT EXPOSE THIS APPLIANCE TO RAIN OR MOISTURE. CAUTION: TO REDUCE THE RISK OF ELECTRIC SHOCK, DO NOT REMOVE COVER (OR BACK). NO USERSERVICEABLE PARTS INSIDE. REFER SERVICING TO QUALIFIED SERVICE PERSONNEL.
This product has been designed and manufactured according to FDA regulations “title 21, CFR, chapter 1, subchapter J, based on the Radiation Control for Health and Safety Act of 1968“, and is classified as class 1 laser product. There is not hazardous invisible laser radiation during operation because invisible laser radiation emitted inside of this product is completely confined in the protective housings. The label required in this regulation is shown ①. Contents Thank you for choosing TEAC.
Features The world’s first VRDS mechanism for Super Audio CD players, incorporating a magnesium turntable and a SS400 bridge The VDRS mechanism completely eliminates any vibration of the disc itself, thanks to the full-diameter clamp, which clamps the disc securely to the turntable. In addition, warping and other defects of the disc are eliminated.
Before Use What’s in the box Placement of the unit Please confirm that the following accessories are in the box when you open it. High-quality hardened tool steel is used for the pin-point feet, securely attached to the bottom of the player. Although the cover feet may appear loose, the weight of the unit causes them to be firm and secure, and the design effectively damps and reduces vibration.
Discs Type of Discs That Can be Played on This System This player can playback discs bearing any of the following logos: Audio CD: • 12cm or 8cm discs • Linear PCM digital audio Audio CDs are divided into tracks. Super Audio CD: • Single layer, dual layer or Hybrid layer • 12cm or 8cm discs • Digital audio (DSD) Super Audio CDs are divided into tracks. < Always place the disc on the disc tray with the label side uppermost. (Compact discs can be played or recorded only on one side.
Remote Control Unit How to insert the batteries Remove the cover of the remote control unit with a screwdriver. After checking the polarity (+/_) of two AA batteries, insert the batteries, replace the cover and replace the screws.
Connections CAUTION: < Switch off the power to all equipment before making connections. < Read the instructions of each component you intend to use with this unit. < Be sure to insert each plug securely. To prevent hum and noise, avoid bundling the signal interconnection cables together with the AC power cord or speaker cables. Master clock generator (G-0s, etc.
A Analog audio output terminals Use either the XLR or RCA (pin) FRONT terminals for analog stereo output. If your amplifier has balanced XLR analog audio inputs, connect the XLR jacks on the unit to the amplifier’s XLR jacks, otherwise use the RCA (pin) connections. For surround (5.1) amplifiers with analog inputs, also use the RCA (pin) SURROUND pair, CENTER and SUBWOOFER connections (in addition to the FRONT pair).
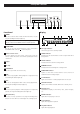
Front panel features A B C Front Panel A POWER Use this to turn the unit on and off. When the unit is on, the ring surrounding the button lights up. D E F G H I J Display a b c e d f The equipment draws nominal non-operating power from the AC outlet with its POWER switch in the OFF position. k j i h g B CLOCK MODE Use this to select an external word sync source connected to the WORD SYNC connector C on the rear panel.
Understanding the remote control unit A Number buttons Use these for selecting tracks by number, etc. B 2CH/MULTI Use this to switch between two-channel (stereo) and multichannel surround audio output. C PLAY AREA Use this to select the playback area of Super Audio CDs. D SCAN (m/,) Use these for fast scanning during playback. E STOP Equivalent to pushing the STOP button on the front panel. ENGLISH I F PLAY Equivalent to pushing the PLAY button on the front panel.
Playback 3 2 4 5 1 5 Press the PLAY button to start playback. Pausing playback 1 Turn on the power using the POWER button on the main unit. The button and the display light. Press the PAUSE button to pause playback (the ring surrounding the PAUSE button on the main unit lights). Press PLAY or PAUSE to restart playback. 2 Press the OPEN/CLOSE button. Stopping playback The tray opens after a second or two (this delay is due to the movement of the internal mechanism of the unit before opening).
Skipping playback Press the MUSIC SKIP button (. or /) repeatedly until the desired track is found. The selected track will be played from the beginning. < If tracks are skipped while playback is paused or stopped, playback is paused or stopped at the start of the selected track. < In programmed playback mode, these buttons will move between tracks in the programmed order. Selecting a track Use the number button to select tracks for playback.
Programmed playback Programmed playback allows up to 30 tracks to be played back in the order you decide. Clearing the last track from the list Push the CLEAR button to clear the last track from the list. 1 Press the PROGRAM button (either when playing back or stopped). If a track is currently playing back (or paused in the middle of the track), this track is added as the first item in the programmed playback list. Adding tracks to the list Use the number buttons to add tracks to the list.
Repeat mode Use the REPEAT button to select the repeat mode for playback. Repeated presses of the REPEAT button cycle between the following options: REPEAT DSC (whole disc repeat) REPEAT OFF (no repeat) < Halting playback stops the repeat mode. < This feature is not available for all discs. < The following buttons cancel repeat mode: STOP, OPEN/CLOSE, POWER. Track repeat The display on the main unit can be dimmed to suit the environment in which you listen to music.
Changing the display mode During playback, it is possible to change the display as shown here. < The DISPLAY button doesn’t work during programmed playback. Currently playing track Elapsed time of current track Time remaining for current track Clock Mode For highly accurate playback, you can use the word clock (sync) output of an external unit such as the Esoteric D-70 or G-0 to synchronize your whole audio system. Use the CLOCK MODE (main unit) button to switch between Word M1 ON and Word OFF.
Settings (introduction) 1 Turn on the main unit. 4 When a option marked with “>” is displayed, use the up or down cursor buttons to change the setting, and press the ENTER button to confirm the entry. 2 Press the SETUP button to enter the setup menu. < Individual menu functions are described on page 19 and 20. < Repeat steps 3 and 4 as required. “AudioSetup” appears on the front panel display. 5 Exit the setup menu by pressing SETUP once more.
Settings (introduction) AudioSetup GeneralSet Analog Out options DigitalOut CD Direct SP Setup SP Size L/R Size options options C Size options options SR/SL Size options SW ON/OFF options L/R *.*m options C *.*m options SR/SL *.*m options LR ***.*dB options C ***.*dB options SR ***.*-dB options SL ***.*dB options SW ***.
Settings (Audio Setup) Analog output settings (Analog Out) When a option marked with “>” is displayed, use the up or down cursor buttons to change the setting, and press the ENTER button to confirm the entry. 2ch * Outputs audio from the FRONT L and R terminals. If the source is multi-channel surround, this is downmixed into 2 channels. Use this setting when you have no multi-channel analog connections. Multi Channel Use this when the unit is connected to an AV amplifier with 5.1 surround analog inputs.
Settings (Speaker Setup 2) Speaker distance Ideally, the speakers should be placed so that they are all the same distance from the listening position. If this is not possible, you should use this method described here to adjust them individually. It is also possible to adjust all distances together. The point of these settings is to provide the best synchronization between sound and image by delaying the sound by an appropriate amount.
Troubleshooting In case you experience any problem with this unit, please take the time to look through this chart and see if you can solve the problem yourself before you call your dealer or a TEAC service center. No power e Check the connection to the AC power supply. Check and make sure the AC source is not a switched outlet and that, if it is, the switch is turned on. Make sure there is power to the AC outlet by plugging another item such as a lamp or fan.
Specifications General System . . . . . . . . . . . . . . . . . . . . . . . Super Audio CD and CD Power supply Europe model . . . . . . . . . . . . . . . . . . . . . AC 230 V, 50 Hz U.S.A./Canada model. . . . . . . . . . . . . . . . AC 120 V, 60 Hz Korea model . . . . . . . . . . . . . . . . . . . . . . AC 220 V, 60 Hz Word Synchronization input format Jack . . . . . . . . . . . . . . . . . . . . . . . . . . . . . . . . . . . . . . . . . BNC Input level . . . . . . . . . . . . . . . . . . . . . . . . . . .
Sommaire Nous vous remercions pour l’achat d’un appareil TEAC. Lire ce manuel avec attention pour obtenir les meilleures performances possibles de cet appareil. Sommaire . . . . . . . . . . . . . . . . . . . . . . . . . . . . . . . . . . . . . . . . 23 Caractéristiques . . . . . . . . . . . . . . . . . . . . . . . . . . . . . . . . . . . 24 Avant utilisation . . . . . . . . . . . . . . . . . . . . . . . . . . . . . . . . . . . 25 Disques. . . . . . . . . . . . . . . . . . . . . . . . . . . . . . . . . . .
Caractéristiques Le premier mécanisme VRDS au monde pour lecteurs Super Audio CD, incorporant un plateau en magnésium et un pont SS400. Le mécanisme VRDS élimine complètement toute vibration du disque lui même, grâce à un palet presseur intégral, qui plaque tout le disque sur le plateau. Le voile et autres déformations du disque sont éliminés.
Avant utilisation Contenu de l’emballage Vérifiez que les accessoires suivants se trouvent bien dans le carton.
Disques Type de disques utilisables sur ce système Ce lecteur permet de lire tous les disques portant les logos suivants: CD audio: • Disques 12 cm ou 8 cm • Audio numérique linear PCM Les CD audio sont divisés en pistes. Disque audio super- compact (Super Audio CD): • Simple couche, double couche ou couche hybride • Disques 12 cm ou 8 cm • Audio numérique (DSD) Les Super Audio CD sont divisés en pistes. “Super Audio CD” est une marque déposée. “DSD” est une marque déposée.
Télécommande Mise en place des piles Retirez le couvercle de la télécommande à l’aide d’un tournevis. Après avoir vérifié la polarité (+/_) des deux piles AA, insérez les piles, remettez le couvercle en place puis replacez les deux vis Restauration des réglages usine Si vous avez fait beaucoup de modifications au système, et voulez repartir d’options connues, restaurez les réglages usine comme suit: 1. Avec l’appareil éteint, appuyez et maintenez enfoncé le bouton STOP. 2.
Raccordement PRÉCAUTION: < Coupez l’alimentation de tous les appareils avant d’effectuer les raccordements. < Lisez les instructions qui accompagnent chaque appareil que vous avez l’intention d’utiliser en association avec cet appareil-ci. < Veillez à ce que chaque fiche soit soigneusement insérée. Pour éviter les ronflements et les bruits parasites, évitez d’attacher les câbles d’interconnexion parcourus par les signaux avec le cordon d’alimentation secteur ou les câbles de liaison aux enceintes.
A Prises de sortie audio analogiques Utilisez soit les prises XLR ou RCA FRONT (avant) pour la sortie analogique stéréo. Si votre amplificateur a des entrées audio analogiques XLR, connectez les prises XLR de l’appareil à celles de l‘amplificateur, sinon utilisez les connexions RCA. Pour les amplificateurs multicanaux (5.1) avec entrées analogiques, utilisez également une paire de câbles RCA SURROUND, les connexions CENTER et SUBWOOFER en plus de la paire avant (FRONT).
Caractéristiques de la face avant A B C A POWER Pour allumer ou éteindre l’appareil. Lorsque l’appareil est sous tension, l’anneau autour du bouton s’illumine. D E F G H I J Afficheur a b c e d f L’appareil tire de la prise secteur une puissance faible mais non nulle lorsque l’interrupteur POWER est sur la position OFF. B CLOCK MODE Pour sélectionner une source word sync externe raccordée au connecteur WORD SYNC du panneau arrière.
Comprendre la télécommande A Touches numériques Pour sélectionner les plages par leur numéro, etc. B 2CH/MULTI Pour basculer entre les modes audio stéréo deux canaux et son multicanal (surround). C PLAY AREA Pour sélectionner l’aire de lecture sur les disques Super Audio CD. D SCAN (m/,) Pour le balayage en lecture. I E STOP Equivalent au bouton STOP sur la face avant. F PLAY A Equivalent au bouton PLAY sur la face avant. J Utilisez ces touches dans le mode configuration.
Lecture 3 2 4 5 Appuyez sur le bouton PLAY pour démarrer la lecture. 5 1 1 Allumez l’appareil en appuyant sur son bouton POWER. Mettre en pause Le bouton et l’affichage s’illuminent. 2 Appuyez sur le bouton OPEN/CLOSE. Appuyez sur le bouton PAUSE pour mettre la lecture en pause (l’anneau entourant le bouton PAUSE de l’appareil principal s’illumine). Appuyez sur PLAY ou PAUSE pour reprendre la lecture.
Sauts en lecture Appuyez sur le bouton MUSIC SKIP (. ou / ) à répétition jusqu’à ce que la plage désiré soit trouvé. La plage sélectionné sera lu à partir de son début. < Si la touche . est pressée une seule fois en lecture, la lecture retourne au début de la plage. Si on re-appuie à moins d’une seconde du début de la plage, la lecture reprend au début de la plage précédant (ainsi en appuyant deux fois rapidement on fera reculer de deux plages, etc.
Lecture programmée La lecture programmée vous permet de lire 30 plages dans l’ordre que vous décidez. 1 Appuyez sur la touche PROGRAM (soit en lecture soit à Effacer la dernière plage de la liste Appuyez sur la touche CLEAR pour effacer le dernier plage de la liste. l’arrêt). Si une plage est en cours de lecture (ou en pause au milieu d’une plage), cette plage est ajoutée en tant que premier item de la liste programmée.
Mode lecture a répétition Utilisez la touche REPEAT pour sélectionner le mode de lecture à répétition. A chaque pression sur la touche REPEAT les fonctions se modifient suivant le cycle: REPEAT TRK (répétition de la plage) REPEAT DSC (répétition du disque) REPEAT OFF (hors service) Répétition d’une plage La luminosité de l’affichage de l’appareil principal peut être atténuée pour s’adapter à l’environnement où vous écoutez la musique. Il y a trois niveaux et une position “off” (coupé).
Changement du mode d’affichage En lecture, Il est possible de changer l’affichage comme montré ici. < La touche DISPLAY ne fonctionne pas pendant la lecture programmée. Mot de synchro Word sync Pour une lecture de haute précision, vous pouvez utiliser la sortie word clock (sync) d’un appareil externe tel que D-70 ou G-0 pour synchroniser votre système audio complet. Utilisez le bouton CLOCK MODE (appareil principal) pour commuter entre “Word M1 ON” et “Word OFF”.
Réglage 1 Mettez l’appareil principal sous tension. 4 Lorsqu’une option marquée d’un “>” est affichée, utilisez les curseurs haut et bas pour changer le réglage, et appuyez sur la touche ENTER pour confirmer l’entrée. 2 Appuyez sur la touche SETUP pour entrer dans le menu de configuration. < Lorsqu’une valeur numérique (telle qu’une distance d’enceinte) est changée la valeur est confirmée sans appuyer sur ENTER. < Les fonctions de menu individuelles sont décrites pages 39 à 40.
Réglage AudioSetup GeneralSet Analog Out option DigitalOut CD Direct SP Setup SP Size L/R Size option option C Size option option SR/SL Size option SW ON/OFF option L/R *.*m option C *.*m option SR/SL *.*m option LR ***.*dB option C ***.*dB option SR ***.*-dB option SL ***.*dB option SW ***.
Réglage (audio) Réglages sortie analogique (Analog Out) Lorsqu’une option marquée d’un “>” est affichée, utilisez les curseurs haut et bas pour changer le réglage, et appuyez sur la touche ENTER pour confirmer l’entrée. 2ch * L’audio sort sur les bornes FRONT L et R (avant gauche et droite). Si la source est en multicanal, elle est réduite par mixage sur 2 canaux. Utilisez ce réglage lorsque vous n’avez pas de connexions analogiques multicanal.
Réglage (réglage des enceintes 2) Distance des enceintes (Distance) Idéalement, les enceintes devraient être placées de telle façon qu’elles soient toutes à la même distance de la position d’écoute. Si ce n’est pas possible, vous devriez utiliser la méthode décrite ci-dessous pour les ajuster individuellement. Il est aussi possible d’ajuster toutes les distances ensemble. Le but de ces réglages est de fournir la meilleure synchronisation son image en retardant le son de la valeur appropriée.
Dépannage 1 En cas de problème avec l’appareil, prenez le temps de lire ce tableau et de voir si vous pouvez résoudre le problème tout seul avant de faire appel à votre revendeur ou au centre d’assistance TEAC. Pas d’alimentation e Vérifiez le raccordement au secteur. Vérifiez que la prise n’est pas commandée par un interrupteur, si c’est le cas allumez l’interrupteur. Assurez vous qu’il y a bien du courant en branchant un autre appareil comme une lampe ou un ventilateur.
Dépannage 2 Le volume global est faible, ou la balance entre les enceintes est étrange e Le niveau d’une enceinte (ou celui d’une paire d’enceintes) a été réglé trop bas ou trop haut dans la configuration des enceintes (voir page 40). Corrigez les niveaux. e Lorsque vous configurez les tailles d’enceintes, attribuer des réglages “small” et “off” à des enceintes autres que le caisson de graves peut affecter le volume du caisson de graves. Ajustez le niveau du caisson lui même.
Spécifications Généralités Système . . . . . . . . . . . . . . . . . . . . . . . . Super Audio CD et CD Alimentation Modèle Europe . . . . . . . . . . . . . . . . . . . . . . 230 Vca 50 Hz Modèle Etats-Unis/Canada . . . . . . . . . . . . . 120 Vca 60 Hz Modèle Corée . . . . . . . . . . . . . . . . . . . . . . . 220 Vca 60 Hz Sortie audio (numérique) OPTICAL . . . . . . Prise numérique optique x 1, –15 à –21 dBm COAXIAL . . . . . . . . . . . . . . . . . Prise RCA x 1, 0,5 Vp-p/75 Ω Puissance absorbée . . .
Ausstattungsmerkmale Magnesium-Disc-Teller und eine Brücke aus SS400-Stahl im weltweit ersten VRDSLaufwerk für Super Audio CD-Player Dank seines CD-Halterungssystems, das die CD vollflächig an den Drehtellermechanismus anpresst, verhindert dieses VDRSLaufwerk der neuesten Generation jegliche Eigenvibration der CD. Gleichzeitig werden Fertigungsfehler und Verformungen der Disc eliminiert, wodurch der Lesewinkel vom optischen Abtastsystem zu den Pits (optischen Vertiefungen) auf der Disc sehr konstant bleibt.
Inhalt Vielen Dank für den Kauf dieses TEAC-Geräts. Bitte lesen Sie diese Anleitung sorgfältig durch, um die Leistungsfähigkeit dieses Geräts optimal nutzen zu können. Vor der ersten Inbetriebnahme Lieferumfang Überprüfen Sie das mitgelieferte Zubehör des X-01 auf Vollständigkeit: Ausstattungsmerkmale . . . . . . . . . . . . . . . . . . . . . . . . . . . . . . 44 Inhalt . . . . . . . . . . . . . . . . . . . . . . . . . . . . . . . . . . . . . . . . . . . 45 Vor der ersten Inbetriebnahme . . . . . . . . .
Vor der ersten Inbetriebnahme Hinweise zur Verwendung dieser Bedienungsanleitung < Die Hinweise in dieser Bedienungsanleitung beziehen sich auf die Tasten der Fernbedienung. Selbstverständlich können Sie auch die entsprechenden Tasten an der Gerätevorderseite benutzen, sofern diese identische oder ähnliche Bezeichnungen tragen. < Funktionalität und Bedienerführung von Disks sind unterschiedlich und abhängig vom durch den jeweiligen Hersteller der Disc zur Verfügung gestellten Funktionsumfang.
Medien Zur Wiedergabe Geeignete Medien Der X-01 eignet sich zur Wiedergabe unterschiedlicher DiscFormate, sofern diese eines der folgenden Logos tragen und den entsprechenden Spezifikationen entsprechen: Audio-CD: • 12cm sowie 8cm Discs • Linear PCM Digital Audio Audio-CDs sind generell in Musiktitel unterteilt. Super Audio CD: • Einschichtig, zweischichtig beschrieben oder Hybrid-Schicht • 12cm sowie 8cm Discs • Digital Audio (DSD) Super Audio CDs sind generell in Programmtitel unterteilt.
Anschluss an einen Verstärker, usw. ACHTUNG: < Bevor Sie die einzelnen Komponenten Ihrer HiFi-Anlage miteinander verbinden, schalten Sie diese bitte aus. < Lesen Sie bitte auch die Bedienungsanleitungen der jeweiligen Komponenten, die Sie am X-01 anschließen möchten. < Vergewissern Sie sich bitte, daß sämtliche Verbindungen korrekt und sicher vorgenommen wurden.
A Analoge Audioausgänge Verwenden Sie die FRONTSEITIGEN XLR- oder Cinchausgänge, über die ein analoges Stereosignal ausgegeben wird. Sofern Ihr Verstärker symmetrisch geschaltete, analoge XLRAudioeingänge besitzt, verbinden Sie die XLR-Ausgänge des X-01 mit diesen Eingängen. Andernfalls verwenden Sie bitte die entsprechenden Cinchanschlüsse . Bei Surround-Verstärkern (5.
Bedienelemente auf der Gerätevorderseite A B C A POWER Hiermit schalten Sie den X-01 ein und aus. Bei eingeschaltetem Gerät leuchtet die Umrandung der Taste. D E F G H I J Display a b c e d f Auch wenn der POWER-Schalter auf OFF gestellt ist, d.h., die Ausrüstung nicht in Betrieb ist, verbraucht sie eine kleine Strommenge. B CLOCK MODE Hiermit können Sie die am WORD SYNC-Anschluss H auf der Geräterückseite angeschlossene externe Word SyncSignalquelle auswählen.
Verwendung der Fernbedienung A Zifferntasten Verwenden Sie die Zifferntasten zur direkten Eingabe einer Titel-, Kapitelnummer usw. B 2CH/MULTI dient zum Umschalten zwischen Zweikanal- (Stereo) und Mehrkanal-Surround-Wiedergabe. C PLAY AREA (Wiedergabebereich) Mittels dieser Taste können Sie den gewünschten Wiedergabebereich einer Super Audio CD auswählen. D SCAN (m/,) I hiermit aktivieren Sie die Zeitraffer-Funktion (schnelle Wiedergabe). E STOP entspricht dem Betätigen der STOP-Taste am X-01.
Fernbedienung Einsetzen der Batterien Lösen Sie bitte die zwei Schrauben des Batteriefachdeckels der Fernbedienung mittels eines passenden Schraubendrehers. Nachdem Sie den Deckel entfernt haben, überprüfen Sie bitte die Polarität (+/_) im Batteriefach. Setzen Sie die Batterien vom Typ „AA“ gemäß ihrer korrekten Polarität ein, und schließen Sie den Batteriefachdeckel.
Wiedergabe 3 2 4 5 1 5 Betätigen Sie zum Starten der Wiedergabe die PLAY- Taste. Unterbrechen der Wiedergabe (Pause) 1 Schalten Sie den X-01 mittels POWER-Taste an der Komponente ein. Die Umrandung der Taste und das Display leuchten. 2 Betätigen Sie die OPEN/CLOSE-Taste. Die Disc-Schublade öffnet sich nach ein bis zwei Sekunden (diese Verzögerung kommt durch die Mechanik des VRDSLaufwerks zustande).
Verwenden der SKIP-Tasten Betätigen Sie wiederholt eine der MUSIC SKIP-Tasten (. oder /), bis Sie den gewünschten Musiktitel gefunden haben. Die Wiedergabe beginnt ab dem Anfang des Titels. < Wenn Sie die .-Taste einmal während der Wiedergabe betätigen, beginnt die Wiedergabe erneut ab dem Anfang des aktuellen Titels. Wenn Sie die Taste innerhalb der ersten Sekunde eines Titels betätigen, beginnt die Wiedergabe ab dem Anfang des vorangegangenen Titels.
Wiedergabe einer programmierten Titelfolge Bei einer programmierten Titelfolge können Sie bis zu 30 Titel in der von Ihnen gewünschten Reihenfolge wiedergeben. 1 Betätigen Sie die PROGRAM-Taste (während der Wiedergabe oder im Stoppmodus). Sofern gerade ein Titel wiedergegeben wird (oder dessen Wiedergabe kurzzeitig unterbrochen wurde (PAUSE)), erscheint die Nummer dieses Titels als erster Eintrag in der zu programmierenden Titelfolge.
Wiedergabewiederholung Verwenden Sie zur Auswahl der Wiedergabewiederholungsfunktion die REPEAT-Taste. Durch wiederholtes Betätigen der REPEAT-Taste können Sie jeweils zwischen den folgenden Optionen umschalten: REPEAT TRK (Titelwiederholung) REPEAT DSC (Disc-Wiederholung) REPEAT OFF (aus) Einstellen der Display-Helligkeit Die Helligkeit der Displayanzeige am X-01 kann in drei Stufen eingestellt oder komplett ausgeschaltet werden.
Ändern der Displayanzeige Während der Wiedergabe ändert sich bei jedem Betätigen der DISPLAY-Taste die Anzeige im Display wie folgt: < Die DISPLAY-Taste kann während der Wiedergabe einer programmierten Titelfolge nicht verwendet werden. Clock-Modus Außerordentlich präzise Wiedergabequalität erzielen Sie, indem Sie das Word Clock-Signal (Sync) einer externen Komponente, wie etwa dem Esoteric D-70 oder G-0 dazu verwenden, um Ihr komplettes Audiosystem zu synchronisieren.
Einstellungen (Einleitung) 1 Schalten Sie die Hauptkomponente ein. 4 Verwenden Sie zum Einstellen der Werte von Menüpunkten, die durch das „>“-Symbol markiert sind, die Auf- oder Abwärts-Cursortasten. Bestätigen Sie Ihre Einstellungen durch Betätigen der ENTER-Taste. 2 Betätigen Sie zum Aufruf des Setupmenüs die SETUP- Taste. < Änderungen numerischer Werte (wie etwa den Abständen von Lautsprechersystemen) werden auch ohne Betätigen der ENTER-Taste vorgenommen.
AudioSetup GeneralSet Analog Out Option DigitalOut CD Direct SP Setup SP Size Option Option C Size Option Option SR/SL Size Option SW ON/OFF Option L/R *.*m Option C *.*m Option SR/SL *.*m Option LR ***.*dB Option C ***.*dB Option SR ***.*-dB Option SL ***.*dB Option SW ***.
Einstellungen (Audio) Einstellungen für die Lautsprechersysteme Einstellen des Analogausgangs (Analog Out) Verwenden Sie die Lautsprechermenüs, wenn Sie am X-01 einen AV-Verstärker/-Receiver über die 5.1-Analogausgänge betreiben (diese Einstellungen wirken sich ausschließlich auf das Audiosignal der mehrkanaligen Analogausgänge aus). Verwenden Sie zum Einstellen der Werte von Menüpunkten, die durch das „>“-Symbol markiert sind, die Auf- oder Abwärts-Cursortasten.
Abstand der Lautsprechersysteme zur Hörposition (Distance) Idealerweise sollten die Lautsprechersysteme so aufgestellt werden, dass sie alle im gleichen Abstand zur Hörposition aufweisen. Falls dies nicht möglich sein sollte, verwenden Sie bitte die im Folgenden beschriebene Methode zur Anpassung der individuellen akustischen Ausgangspegel. Sie können ebenfalls alle Entfernungswerte gleichzeitig einstellen.
Hilfe bei Funktionsstörungen Falls Sie mit dem Gerät einmal Probleme haben sollten, nehmen Sie sich bitte die Zeit, um die folgende Auflistung durchzugehen. In den meisten Fällen werden Sie das Problem selbst lösen können, ohne dass Sie sich an Ihren Händler oder ein TEAC-Service-Center wenden müssen. Keine Netzversorgung e Überprüfen Sie bitte, ob der Netzstecker korrekt an einer Wandsteckdose angeschlossen ist.
Technische Daten Allgemein System . . . . . . . . . . . . . . . . . . . . . . . Super Audio CD und CD Spannungsversorgung Europa-modell . . . . . . . . . 230 V Wechselspannung, 50 Hz USA/Kanada-modell . . . . . 120 V Wechselspannung, 60 Hz Korea-modell . . . . . . . . . . 220 V Wechselspannung, 60 Hz Leistungsaufnahme . . . . . . . . . . . . . . . . . . . . . . . . . . . . 40 W Gewicht . . . . . . . . . . . . . . . . . . . . . . . . . . . . . . . . . . . . 25 kg Abmessungen (BxHxT) . . . . . . . . . . . . .
TEAC ESOTERIC COMPANY 3-7-3, Nakacho, Musashino-shi, Tokyo 180-8550, Japan Phone: (0422) 52-5132 e-mail: eso-os@tec.teac.co.jp TEAC AMERICA, INC. 7733 Telegraph Road, Montebello, California 90640 Phone: (323) 726-0303 TEAC CANADA LTD. 5939 Wallace Street, Mississauga, Ontario L4Z 1Z8, Canada Phone: (905) 890-8008 TEAC MEXICO, S.A. De C.