D01102420A RZ-1 Integrated Music System OWNER’S MANUAL..................... 4 MODE D’EMPLOI....................... 28 MANUAL DEL USUARIO............
IMPORTANT SAFETY INSTRUCTIONS CAUTION: TO REDUCE THE RISK OF ELECTRIC SHOCK, DO NOT REMOVE COVER (OR BACK). NO USER-SERVICEABLE PARTS INSIDE. REFER SERVICING TO QUALIFIED SERVICE PERSONNEL. The lightning flash with arrowhead symbol, within an equilateral triangle, is intended to alert the user to the presence of uninsulated “dangerous voltage” within the product’s enclosure that may be of sufficient magnitude to constitute a risk of electric shock to persons.
For U.S.A. This equipment has been tested and found to comply with the limits for a Class B digital device, pursuant to Part 15 of the FCC Rules. These limits are designed to provide reasonable protection against harmful interference in a residential installation. This equipment generates, uses, and can radiate radio frequency energy and, if not installed and used in accordance with the instructions, may cause harmful interference to radio communications.
Contents Thank you for choosing ESOTERIC. Read this manual carefully to get the best performance from this unit. Before Use. . . . . . . . . . . . . . . . . . . . . . . . . . . . . . . . . . . . . . . . . . . . . . . . . . . . . . . . . . . . 5 Discs. . . . . . . . . . . . . . . . . . . . . . . . . . . . . . . . . . . . . . . . . . . . . . . . . . . . . . . . . . . . . . . . . 6 Speaker Connections. . . . . . . . . . . . . . . . . . . . . . . . . . . . . . . . . . . . . . . . . . . . . . . . .
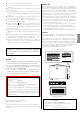
Before Use Read this before attempting any operations. Placement of the unit What’s in the box Confirm the supplied standard accessories. Remote control unit (RC-1251) x 1 < Choose the installation location of your unit carefully. Avoid placing it in direct sunlight or close to a source of heat. Also avoid locations subject to vibrations and excessive dust, heat, cold or moisture. Batteries (AA) x 2 < Do not place the unit on an amplifier or receiver or any other device that generates heat.
Discs Discs that can be played on this unit CDs that bear the “COMPACT disc DIGITAL AUDIO” logo. (12 cm/8 cm) < Never use a stabilizer. Using commercially available CD stabilizers with this unit will damage the mechanisms and cause them to malfunction. < Do not use irregularly-shaped discs (octagonal, heart-shaped, business card size, etc.). CDs with these shapes could damage the unit. Super Audio CDs that bear the “Super Audio CD” logo.
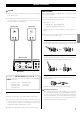
Speaker Connections CAUTION How to connect < After all connections are complete, connect the power cord’s plug to the AC wall socket. < The metal portions of the two separate wires should not touch or an electrical short can occur. Shorted wires can create a fire hazard or induce a failure in your equipment. Right Speaker Left Speaker The red speaker terminals are + (positive) and the black speaker terminals are _ (negative).
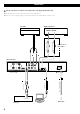
Connections After all connections are complete, connect the power cord’s plug to the AC wall socket. < Read the instructions of each component you intend to use with this unit. < Be sure to connect each plug securely. To prevent hum and noise, do not bundle the connection cords. Turntable Digital audio device DIGITAL OUT COAXIAL OPTICAL Optical digital cable RCA coaxial cable A Connect one of these cables.
A Analog audio input terminals [LINE IN] Used for the input of analog 2-channel audio signals from a cassette tape deck, tuner, etc. Connect the component with commercially-available RCA cables. Make sure to connect: White plug e White jack (L: left channel) Red plug e Red jack (R: right channel) < Connect the ground lead of the turntable to the SIGNAL GND terminal of the RZ-1. Inputs PCM format digital audio.
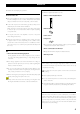
Identifying the Parts (Main Unit) Disc slot Display A B C A D STANDBY/ON E D Use this button to turn the unit on and to standby mode (off). The blue indicator lights when the unit is turned on. Press and hold this button for more than 2 seconds to enter the sleep timer setting mode (page 16). B Remote sensor When operating the remote control unit, point it towards here. E Play/Skip (y//) When a disc is loaded, press this button to start playback. The unit turns to CD/SACD mode automatically.
Identifying the Parts (Display) CD/SACD mode COAX/OPT/USB mode During playback Current input (COAX, OPT or USB) Volume (0 to 99) Currently playing track number (This is not displayed when remaining time of disc is displayed.) Volume (0 to 99) Sampling frequency (32k, 44k, 48k, 88k, 96k, 176k or 192k) < If no input device is connected, or this unit is unable to lock with that device, instead of the sampling frequency being shown, the name of the input source will blink. Check the connections.
Identifying the Parts (Remote Control Unit) A ON Press this button to turn the unit on. The blue indicator lights when the unit is turned on. B STANDBY Press this button to turn the unit to standby mode (off). C A In CD/SACD mode, use these buttons to enter the track number for playback. N B D C D F G H I E S Q R E 2CH/MULTI This button will not work on the RZ-1. Please ignore this button. F AUDIO In CD/SACD mode, press this button to change the shuffle mode (page 18).
Remote Control Unit (1) M SETUP Press this button to enter the setup mode. In setup mode, use this button to select an item (page 22). N The included remote control allows this unit to be operated from a distance. Point the remote control unit at the main unit’s remote sensor within 7 m (23 feet) of the main unit. Eject (OPEN/CLOSE L) Press this button to eject the disc. O Remote sensor CLEAR If you accidentally press the “+10” key, press this to cancel the input value (page 18).
Remote Control Unit (2) Battery Replacement If the distance required between the remote control unit and main unit decreases, the batteries are exhausted. In this case replace the batteries with new ones. For more information about collection of batteries, please contact your local municipality, your waste disposal service or the point of sale where you purchased the items. Basic Operation 1 The blue indicator lights.
Dimmer/Muting 3 Play the source, and adjust the volume using the VOL (+/−) buttons. These operations are available in every mode. Dimmer You can change the brightness of the display and indicator lamps. Each time the DIMMER button is pressed, the brightness changes as follows: 3 full brightness Turning the unit standby (off) 2 To prevent sudden noise from the speakers, make sure to turn the unit off in the following way. 1 2 1 0 off Stop the playback of the connected component.
Sleep Timer CD/SACD Playback (1) You can set the sleep timer so that the unit turns itself off after a specified amount of time. This operation is available in every mode. 1 1 Press the SOURCE button repeatedly to select “CD/SACD”. Press and hold the STANDBY/ON button for more than 2 seconds to enter the sleep timer setting mode. < When a disc is loaded while a source other than CD/SACD mode is selected, the unit turns automatically to CD/SACD mode. 2 Hold down more than 2 sec.
Suspending playback temporarily (Pause mode) Stopping playback During playback Press a Skip button (. or /) repeatedly until the desired track is selected. The selected track will be played from the beginning. < If the . button is pressed once during playback, the track being played will be played again from the beginning. To return to the beginning of the previous track, press the . button repeatedly.
CD/SACD Playback (2) Direct playback Repeat playback When stopped or playing back, you can use the Number buttons to directly select a track. Playback starts from the selected track. During playback, press the REPEAT button to change the repeat mode. Each time the REPEAT button is pressed, the repeat setting changes as follows: Examples: To playback track 5 Track repeat The track being played will be played repeatedly. If you select another track, the selected track will be played repeatedly.
Connecting to a Personal Computer and Playing Back a Music File (1) By connecting the USB input terminal of this unit to a personal computer using a USB cable, music files on the computer can be played with this unit. The USB-connected personal computer must be running with Microsoft Windows XP or Windows Vista. This unit might not function properly when used with a computer running a different OS. In addition, you must use a computer that is compatible with USB 1.1 or higher.
Connecting to a Personal Computer and Playing Back a Music File (2) < Depending on the operation environment of the personal computer, it may not be possible to maintain the USB data transfer speed. This may interrupt playback or cause noise. Furthermore, starting other applications during music file playback may interrupt playback or cause noise.
For Windows Vista e Click “Advanced” tab. e Select “2 channel, 24 bit, ********Hz”. “Control Panel” e “Sound” e Check that “SPDIF Interface ESOTERIC RZ-1” is selected in “Playback” tab. ENGLISH < Regardless of the format of the music file being played, the USB connection sends a PCM signal at the sampling frequency selected. Furthermore, it is recommended to change the following settings: Clicking “Properties” at this window displays the following window.
Setup Mode 3 Changing settings 1 Press the VOL (+/−) buttons to change the setting. Press and hold the SOURCE button for more than 2 seconds to enter the setup mode. < You can also use the INPUT ( control unit. Hold down more than 2 sec. The setup indicator ( display. 2 ) buttons on the remote See “Available setup items and settings” on the next page for Individual setting. ) and setup item appear on the < You can also use the SETUP button on the remote control unit.
Available setup items and settings H H DF > (Digital filter) Changes the digital filter of D/A converter. FIR A 32-bit FIR digital filter (Finite impulse response) oversamples the input signal to 8 times the frequency of the original signal. This provides a fuller, richer and deeper sound. BAL > (Speaker balance) Use this to adjust the left/right speaker output balance. The higher the R value, the more the sound will be balanced to the right speaker.
Restoring Factory Settings Protection Circuit Memorized settings are stored even after the power cord has been disconnected. This unit has a built-in protection circuit. “AMP ERROR!” blinks on the display when the protection circuit is activated. In this case, follow the steps below. If you have made changes through the setup process, and want to restart from a known set of options, restore the unit to the default factory settings as follows: 1 Turn the unit to standby mode (off).
Troubleshooting If you experience any problems with the unit, please take a moment to look through this chart and see if you can solve the problem yourself before you call your dealer or ESOTERIC customer service/ technical support. Moreover, the problem might be caused by something other than this unit. Confirm that connected devices are also being used properly. General Remote control does not work. e If the batteries are exhausted, change the batteries.
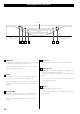
Rear Panel Layout 26
Specifications Amplifier Section Output power. . . . . . . . . . . . . . . . . . . . . . . . 100 W + 100 W (1 kHz, 6 Ω, JEITA) Minimum rated power output. . . . . . . . . . . . . . . . . . . . . . . . . . . 80 W + 80 W (1 kHz, 0.1 %, 6 Ω, LPF 20 kHz) (JEITA) Minimum impedance.. . . . . . . . . . . . . . . . . . . . . . . . . . . . . . . . . . . . . . . . . . . . . 4 Ω Frequency response. . . . . . . . . . . 15 Hz - 65 kHz (+1 dB, –3 dB, 6 Ω) (JEITA) Total harmonic distortion. . . . . . . . . . . . . . . .
ESOTERIC COMPANY 1-47 Ochiai, Tama-shi, Tokyo 206-8530 Japan Phone: (042) 356-9156 e-mail: eso-os@tec.teac.co.jp TEAC AMERICA, INC. 7733 Telegraph Road, Montebello, California 90640 U.S.A. Phone: (323) 726-0303 e-mail: esoteric_info@teac.com TEAC CANADA LTD. 5939 Wallace Street, Mississauga, Ontario L4Z 1Z8, Canada Phone: (905) 890-8008 TEAC MEXICO, S.A. DE C.V. Río Churubusco 364, Colonia Del Carmen, Delegación Coyoacàn, CP 04100, México DF, México Phone: (5255)5010-6000 TEAC UK LTD.