D01012820A X-05 Super Audio CD Player OWNER’S MANUAL . . . . . . . . . . . . . . . 2 MANUEL DU PROPRIÉTAIRE . . .
< Do not expose this apparatus to drips or splashes. < Do not place any objects filled with liquids, such as vases, on the apparatus. CAUTION: TO REDUCE THE RISK OF ELECTRIC SHOCK, DO NOT REMOVE COVER (OR BACK). NO USERSERVICEABLE PARTS INSIDE. REFER SERVICING TO QUALIFIED SERVICE PERSONNEL.
For U.S.A. Contents Thank you for choosing Esoteric. Read this manual carefully to get the best performance from this unit. Contents. . . . . . . . . . . . . . . . . . . . . . . . . . . . . . . . . . . . . . . . . . 3 Before Use . . . . . . . . . . . . . . . . . . . . . . . . . . . . . . . . . . . . . . . . 4 Discs . . . . . . . . . . . . . . . . . . . . . . . . . . . . . . . . . . . . . . . . . . . . . 5 Connection. . . . . . . . . . . . . . . . . . . . . . . . . . . . . . . . . . . . . . . .
Before Use What’s in the box Please confirm that the following accessories are in the box when you open it. Power cord x 1 Remote control unit (RC-1156) x 1 Batteries (AA, R6, SUM-3) x 2 Felt sheet x 3 Owner’s manual x 1 Warranty card x 1 Read this before operation < Be careful to avoid injury when moving the unit, on account of its weight. Get someone to help you if necessary. DO NOT MOVE THE UNIT DURING PLAYBACK During playback, the disc rotates at high speed.
Discs Type of discs that can be played on this system This unit can playback discs bearing any of the following logos: Super Audio CD: • Single layer, dual layer or Hybrid layer • 12cm (4.7”) or 8cm (3.15”) discs • Digital audio (DSD) Super Audio CDs are divided into tracks. Audio CD: • 12cm (4.7”) or 8cm (3.15”) discs • Linear PCM digital audio Audio CDs are divided into tracks.
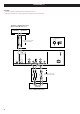
Connection (1) CAUTION: < Switch off all the equipment before making connection. < Read the instructions of each component you intend to use with this unit. Amplifier or digital audio device (CD recorder, MD deck, etc.) DIGITAL IN (COAXIAL) DIGITAL IN (OPTICAL) optical digital cable RCA digital coaxial cable Balanced XLR pin assignment Connect one of the cables as shown B C A RCA audio cable XLR cable Connect one set of the cables as shown Audio input (LINE IN) Stereo amplifier (AI-10 etc.
A Analog audio output terminals Use either the XLR or RCA (pin) terminals for 2-channel analog stereo output. Use commercially available XLR or RCA audio cables: XLR: Use a balanced XLR digital cable RCA: Use an RCA audio cable C RESERVED (slot for i.LINK) terminals The i.LINK (AUDIO) terminals will become available after a future hardware upgrade (chargeable and optional upgrade). i.LINK (AUDIO): 6pin x 1 i.
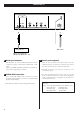
Connection (2) D E F Supplied power cord BNC coaxial cable WORD SYNC OUT Wall socket Master clock generator (AI-10, G-0s, G25U, AZ-1, etc.) D Word sync connector This allows the use of an externally-generated word clock connection, using a commercially available BNC coaxial cable. Connect the WORD SYNC OUT terminal on an amplifier AI10 or word clock generator to this unit.
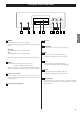
Front panel features (Main unit) A B C D E F G H I J ENGLISH A POWER Use this button to turn the unit on and off. The indicator ring changes depending on the operation status below: E Disc tray F OPEN/CLOSE Use this button to open and close the disc tray. Blue (on): The POWER button of the main unit is ON. Off: The POWER button of the main unit is OFF. When you do not use the unit, make sure to turn off the unit.
Front panel display a b c d e f g h a Disc type indicator Shows the type of disc currently loaded CD or SACD. Note: This display also lights when DVD video, DVD audio or Video CD discs are loaded (but playback of these types of discs is not possible with this unit). b REPEAT indicator Lights when repeat play mode is selected. c SETUP indicator Lights in the setup menu mode. d Message area Alphanumeric display to show times, status messages, etc.
Understanding the remote control unit D 2CH/MULTI If you have optionally upgraded to add the i.LINK connection, then this button will become operational. Press to select 2-channel stereo or multi-channel surround audio output (page 17). L A E SCAN Press to scan forward and backward during playback (page 13). B F STOP (H) M N C P E F G Q R Press to start playback (page 12). H VOLUME These buttons do not work on the X-05.
Remote Control Unit Playback (1) Notes on use < Point the remote control unit at the main unit’s remote sensor within seven meters (23 feet) of the main unit. There should not be any obstacles between the player and the remote control unit. < Do not allow direct sun or other light to shine on the remote sensor part of the main unit. This may cause the remote control unit to work incorrectly. 1 3 2 4 5 1 Press the POWER button to turn the unit on.
Pausing playback Press the PAUSE button (J) to pause playback and the indicator ring of the PLAY button (y) blinks. Stopping playback There are two types of Super Audio CDs, regular ones that contain 2-channel stereo and multi-channel stereo and hybrid discs (two-layer discs) that contain Super Audio CD and regular CD data. To change the playback area, press the front panel MODE button for 2 seconds or more while playback is stopped.
Playback (2) Repeat mode Selecting a track Use the number button to select tracks for playback in playback or stop mode. Example: To play track 3, press 3. To play track 12 press 10 and 2. Use the REPEAT button to select the repeat mode for playback. Repeated presses of the REPEAT button cycle between the following options: REPEAT TRK (track repeat) REPEAT DSC (whole disc repeat) REPEAT OFF (no repeat) Skipping playback Track repeat When this is selected, the currently selected track repeats.
Display dimming The display on the main unit can be dimmed to suit the environment in which you listen to music. Use the DIMMER button to cycle between these settings. During playback, it is possible to change the display as shown here. ENGLISH FL Dimmer3: Full brightness Changing the display mode Currently playing track Elapsed time of current track FL Dimmer2: Medium brightness FL Dimmer1: Minimum brightness Time remaining for current track OFF: The display and indicators are off.
Settings Available menu item and options WORD MODE 1 Repeatedly press the MODE button to select the menu item to be changed. Each press changes the display. WORD DF DSD (iLINK) (normal display) Turns on or off the word sync function. The WORD button of the remote control unit provides the same function.
2ch/Multi ch (i.LINK) If you have optionally upgraded to add the i.LINK connection, then the i.LINK terminal becomes operational. When the i.LINK (AUDIO) terminal is connected to an amplifier or a D/A converter, select a proper i.LINK output setting. When using the i.LINK terminal, select “60958” or “PCM”. 60958 DSD signal is output during playback of a Super Audio CD. The digital signal in IEC60958 (DSD) format is output during playback of a CD. < Some amplifiers may display this signal as DVD-Audio.
i.LINK (IEEE 1394) If you have optionally upgraded to add the i.LINK connection, then the i.LINK terminal becomes operational. The i.LINK is also known as IEEE 1394, an international specification. By connecting an i.LINK (AUDIO)-capable device to the i.LINK (AUDIO) terminal on this unit using an i.
Troubleshooting In case you experience any problem with this unit, please take the time to look through these pages and see if you can solve the problem yourself before you call your dealer. General No power e Make sure to plug the power cord into the AC outlet. Make sure there is power to the AC outlet by plugging another item such as a lamp or fan to test the outlet circuit. Other units with remote controls operate incorrectly.
Specifications General System . . . . . . . . . . . . . . . . . . . . . . . . . . Super Audio CD, CD Power supply Europe model . . . . . . . . . . . . . . . . . . . . . AC 230 V, 50 Hz U.S.A./Canada model. . . . . . . . . . . . . . . . AC 120 V, 60 Hz Korea model . . . . . . . . . . . . . . . . . . . . . . AC 220 V, 60 Hz Power consumption . . . . . . . . . . . . . . . . . . . . . . . . . . . . 15 W Weight . . . . . . . . . . . . . . . . . . . . . . . . . . . . 17.2 kg (38.
Sommaire ATTENTION < N’exposez pas cet appareil au ruissellement ni aux éclaboussures. Nous vous remercions pour l’achat d’un appareil Esoteric. Lire ce manuel avec attention pour obtenir les meilleures performances possibles de cet appareil. < Ne placez aucun objet contenant du liquide, tel qu’un vase, sur l’appareil. Sommaire . . . . . . . . . . . . . . . . . . . . . . . . . . . . . . . . . . . . . . . . 21 < N’installez pas cet appareil dans un espace confiné comme une bibliothèque ou similaire.
Avant utilisation Contenu de l’emballage Veuillez vérifier que les accessoires suivants se trouvent dans l’emballage après l’avoir ouvert. Cordon d’alimentation x 1 Télécommande (RC-1156) x 1 Piles (AA, R6, SUM-3) x 2 Tampons de feutrine x 3 Mode d’emploi x 1 Carte de garantie x 1 Lisez ceci avant utilisation < Faites attention de ne pas vous blesser lors du déplacement de l’appareil, en raison de son poids. Faites-vous aider si nécessaire.
Disques Types de disques lisibles par ce système Ce lecteur peut lire les disques portant n’importe lequel des logos suivants : Super Audio CD : • Simple couche, double couche ou hybride • Disques de 12 cm ou 8 cm • Audio numérique (DSD) Les Super Audio CD sont divisés en plages. CD audio : • Disques de 12 cm ou 8 cm • Audio numérique PCM linéaire Les CD audio sont divisés en plages.
Connexions (1) ATTENTION < Eteignez tous vos équipements avant de faire des connexions. < Lisez les instructions accompagnant chaque élément que vous désirez utilisez avec cet appareil. Amplificateur ou appareil audio numérique (enregistreur de CD, platine MD, etc.
A Prises de sortie audio analogique 2 canaux Reliez les prises XLR ou cinch (RCA) aux entrées audio analogiques d’un amplificateur stéréo à l’aide de câbles audio XLR ou cinch (RCA) du commerce. Utilisez des câbles audio XLR ou RCA disponibles dans le commerce. XLR: Utilisez un câble symétrique numérique XLR RCA: Utilisez un câble audio RCA Branchez la prise R de cet appareil à la prise de droite (R) de l’amplificateur et la prise L de cet appareil à la prise de gauche (L) de l’amplificateur.
Connexions (2) D E F Cordon d’alimentation fourni Câble coaxial BNC WORD SYNC OUT Prise secteur Générateur d’horloge de référence (AI-10, G-0s, G25U, AZ-1 etc.) D Connecteur de synchronisation Word Clock Il permet l’emploi d’une connexion à une référence word clock externe, au moyen d’un câble coaxial BNC du commerce. Branchez la prise WORD SYNC OUT d’un amplificateur AI-10 ou un générateur word clock à cet appareil.
Caractéristiques de la face avant A B C D A POWER Utilisez cette touche pour allumer et éteindre l’unité. Le témoin indicateur change en fonction de l’état de fonctionnement indiqué ci-dessous: E F G H I J E Tiroir de disque F OPEN/CLOSE (OUVRIR/FERMER) Utilisez cette touche pour ouvrir et fermer le tiroir de disque. Lorsque vous n’utilisez pas l’unité, veillez à l’éteindre.
Afficheur de la face avant a b c d e f g h a Indicateur de type de disque Affiche le type de disque actuellement chargé: CD ou SACD. Remarque: Cet indicateur s’allume aussi lorsqu les disques DVD vidéo, DVD audio ou CD vidéo est chargé (mais la lecture de ce type de disques est impossible dans cet appareil). b Indicateur de lecture en boucle (REPEAT) S’allume quand le mode de lecture en boucle est sélectionné. c Indicateur SETUP S’allume parallèlement au mode de configuration (setup).
Emploi de la télécommande D 2CH/MULTI Si vous avez effectué la mise à niveau optionnelle pour ajouter la connexion i.LINK, cette touche deviendra opérationnelle. Appuyez pour sélectionner la sortie audio stéréo 2 canaux ou ambiophonique multicanal (voir page 35). L A E SCAN Appuyez pour le balayage en avant et en arrière pendant la lecture (voir page 31). B F STOP (H) M N C D O P E F G Q R Appuyez pour arrêter la lecture (voir page 31).
Télécommande Lecture (1) Notes d’utilisation < Pointez la télécommande vers le capteur du lecteur dans un rayon de sept mètres. Il ne doit pas y avoir d’obstacles entre le lecteur et la télécommande. < N’exposez pas le capteur de télécommande du lecteur directement au soleil ou à une autre source lumineuse. Cela pourrait faire fonctionner incorrectement la télécommande.
Pause de la lecture Appuyez sur la touche PAUSE (J) pour interrompre la lecture et le témoin indicateur de la touche PLAY (y) clignotera. Appuyez sur la touche PLAY (y) ou la touche PAUSE (J) pour relancer la lecture.
Lecture (2) Lecture en boucle (Repeat) Sélection d’une plage Utilisez les touches numériques pour sélectionner une plage à reproduire. Exemple: Pour lire la plage 3, appuyez sur 3. Pour lire la plage 12, appuyez sur 10 et sur 2. Utilisez la touche REPEAT pour sélectionner le mode de lecture en boucle.
Atténuation de l’afficheur La luminosité de l’afficheur du lecteur peut être atténuée en fonction de l’environnement dans lequel vous écoutez de la musique. Utilisez la touche DIMMER pour passer en revue ces réglages. FL Dimmer3: Luminosité totale Changement du mode d’affichage Durant la lecture, il est possible de changer l’affichage comme indiqué ici.
Réglages Paramètres de menu et options disponibles WORD MODE 1 Appuyez répétitivement sur la touche MODE pour sélectionner le paramètre de menu à changer. Chaque pression modifie l’afficheur. WORD DF DSD (iLINK) (affichage normal) < Si l’appareil reste inutilisé durant 10 secondes, le mode de réglage est annulé. 2 Utilisez les touches SKIP (.//) pour sélectionner les options du paramètre de menu. Active/désactive la fonction de synchronisation word clock.
2ch/Multi ch Réglage de sortie i.LINK Si vous avez effectué la mise à niveau optionnelle pour ajouter la connexion i.LINK, la prise i.LINK devient opérationnelle. Quand la prise i.LINK (AUDIO) est connectée à un amplificateur ou à un convertisseur N/A, sélectionnez le bon réglage de sortie i.LINK. Quand vous utilisez la prise i.LINK, réglez ce paramètre sur « 60958 » ou « PCM ». 60958 Le signal DSD est produit durant la lecture d’un Super Audio CD.
i.LINK (IEEE 1394) Si vous avez effectué la mise à niveau optionnelle pour ajouter la connexion i.LINK, la prise i.LINK devient opérationnelle. Comment connecter plusieurs appareils compatibles i.LINK La liaison i.LINK est aussi connue sous le nom IEEE 1394, une norme internationale. En branchant un appareil compatible i.LINK (AUDIO) à la prise i.LINK (AUDIO) de cette unité au moyen d’un câble i.
Guide de dépannage Si vous avez des problèmes avec cet appareil, veuillez lire les pages qui suivent et voyez si vous pouvez résoudre le problème vous-même avant d’appeler votre revendeur. Généralités Pas d’alimentation e Vérifiez la connexion à la prise secteur. Contrôlez et assurezvous que la prise secteur n’a pas d’interrupteur et, si elle en a un, qu’elle est en service.
Caractéristiques Généralités Système . . . . . . . . . . . . . . . . . . . . . . . . Super Audio CD et CD Alimentation Modèle Europe . . . . . . . . . . . . . . . . . . . . . . 230 Vca 50 Hz Modèle Etats-Unis/Canada . . . . . . . . . . . . . 120 Vca 60 Hz Modèle Corée . . . . . . . . . . . . . . . . . . . . . . . 220 Vca 60 Hz Puissance absorbée . . . . . . . . . . . . . . . . . . . . . . . . . . . . 15 W Poids . . . . . . . . . . . . . . . . . . . . . . . . . . . . . . . . . . . . .
FRANÇAIS 39
TEAC ESOTERIC COMPANY 1-47 Ochiai, Tama-shi, Tokyo 206-8530, Japan Fax: (042) 356-9240 e-mail: eso-os@tec.teac.co.jp TEAC AMERICA, INC. 7733 Telegraph Road, Montebello, California 90640 Phone: (323) 726-0303 TEAC CANADA LTD. 5939 Wallace Street, Mississauga, Ontario L4Z 1Z8, Canada Phone: (905) 890-8008 TEAC MEXICO, S.A. De C.