Combined security camera floodlight system
Table of contents Contents of package . . . . . . . . . . . . . . . . . . . . . . . . . . . . . . . . . . . . . . . . . . . . . . . . 3 GuardCam Motion Light with Video Camera . . . . . . . . . . . . . . . . . . . . . . . . . . . 4 Step 1 - Assembly . . . . . . . . . . . . . . . . . . . . . . . . . . . . . . . . . . . . . . . . . . . . . . . . . . 4 Step 2 - Insert/remove SD Card . . . . . . . . . . . . . . . . . . . . . . . . . . . . . . . . . . . . . . 5 Step 3 - Installing the GuardCam . . . . . . . . .
GuardCam Motion Light with Video Camera overview Floodlight Cover Halogen lamp 45º 45º 50º Waterproof cover 3 mode selection Camera lens PIR lens Low battery indicator 45º Step 1 - Assembly 45º 35º Install/replace the halogen lamp (see Fig. 1) I Make sure to unplug unit or turn off power first. I Remove floodlight cover by unscrewing floodlight screws using a Phillips head screw driver. I If replacing a bulb, take out the existing halogen light bulb.
Installation and replacement of back up batteries The Function of the back up batteries is to Provide power to complete a part finished recording if a mains power outage occurs and preserve date/time settings for a minimum of 120 hours prior to mains power being restored. Unscrew the screw A and remove back cover. Unscrew screw B and remove battery cover. I Put the 3pcs “AAA” 1.5V batteries into the battery compartment and make sure the polarity (- +) is aligned correctly.
Step 3 - Installing the GuardCam IMPORTANT - IF IN ANY DOUBT ABOUT THE INSTALLATION OF THIS PRODUCT, CONSULT A QUALIFIED ELECTRICIAN G This product must be grounded G Do not mount the unit against inflammable surfaces G The motion detector will not operate correctly if it is installed: - Near the outlet of a central heating boiler - Near air conditioning plant - Pointing directly at moving vehicles - Within sight of reflections from moving water - Where other lamps could shine on the detector BEFORE ATTEMPT
Step 4 - Mounting your GuardCam (see Fig. 4 & Fig. 5) 1. Place plastic masonry plugs into desired surface aligning holes as shown below. Using an electric screwdriver, fasten mounting plate directly to surface using screws E. 2. Feed the cable through the back mounting box and bush the cable entry to avoid abrasion to the cable. 3. Wire the unit as follows: (Ensure all wires are connected securely and that no loose strands are exposed) Fig.
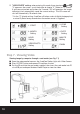
Step 5 - Adjusting the Settings (see Figs. 7 - 9) I Time control: Turn the time control knob to”+” side to increase the illumination time (7 minutes max.), turn the control knob to “-“ side to reduce the illumination time (30 seconds min.) I Sensitivity control: Adjust the detector range of Passive Infrared Motion Sensor (± 2M ~ 10M) Fig.
G Please note when off/record button is pressed, remove SD card within 30 seconds (now the LED will turn red after SD card is removed from the slot) I Reset button: restore functions to default settings 1) Press RESET button once each time you turn on unit. 2) Please press this button in case of system malfunction. I Off/Rec: Please press Off/Rec button to remove SD card. Please remove card within 30 seconds of pressing the Off/Rec button to avoid loss of data. Fig. 8 Fig.
2. “VIDEO/PHOTO” setting: when entering this mode, these two icons and “V” appear on the screen;push the button to choose ”V” (Video) or ”P” (Photo). If you have not pushed any buttons for 3 second, “OK” will appear on the screen, indicating it has automatically saved the current settings. The LCD screen will shut off automatically 10 seconds later. * On the ”P” (photo) setting, GuardCam will take a series of digital photographs at a rate of 3 photos every second when the motion sensor is triggered. 1.
Technical Specifications Features and specification: I PIR detection angle 160 Deg and detection range up to 10M I Records 20 seconds image recording for image stream:10fps at 480*640 Pixels I Built in SD card slot for SD memory card I SD card slot for additional storage, max memory size up to 2G I SD card specification: FAT I Automatic exposure control, white balance and sharpness I Auto Date & Time stamp I Effective viewing angle:60 deg I Effective viewing distance: 8M I Image format: JPEG AVI File I Powe
General Information and Safety SPECIAL CARE INSTRUCTIONS G The GuardCam Motion Light with Video Camera is designed to be weather resistant. Never attempt to immerse the unit in water or any other liquid. This will damage the unit and void the warranty. G This product is designed to illuminate, video, and make verbal announcements. It will not prevent the commission of any act, legal or illegal. The manufacturer assumes no liability for any damage to property, injury to person, or death.