
User Manual
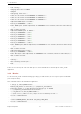
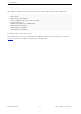

Table Of Contents

3 Get Started
4
Warn about uninitialized values.
5 -- Found Git: /usr/bin/git (found version ”2.17.0”)
6 -- Building empty aws_iot component due to configuration
7 -- Component names: ...
8 -- Component paths: ...
9
10 ... (more lines of build system output)
11
12 [527/527] Generating hello_world.bin
13 esptool.py v2.3.1
14
15 Project build complete. To flash, run this command:
16 ../../../components/esptool_py/esptool/esptool.py -p (PORT) -b 921600
17 write_flash --flash_mode dio --flash_size detect --flash_freq 40m
18 0x10000 build/hello_world.bin build 0x1000 build/bootloader/bootloader.bin 0x8000
19 build/partition_table/partition-table.bin
20 or run ’idf.py -p PORT flash’
If there are no errors, the build will finish by generating the firmware binary .bin file.
3.4.5 Flash onto the Device
Flash the binaries that you just built onto your module by running:
1 idf.py -p PORT [-b BAUD] flash
Replace PORT with your ESP32-S2 board’s serial port name from Step: Connect Your Device.
You can also change the flasher baud rate by replacing BAUD with the baud rate you need. The default baud
rate is 460800.
For more information on idf.py arguments, see idf.py.
Note:
The option ‘flash‘ automatically builds and flashes the project, so running ‘idf.py build‘ is not necessary.
When flashing, you will see the output log similar to the following:
1 ...
2 esptool.py esp32s2 -p /dev/ttyUSB0 -b 460800 --before=default_reset --after=hard_reset
3 write_flash --flash_mode dio --flash_freq 80m --flash_size 4 MB 0x0 bootloader/bootloader.
bin
4 0x10000 hello_world.bin 0x8000 partition_table/partition-table.bin
5 esptool.py v3.2-dev
6 Serial port /dev/ttyUSB0
7 Connecting....
8 Chip is ESP32-S2
9 Features: WiFi
10 Crystal is 40MHz
11 MAC: 7c:df:a1:e0:00:64
12 Uploading stub...
13 Running stub...
Espressif Systems 11 ESP32-S2-MINI-2 User Manual v0.5