ESP32-WATG-32D User Manual Preliminary version 0.
About This Guide This document is intended to help users set up the basic software development environment for developing applications using hardware based on the ESP32WATG-32D module. Release Notes Date Version Release notes 2019.12 V0.1 Preliminary release.
Table of Contents About This Guide 2 Release Notes 2 Table of Contents 3 1. Introduction to ESP32-WATG-32D 1 1.1. ESP32-WATG-32D 1 1.2. Pin Description 2 2. Hardware Preparation 5 2.1. Hardware Preparation 5 2.2. Hardware Connection 5 3. Getting Started with ESP32-WATG-32D 7 3.1. ESP-IDF 7 3.2. Set up the Tools 7 3.2.1. Standard Setup of Toolchain for Windows 7 3.2.2. Standard Setup of Toolchain for Linux 7 3.2.3. Standard Setup of Toolchain for Mac OS 9 3.3. Get ESP-IDF 9 3.4.
1. Introduction to ESP32WATG-32D 1.1. ESP32-WATG-32D ESP32-WATG-32D is a custom WiFi-BT-BLE MCU module for giving the “Connectivity Function” to customer’s different products, including Water Heater and Comfort Heating Systems. Table 1 provides the specifications of ESP32-WATG-32D. Table 1: ESP32-WATG-32D Specifications Categories Items Specifications 802.11 b/g/n (802.11n up to 150 Mbps) Wi-Fi Protocols A-MPDU and A-MSDU aggregation and 0.
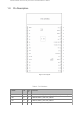
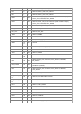
ESP32-WATG-32D has 35 pins which are described in Table2. 1.2. Pin Description Figure 1: Pin Layout Table 2: Pin Definitions Name No. Typ e Function RESET 1 I Module enable signal(Internal pull-up by default). Active high.
I39 5 I GPIO39, ADC1_CH3, RTC_GPIO3 I34 6 I GPIO34, ADC1_CH6, RTC_GPIO4 I35 7 I GPIO35, ADC1_CH7, RTC_GPIO5 IO32 8 I/O GPIO32, XTAL_32K_P (32.768 kHz crystal oscillator input), ADC1_CH4, TOUCH9, RTC_GPIO9 IO33 9 I/O GPIO33, XTAL_32K_N (32.
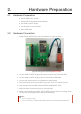
2. Hardware Preparation 2.1. Hardware Preparation • ESP32-WATG-32D module • Espressif RF testing board (Carrier Board) • One USB-to-UART dongle • PC, Windows 7 recommended • Micro-USB cable 2.2. Hardware Connection 1. Solder ESP32-WATG-32D to the Carrier Board, as Figure 2 shows. Figure 2: Testing Environment Setup(Needs Update) 2. Connect USB-to-UART dongle to the carrier board via TXD, RXD and GND. 3. Connect USB-to-UART dongle to the PC via the Micro-USB cable. 4.
3. Getting Started with ESP32WATG-32D 3.1. ESP-IDF The Espressif IoT Development Framework (ESP-IDF for short) is a framework for developing applications based on the Espressif ESP32. Users can develop applications with ESP32 in Windows/Linux/MacOS based on ESP-IDF. 3.2. Set up the Tools Aside from the ESP-IDF, you also need to install the tools used by ESP-IDF, such as the compiler, debugger, Python packages, etc. 3.2.1.
sudo apt-get install gcc git wget make libncurses-dev flex bison gperf python pythonpip python-setuptools python-serial python-cryptography python-future python-pyparsing python-pyelftools Arch: sudo pacman -S --needed gcc git make ncurses flex bison gperf python2-pyserial python2cryptography python2-future python2-pyparsing python2-pyelftools Set up The Toolchain 64-bit Linux: https://dl.espressif.com/dl/xtensa-esp32-elf-linux64-esp32-2019r1-8.2.0.tar.gz 32-bit Linux: https://dl.espressif.
Backwards compatibility libraries are available in AUR for native and lib32 configurations: https://aur.archlinux.org/packages/ncurses5-compat-libs/ https://aur.archlinux.org/packages/lib32-ncurses5-compat-libs/ Before installing these packages you might need to add the author’s public key to your keyring as described in the “Comments” section at the links above. Alternatively, use crosstool-NG to compile a gdb that links against ncurses 6. 3.2.3.
3.4.1. Windows Search for "Edit Environment Variables" on Windows 10. Click New... and add a new system variable IDF_PATH. The configuration should include an ESP-IDF directory, such as C:\Users\user-name\esp\esp-idf. Add ;%IDF_PATH%\tools to the Path variable to run idf.py and other tools. 3.4.2. Linux and MacOS Add the following to ~/.profile: export IDF_PATH=~/esp/esp-idf export PATH="$IDF_PATH/tools:$PATH" Run the following to check IDF_PATH: printenv IDF_PATH Run the following to check if idf.
4. Establish Serial Connection with ESP32-WATG-32D This section provides guidance how to establish serial connection between ESP32WATG-32D and PC. 4.1. Connect ESP32-WATG-32D to PC Solder ESP32-WATG-32D module to the carrier board and connect carrier board to the PC using the USB-to-UART dongle. If device driver does not install automatically, identify USB to serial converter chip on your external USB-to-UART dongle, search for drivers in internet and install them.
Figure 4-2. Two USB Serial Ports of USB-to-UART dongle in Windows Device Manager 4.3. Check Port on Linux and MacOS To check the device name for the serial port of your USB-to-UART dongle, run this command two times, first with the dongle unplugged, then with plugged in. The port which appears the second time is the one you need: Linux ls /dev/tty* MacOS ls /dev/cu.* 4.4. Adding User to dialout on Linux The currently logged user should have read and write access the serial port over USB.
Run terminal, set identified serial port, baud rate = 115200, data bits = 8, stop bits = 1, and parity = N. Below are example screen shots of setting the port and such transmission parameters (in short described as 115200-8-1-N) on Windows and Linux. Remember to select exactly the same serial port you have identified in steps above. Figure 4-3.
Figure 4-4. Setting Serial Communication in PuTTY on Linux Then open serial port in terminal and check, if you see any log printed out by ESP32. The log contents will depend on application loaded to ESP32. Notes: • For some serial port wiring configurations, the serial RTS & DTR pins need to be disabled in the terminal program before the ESP32 will boot and produce serial output. This depends on the hardware itself, most development boards (including all Espressif boards) do not have this issue.
5. Configure Enter hello_world directory and run menuconfig. Linux and MacOS cd ~/esp/hello_world idf.py -DIDF_TARGET=esp32 menuconfig You may need to run python2 idf.py on Python 3.0. Windows cd %userprofile%\esp\hello_world idf.py -DIDF_TARGET=esp32 menuconfig The Python 2.7 installer will attempt to configure Windows to associate a .py file with Python 2. If other programs (such as Visual Studio Python tools) have been associated with other versions of Python, idf.
6. Build and Flash Now you can build and flash the application. Run: idf.py build This will compile the application and all the ESP-IDF components, generate bootloader, partition table, and application binaries, and flash these binaries to your ESP32 board. $ idf.py build Running cmake in directory /path/to/hello_world/build Executing "cmake -G Ninja --warn-uninitialized /path/to/hello_world"... Warn about uninitialized values. -- Found Git: /usr/bin/git (found version "2.17.
7. Flash onto the Device Flash the binaries that you just built onto your ESP32 board by running: idf.py -p PORT [-b BAUD] flash Replace PORT with your ESP32 board's serial port name. You can also change the flasher baud rate by replacing BAUD with the baud rate you need. The default baud rate is 460800. Running esptool.py in directory [...]/esp/hello_world Executing "python [...]/esp-idf/components/esptool_py/esptool/esptool.py -b 460800 write_flash @flash_project_args"... esptool.
8. IDF Monitor To check if "hello_world" is indeed running, type idf.py -p PORT monitor (Do not forget to replace PORT with your serial port name). This command launches the monitor application: $ idf.py -p /dev/ttyUSB0 monitor Running idf_monitor in directory [...]/esp/hello_world/build Executing "python [...]/esp-idf/tools/idf_monitor.py -b 115200 [...]/esp/hello_world/ build/hello-world.elf"...
9. Examples For ESP-IDF examples, please go to ESP-IDF GitHub.
Disclaimer and Copyright Notice Information in this document, including URL references, is subject to change without notice. THIS DOCUMENT IS PROVIDED AS IS WITH NO WARRANTIES WHATSOEVER, INCLUDING ANY WARRANTY OF MERCHANTABILITY, NON-INFRINGEMENT, FITNESS FOR ANY PARTICULAR PURPOSE, OR ANY WARRANTY OTHERWISE ARISING OUT OF ANY PROPOSAL, SPECIFICATION OR SAMPLE. All liability, including liability for infringement of any proprietary rights, relating to use of information in this document is disclaimed.