ESP8685WROOM03 User Manual Pre-release v0.1 Espressif Systems Copyright © 2021 www.espressif.
About This Document This user manual shows how to get started with the ESP8685-WROOM-03 module. Document Updates Please always refer to the latest version on https://www.espressif.com/en/support/download/documents. Revision History For revision history of this document, please refer to the last page. Documentation Change Notification Espressif provides email notifications to keep you updated on changes to technical documentation. Please subscribe at www.espressif.com/en/subscribe.
Contents Contents 1 Overview 4 1.1 Module Overview 4 1.2 Pin Description 4 2 Get Started on ESP8685WROOM03 6 2.1 What You Need 6 2.2 Hardware Connection 6 2.3 Set up Development Environment 7 2.3.1 Install Prerequisites 7 2.3.2 Get ESP-IDF 7 2.3.3 Set up Tools 8 2.3.4 Set up Environment Variables 8 2.4 Create Your First Project 8 2.4.1 Start a Project 8 2.4.2 Connect Your Device 8 2.4.3 Configure 8 2.4.4 Build the Project 9 2.4.
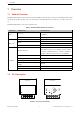
1 Overview 1 Overview 1.1 Module Overview ESP8685-WROOM-03 is a general-purpose Wi-Fi and Bluetooth LE module. The rich set of peripherals and a small size make this module an ideal choice for smart homes, industrial automation, health care, consumer electronics, etc. ESP8685-WROOM-03 comes with a PCB antenna. Table 1: ESP8685WROOM03 Specifications Categories Specifications IEEE 802.
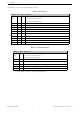
1 Overview The module has 11 pins. See pin definitions in Table 2. Table 2: Pin Definitions Name Type1 Function No. High: on, enables the chip. EN 1 I Low: off, the chip powers off.
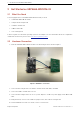
2 Get Started on ESP8685-WROOM-03 2 Get Started on ESP8685WROOM03 2.1 What You Need To develop applications for ESP8685-WROOM-03 module you need: • 1 x ESP8685-WROOM-03 module • 1 x Espressif RF testing board • 1 x USB-to-Serial board • 1 x Micro-USB cable • 1 x PC running Linux In this user guide, we take Linux operating system as an example. For more information about the configuration on Windows and macOS, please refer to ESP-IDF Programming Guide. 2.2 Hardware Connection 1.
2 Get Started on ESP8685-WROOM-03 7. After download, remove the jumper on IO9 and GND. 8. Power up the RF testing board again. ESP8685-WROOM-03 will switch to working mode. The chip will read programs from flash upon initialization. Note: IO9 is internally logic high. If IO9 is set to pull-up, the Boot mode is selected. If this pin is pull-down or left floating, the Download mode is selected. For more information on ESP8685-WROOM-03, please refer to ESP8685-WROOM-03 Datasheet. 2.
2 Get Started on ESP8685-WROOM-03 2.3.3 Set up Tools Aside from the ESP-IDF, you also need to install the tools used by ESP-IDF, such as the compiler, debugger, Python packages, etc. ESP-IDF provides a script named ’install.sh’ to help set up the tools in one go. cd ~/esp/esp-idf ./install.sh 2.3.4 Set up Environment Variables The installed tools are not yet added to the PATH environment variable. To make the tools usable from the command line, some environment variables must be set.
2 Get Started on ESP8685-WROOM-03 Setting the target with ‘idf.py set-target esp8685’ should be done once, after opening a new project. If the project contains some existing builds and configuration, they will be cleared and initialized. The target may be saved in environment variable to skip this step at all. See Selecting the Target for additional information.
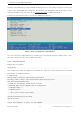
2 Get Started on ESP8685-WROOM-03 ../../../components/esptool_py/esptool/esptool.py -p (PORT) -b 921600 write_flash --flash_mode dio --flash_size detect --flash_freq 40m 0x10000 build/hello-world.bin build 0x1000 build/bootloader/bootloader.bin 0x8000 build/partition_table/partition-table.bin or run ’idf.py -p PORT flash’ If there are no errors, the build will finish by generating the firmware binary .bin file. 2.4.
2 Get Started on ESP8685-WROOM-03 Writing at 0x00020000... (100 %) Wrote 145520 bytes (71984 compressed) at 0x00010000 in 2.3 seconds (effective 504.4 kbit/s)... Hash of data verified. Leaving... Hard resetting via RTS pin... Done If everything goes well, the “hello_world” application starts running after you remove the jumper on IO0 and GND, and re-power up the testing board. 2.4.6 Monitor To check if “hello_world” is indeed running, type ‘idf.
3 U.S. FCC Statement 3 U.S. FCC Statement FCC ID: 2AC7ZESP868503 This device complies with Part 15 of the FCC Rules. Operation is subject to the following two conditions: • This device may not cause harmful interference. • This device must accept any interference received, including interference that may cause undesired operation. This equipment has been tested and found to comply with the limits for a Class B digital device, pursuant to Part15 of the FCC Rules.
3 U.S. FCC Statement Notice: In the event that these conditions cannot be met (for example certain laptop configuration or co-location with another transmitter), then the FCC authorization for this module in combination with the host equipment is no longer considered valid and the FCC ID of the module cannot be used on the final product. In these and circumstance, the OEM integrator will be responsible for re-evaluating.
4 Learning Resources 4 Learning Resources 4.1 MustRead Documents Please familiarize yourself with the following documents: • ESP-IDF Programming Guide Extensive documentation for the ESP-IDF development framework, ranging from hardware guides to API reference. • Espressif Products Ordering Information 4.2 Important Resources Here are the important -related resources.
Revision History Revision History Date Version Release notes 2021-12-27 V0.1 Preliminary release Espressif Systems 15 ESP8685-WROOM-03 User Manual v0.
Disclaimer and Copyright Notice Information in this document, including URL references, is subject to change without notice. ALL THIRD PARTY’S INFORMATION IN THIS DOCUMENT IS PROVIDED AS IS WITH NO WARRANTIES TO ITS AUTHENTICITY AND ACCURACY. NO WARRANTY IS PROVIDED TO THIS DOCUMENT FOR ITS MERCHANTABILITY, NONINFRINGEMENT, FITNESS FOR ANY PARTICULAR PURPOSE, NOR DOES ANY WARRANTY OTHERWISE ARISING OUT OF ANY PROPOSAL, SPECIFICATION OR SAMPLE.