Vers 11/12 ESSE Engineering Limited, Ouzledale Foundry, Long Ing, Barnoldswick, Lancashire BB18 6BN Tel: 01282 813235 Fax: 01282 816876 E-mail: enquiries@esse.com Website: http://www.esse.com On-line store: http://esseparts.
ESSE Plus 1 Cooking Stove INSTALLATION, COMMISSIONING AND OPERATING INSTRUCTIONS MODEL: Plus 1 Wood/Smokeless Solid Fuel
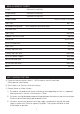
Master Stove Makers since 1854 ESSE Plus 1 Cooking Stove INSTALLATION, COMMISSIONING AND OPERATING INSTRUCTIONS TABLE OF CONTENTS General Safety Information Page 2 Cooking on a Hot Plate Page 10 Chimney and Flue Information Page 3 General Advice Page 10 Flue Draught Page 4 Cooking in the Oven Page 10 Installing the Appliance Page 5 Ash Removal Page 11 Commissioning the Appliance Page 5 Seasoning and Storing Firewood Page 12 Chimney and Flue Page 6 The Wood Burning Process Page 13 Re
GENERAL SAFETY INFORMATION In the UK, the installer has a responsibility under the Health and Safety at Work Act 1974 to provide for the safety of persons carrying out the installation. Attention is drawn to the fact that fire cement is caustic and hands must be washed thoroughly after use. The appliance is heavy and care must be taken during handling.
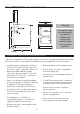
Fig.1 – Cooker Dimensions Note: All Dimensions are in milimetres 500 mm Warning 900 mm The appliance gets very hot especially the top and firedoor and extreme care should be taken when using the appliance. CHIMNEY AND FLUE INFORMATION CHIMNEY AND FLUE INFORMATION The successful operation of the cooking appliance relies on the adequate performance of the chimney to which it is connected.
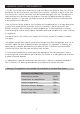
Note: The chimney/flue to which this appliance is being connected must be swept and examined for soundness prior to installation. Remedial action should be taken if required, seeking expert advice if necessary. Where the chimney is believed to have served an open fire installation it is possible that a higher flue gas temperature from a closed appliance may loosen deposits that were firmly adhered, with the consequent risk of flue blockage.
INSTALLING THE APPLIANCE Flue Connection The flue pipe used to connect the appliance to the chimney is 6’’ (150mm) in diameter. A 5-6’’ adaptor is supplied to connect to the flue box of the cooker. (The flue connection is on the top of the appliance, in the centre at the back.) Important Installation Notes 1. The installation must allow access for adequate chimney sweeping and flue cleaning. 2. Avoid using bends greater than 45º to the vertical.
CHIMNEY AND FLUE INFORMATION CHIMNEY AND FLUE Fig.2 – Chimney and Flue Performance LOW FLUE DRAUGHT SYMPTOMS: DIFFICULT TO LIGHT AND SMOKE COMING INTO THE ROOM CAUSE REMEDY Cold chimney Line the chimney Chimney too short Extend the chimney Down draught Relocate/extend chimney terminal. Fit an anti down draught cowl. Chimney diameter too large Line the chimney Chimney obstruction Clear/sweep the chimney Restricted air supply Check for competing draughts (other chimneys, extractor hood/fans).
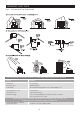
REPLACEMENT PARTS Ashpan Optional for solid fuel Ashpan guide Optional for solid fuel Grate Optional for solid fuel Hotplate Rope ROPE/CUT.
4) Installation as a central heating system alone, i.e. without a domestic supply, is not recommended as the boiler will produce heat when the cooker is in use, irrespective of central heating demand, and primary absorption must be provided. Installation and usage without water in the boiler is not permitted, and will damage the boiler and invalidate the warranty. 5) Whichever system is chosen the layout must follow established heating engineering practice.
Avoid the use of aerosol sprays in the vicinity of the cooker when it is in operation and do not heat any unopened airtight containers Ensure that precautions are taken when deep fat frying, never leave the appliance unattended and ensure you have fire safety equipment available such as a fire blanket in case of emergency.
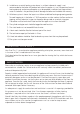
COOKING ON THE HOTPLATE Heat up from cold or low can be achieved quite quickly with a fast burning fire. Once hot, the hotplate will retain temperature for long periods even as the fire burns down. On page 11 is a graph showing typical hotplate temperatures that can be achieved using quality dry wood. Machined base pans are essential, as heat passes by conduction. Wipe the hotplate regularly to remove anything that might interfere with the contact between the hotplate and the base of the pan.
Fig.5 Cooker Ovens KEY: Lower oven °C 300 250 200 150 100 50 Temp °C 0 15mins 30mins 45mins 60mins 90mins 2hrs 3hrs Elasped time - 6 hours 4hrs 5hrs 6hrs 60mins 90mins 2hrs 3hrs Elasped time - 6 hours 4hrs 5hrs 6hrs Cooker Hotplates KEY: Hotplate 300 250 200 150 100 50 Temp °C 0 15mins 30mins 45mins ASH REMOVAL When burning wood, only remove small amounts of ash from the grate, leaving ideally 30mm depth of ash in the bottom for best performance.
SEASONING AND STORING FIREWOOD Wood, which has recently been cut and is still full of sap and water is known as "green" wood. Green wood will generally burn poorly and inefficiently, because it can have over 50% water in its cells. It may be hard to light, smoulder, not put out any heat and cause more than the usual amount of creosote to build up in your chimney. So your aim should be to dry the wood out to below 25% moisture content, this process is called seasoning.
THE WOOD BURNING PROCESS Understanding what happens when wood is burnt will enable you to burn wood in a more environmentally friendly way, reduce the maintenance required for your chimney and get more out of your wood. There are 3 stages in the wood-burning process: Evaporation When you light the cooker a lot of energy will be needed at first to boil away any moisture, which is left in the wood.
WHAT TYPE OF WOOD IS BEST The difference between 'hard' and 'soft' woods is the density of their cells or fibres. As a general rule, the deciduous trees (those that loose their leaves in the autumn) are usually thought of as hardwoods and the evergreen trees (such as pines, firs and larches) as the softwoods. But generalisations are of course always subject to many exceptions. Some evergreens may well be harder than some deciduous trees. Birch, for example, is not very hard at all.
THE IMPORTANCE OF A HEALTHY FLUE The successful operation of your range cooker is entirely dependent on the adequate performance (pull) of the chimney or flue to which it is connected. The following maintenance guidelines will be pointless unless the flue is also maintained and cleaned regularly. How often it needs cleaning will depend on the quality and moisture content of the wood you burn but an annual clean is recommended.
CLEANING THE FLUE WAYS - Every 3 months Always carry out cleaning procedures when the cooker is out and has been allowed to cool sufficiently to avoid burns. With time and experience you will be able to gauge the intervals between flue way cleaning more accurately. It will vary depending on the quality of your firewood and performance of your flue. Take time to get to know your cooker and inspect it at regular intervals for the first 6 months.
OPERATING TIPS By taking time to get to know your cooker, following our maintenance guidelines and using good quality firewood you should enjoy trouble free operation of your Woodfired cooker but it is also worth bearing in mind these useful operating tips: Fig.6 19cm • Don’t leave the cooker lit for long periods in slumbered down mode (as you would for overnight burning), open the air control and bank up the fire periodically to heat up the cooker and flue to prevent soot build up.
CONDITIONS OF GUARANTEE Your ESSE cooker is guaranteed against defects arising from faulty manufacture for three years, subject to the following express conditions: • This cooker must be commissioned by your ESSE Dealer (or an authorised HETAS engineer) upon installation. The details must be recorded on the Commissioning card and registered with ESSE by returning the completed card. The guarantee period commences upon delivery of the cooker (subject to receipt of the correctly completed card).