TouchConnect Model WPF-588 User Manual Version 1.0.
The only warranties for eStarling products and services are set forth in the express statements accompanying such products and services. Nothing herein should be construed as constituting an additional warranty. PF Digital,Inc. shall not be liable for technical or editorial errors or omissions contained herein. PF Digital,Inc. assumes no responsibility for the use or reliability of its software on equipment that is not furnished by PF Digital,Inc.
Table of Contents Introduction …………………………………………………………………………….................……... Package Contents ………………………………………………………………................……....……. Physical Setup ………………………………………………………………................………….......... Secure Digital™ Card ………………………………………………………................…………....….. Digital Keyboard ………………………………………………………….................…………...……… Initial Setup ………………………………………………………………..................…………...……… Over-The-Air Firmware Upgrades …………………………………….................……………...……..
Introduction Congratulations on your purchase of the eStarling TouchConnect. Now you can show off your digital photos directly from emails, RSS feeds, Picasa™, Flickr™, and Facebook™. Please read this manual carefully and follow all warnings and instructions before using your TouchConnect. Failing to follow these warnings can result in personal injury or damage to the TouchConnect. Keep this user manual in a convenient location for future reference.
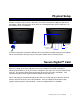
Physical Setup (1) Attach the stand to the rear of the TouchConnect by screwing it into the threaded hole clockwise in the back of the frame. Manually screw in the stand until it is tightened, but do not over tighten. When facing the back of the frame in a horizontal position, the threaded hole is to the left of the frame’s connections.
Digital Keyboard When you set up your eStarling TouchConnect, data fields will require you to use the digital keyboard on the touchscreen. This is necessary for configuring your wireless network requirements, setting the weather location, and accessing user accounts on the supported social applications. The digital keyboard displays at the bottom of the screen when you need to enter information into data fields.
Initial Setup The first time you turn on your eStarling TouchConnect, it will ask you to choose your wireless network (note that this will not occur if you connected an Ethernet cable to the eStarling TouchConnect and a working internet connection). (1) Please choose your wireless network by pressing and holding it on the touchscreen. If the frame cannot find your specific network (also known as the server set identifier or SSID), please select “Manual Setup” to set up your Wi-Fi configuration.
Over-the-Air Firmware Upgrades After successfully connecting to the Internet, your eStarling TouchConnect will now utilize the over-the-air firmware update feature to download the latest firmware for your frame. Please do not turn off your frame during the upgrade process. Your frame will reboot automatically during the firmware update. When rebooting your frame in the future, your eStarling TouchConnect will automatically update itself on occasion.
Gmail™ Setup After setting up your eStarling TouchConnect, you will be asked to enter your Gmail™ account information. It is strongly recommended that you create a new Gmail™ account dedicated only to your eStarling TouchConnect. The only supported email accounts for directly receiving photos and videos are Gmail™ accounts. (1) Please open a web browser on a computer or smartphone to visit Gmail’s website and setup a free Gmail™ account. Please follow Google’s instructions on initiating an account.
Navigating the TouchConnect You can access the eStarling TouchConnect’s functions by using the touchscreen interface. There are four major toolbars on the “Home” screen: (1) The Control Panel (2) The Media Taskbar (3) The Application Overlay (4) The Sidebar Control Panel Application Overlay Media Toolbar Sidebar You can access the various toolbars by pressing the open space on the touchscreen where the toolbar is located.
Control Panel There are three buttons on the Control Panel (1) Home (2) Wireless (3) Menu Home Wireless Menu The “Home” button allows you to return to the “Home” screen. The “Wireless” button will bring you to the “Choose your wireless network screen”. The “Menu” button provides access to the “Menu” that contains the “About” and “Brightness” functions.
About The “About” function on the eStarling TouchConnect allows you to see the firmware version, as well as the MAC address and IP address of your frame. Brightness To change the brightness on your frame’s display, touch and slide the touchscreen on the “Brightness” bar in the direction of your desired brightness. The “Brightness” indicator denotes the current brightness setting.
Sidebar There are three applications on the Sidebar: (1) The Clock (2) Yahoo! Weather™ (3) The Slideshow Cycle Clock Yahoo! Weather™ Slideshow Cycle You can access the Clock and Yahoo! Weather by touching the screen where the application is located. The Slideshow Cycle displays the previous picture and the next picture of the Slideshow.
Clock Once you have opened the “Clock”, you have the ability to change the following options: Date (1) Month - Touch the down-arrow to select the month from a list (2) Day - Press the data field to enter the numeric day on the digital keyboard (3) Year - Touch the down-arrow to select the year from a list Time (1) Hour - Press the data field to enter the numeric hour on the digital keyboard (2) Minute - Press the data field to enter the numeric minute on the digital keyboard (3) Time Zone - Touch one of the
Yahoo! Weather™ You have the option of setting the location of the desired weather conditions on your eStarling TouchConnect by zip code (USA only) or Where On Earth ID (WOEID). Just touch the small circle next to “United States” to change the zip code or the small circle next to “Other Country” to change the WOEID. Once you have completed entering the desired zip code or WOEID, please press the “Save” button. Note: You can find a WOEID at the website for Yahoo! Weather™ with a web browser.
Media Taskbar There are two sets of functions on the Media Taskbar: Photo (1) Media Toggle (2) Photo Gallery (3) Photo Controls (4) Layout (5) Interval Media Toggle Photo Gallery Video (1) Media Toggle (2) Video Gallery (3) Video Controls (4) Capture (5) Volume Photo Controls Layout Interval Media Toggle Video Gallery Video Controls Capture Volume You can access the functions on the “Media Taskbar” by touching the screen where the function is located.
Photo Gallery The “Photo Gallery” will display thumbnails of all the photos successfully downloaded to your eStarling TouchConnect. Touch a thumbnail to see a preview of the photo. If you would like for the previewed photo to be displayed, just touch the previewed photo. If you would like to return to the “Photo Gallery”, just touch the screen away from the previewed photo. You can toggle between pages by touching the arrows on either side of the photo page.
Photo Controls The “Photo Controls” allow you to play and pause the slideshow as well as cycle through pictures on your eStarling TouchConnect. To play or pause the slideshow, please press the “Play” button. To see the previous photo, press the “Back” button. If you want to see the next photo, press the “Next” button. Back Play Next Layout The “Layout” button gives you the option of how you would like the Sidebar to be displayed.
Video Gallery The “Video Gallery” will display thumbnails of all the videos successfully downloaded to your eStarling TouchConnect. Touch a thumbnail to see a larger preview of the thumbnail. If you would like for the previewed video to play, just touch the previewed video. If you would like to return to the “Video Gallery”, just touch the screen away from the previewed video. You can toggle between pages by touching the arrows on either side of the video page.
Video Controls The “Video Controls” allow you to play and pause the video as well as cycle through videos on your eStarling TouchConnect. To play or pause the video, please press the “Play” button. To see the previous video, press the “Back” button. If you want to see the next video, press the “Next” button. Back Play Next Capture The “Capture” button gives you the option to change the thumbnail preview of a video. Press the “Capture” button while a video is playing.
Application Overlay There are currently six working applications on the “Application Overlay”: (1) Photo & Video Via Gmail™ (2) My RSS (3) Picasa™ (4) Flickr™ (5) Facebook™ (6) Twitter™ Photo & Video Via Gmail™ My RSS Picasa™ Flickr™ Facebook™ Twitter™ You can access an application by touching the screen where the application is located. Photo & Video Via Gmail™ user information should have been completed when you initially set up your eStarling TouchConnect.
My RSS With your eStarling TouchConnect, you can update your photos with an RSS feed by sending an email to the Gmail™ webmail service account of your individual frame. To accomplish this, in the subject line, just type the symbol # and paste the RSS link address and type the symbol # again. For example: From: youremailaddress@you.com To: yourframe@gmail.com Subject: #http://yourfavoritewebsite.com/rss_link# Your eStarling TouchConnect will automatically subscribe to photos every hour.
Picasa™ Images on the eStarling TouchConnect can be updated through a Picasa™ photo organizing web account. Once you add your Picasa ™ account, your photos will automatically be downloaded onto your frame. The frame will update every time you upload an image to your Picasa ™ account. (1) After acquiring a Picasa™ account, please enter the username and password of your Picasa™ account on the digital keyboard. The digital keyboard will appear when you touch the data field.
Flickr™ In order to synchronize the eStarling TouchConnect with your Flickr™ account, you must first provide your authorization by clicking a link sent to the Gmail™ address of your frame. Next, the link will bring you to a Flickr™ login screen. Once you login to your Flickr™ account, you will see an authorization screen. Please press the button “OK, I’ll Authorize It”. Then, you must click the "Confirm" button on the Flickr™ application on your eStarling TouchConnect.
Facebook™ In order to synchronize the eStarling TouchConnect with your Facebook™ account, you must first provide your authorization by clicking a link sent to the Gmail™ address of your frame. Next, the link will bring you to a Facebook™ login screen. Once you login to your Facebook™ account, you will see a confirmation that you have authorized eStarling’s Facebook™ application. Then, you must click the "Confirm" button on the Facebook™ application on your eStarling TouchConnect.
Twitter™ On your eStarling TouchConnect you have the ability to update your Twitter™ status as well as receive status updates from people or organizations that you want to follow. (1) After acquiring a Twitter™ account, please enter the username and password of your Twitter™ account on the digital keyboard. The digital keyboard will appear when you touch the data field. (2) Press the “OK” button to save the information within your frame.
Specifications • Touchscreen interface for easy navigation • Wi-Fi 802.11b/g/n (WEP64, WEP128, WPA1, WPA2) connectivity • RJ45 wired connectivity • 10.
Frequently Asked Questions Q: I set up the eStarling TouchConnect; why won’t it turn on? A: The AC adapter is not securely connected to the frame or the power button is not pushed in. Q: I have a memory card in the eStarling TouchConnect; why can’t I view my photos? A: First, make sure that the memory card is a Secure Digital™ card and not a memory card in another format.
Maintenance & Cleaning Always follow these basic safety precautions when using your eStarling TouchConnect. This will reduce the risk of fire, electric shock, and injury. Do not expose this frame to rain, moisture, direct sunlight, or heat sources. Do not remove the cover. Keep the eStarling TouchConnect in a well-ventilated area. Refer all servicing to qualified personnel. • The eStarling TouchConnect is for indoor use only.
Limited Warranty Warranty / Return Policy The following eStarling Return Policies and Procedures apply only to eStarling hardware products. eStarling Return Policies and Procedures: 1. Returns within first 30 days of purchase 2. Dead on Arrival (DOA) Returns 3. Warranty Returns 4. Out of Warranty (OOW) Returns 1.