UseAmdCare -lr-l I II A Note To You 2 Understanding Safety 3 Knowing Your Dryer’s Features 5 Eget.ing Your 6 Caring For Your Dryer 8 Laundry Tips 12 If You Need Assistance Or Service 18 Warranty 20 1-800-253-1301 Call us with ELECTRIC AND GAS DRYERS PART NO. 3396310 questions or comments.
A Note To You Thank you for buying an Estate@ appliance. You have purchased a quality, wor/&c/ass home app iance. Years of engineering experience have gone into its manufacturing. To ensure many years oi trouble-free operation, we have developed this Use and Care Guide. it is full of valuable informaiion on how to operate and maintain your appliance properly and safely. Please read it carefully. Also, please complete and mail the Ownership Registration Card provided with your appliance.
Understanding Safety For your safety the information in this manual must be followed to minirlize the risk of fire or explosion or to prevent property damage, personal injury or -Do not store or use gasoline or other flammable vapors and liquids in the vicinity of this or any other appliance. -WHAT TO DO IF YOU SMELL GAS: l l l l l Do not try to light any appliance. Do not touch any electrical switch; do not use any phone in your building. Clear the room, building or area of all occupants.
IMPORTANT SAFETY INSTRUCTIONS To reduce the risk of fire, electrical shock, or injury to persons when using your dryer, follow bi lsic precautions, including the following: l l l l l Read all instructions . Do not tamper with the controls. l You are responsible for making sure that your dryer is installed, repaired and has parts replaced by a qualified person. Do not allow children to operate, play with or crawl inside your dryer. Supervise children when your dryer is used near children.
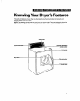
Knowing Your Dryer’s Features The parts and features of your dryer are illustrated features before using your dryer. be low. Become familiar with all parts and NOTE: The drawings in this book may vary from yout dryer model. They are designed to show the different features of all models covered by this book. Your model may not include all features.
Operating In This Before Section or stopping Page Page your dryer . . . . . . . . .. . . . . . . . . . . . . . . . . . . . . . . . 6 starling Starting Your Dryer Se ecting a cycle . . . .. . .. . . . .. . . .. .. . . . . . . . . . . . . . . . . . . . . . . . . . . . . 6 your dryer . . . . . . . . . . . .. . . . . .. . . . . 6 Operating your dryer properly assures the best dryinf results. This section gives you important information to help you to select a cycle, time and tertperature.
Loads tumble without heat during the last few minutes of all heated cycles. This makes a load easier to handle and helps keep wrinkles from setting in. NOTE: l l To help reduce wrinkling, remove the load from the dryer as soon as tumbling stops. This is important for permanent press, knits and synthetic fabrics. Do not overdry. Overdrying can cause shrinkage, static cling, and damage some fabrics. Using cycle the High Heat the Timed (high Failure to do so could result in fire or damaged items.
Using the Damp Dry cycle Use this cycle to dry damp items that do not require an entire drying cycle, or to dry items to damp level. Two examples are heavy cottons, such as jeans, which you do not want to become stiff, or cotton clothes which are easier to press when damp. 1. Set the Cycle Control Knob on DAMP DRY. 2. Push the Start Button. The last few minutes of this cycle are without heat to make the load easier to handle. Damp dry cycle Caring For Your Dryer Dryers require regular maintenance.
Maintenance-as needed Use the following suggestions about cleaning and lint removal to maintain your dryer and keep it operating efficiently. Cleaning a clogged lint screen Laundry detergents and fabric softeners can cause a residue build-up on the lint screen. A clogged lint screen can extend drying times. Clean the lint screen every six months or more frequently if it becomes clogged due to a residue build-up. Use the following method: 1. Wet both sides of lint screen with hot water. 2.
Removing accumulated lint Lint can gather inside the dryer and be a fuel for fire. It is recommended that lint be removed every 2 to 3 years, or more often, depending on dryer usage. Cleaning should be done by a qualified person. If you have any questions, please call our toll-free number l-800-253-1 301. Electrical Shock and Personal Injury Hazard l Unplug the power supply cord or turn off the electrical power before removing dryer panels. e Make sure the dryer is cool.
tf your dryer Is gas and has a full front panel, remove front panel as follows 1. Unplug the power supply cord or turn off the 2. 3. 4. 5. 6. 7. electrical power. Open lint screen lid. Remove two screws from lint screen area. Open top by pulling forward and up at each front comer (see View A). Rest raised top against wall behind dryer (top is hinged at rear). Remove two internal screws from front panel flanges (near top front corners). Lift front panel slightly, lifting off lower clips (see View B).
Laundry I In This Tips Section Before you dry .................................................. Air/line drying Drying ................................................... specialcare Using dryer fabric items ................................ softeners ................................................ Page 15 13 Vat ation care ................................................ .15 13 Solving Page 12 ............................
Air/line drying The following are examples of items that require drying without heat. These items can be placed on a line or rack to air dry. Heat sensitive items should not be dried in this dryer. Fire Hazard Do not dry heat sensitive fabrics, plastic, rubber, or some stuffed items with heat. Air/line dry these items on a line or rack. Failure to do so could result in fire or damaged items. .
Remove drapery weights ant hooks before laundering. For slipcovers, replace while still slightly damp. They will dry to fit tightly. Dry only a few minutes. 1. Leave room in dryer for loild to fluff. 2. Remove from dryer while Aightly damp. Do not overdry. Curtalns, SlipCOVerS Draperies, slipcovers l Sheers, some synthetic curtains Bonded or laminated fabrics l l Diapers, clothes Elastic Dry only a few minutes. Line dry these items.
Towels Select cycle according to fab ,ic type. Some towels, particularly those made of a blend of synthetic ‘ibers and natural fibers (polyester and cotton blends), may shed move lint than other towels causing your dryer’s lint screen to get full faster. Be sure to remove lint from the dryer lint screen before and after drvin I new towels. Washable Using knits Do not overdry knits. Overdr) ing can cause shrinking and static cling. 1. Select cycle according to 1abric and construction. 2.
Solving laundering problems Most laundering problems are easily solved. Check tl-e following list for problems you may have and possible causes. If you need additional help, chel:k the “Assistance or Service” section of this book. PROBLEM Greasy spots Lint Dryer fabric softeners were used Follow manufacturer’s carefully. Undiluted washer fabric softener was used Dilute fabric softener the final rinse. Enough detergent Use enough detergent to hold soil in the wash water until it drains away.
PROBLEM Shrlnldng Slow drying CAUSES/SOLUTIONS CHECK IF Items are overdried Remove items while there is still a trace of moisture. Some items should be removed while damp, then shaped and air dried. Fabric type and quality is suitable for drying Some turing. to the quality fabric There is a large amount of moisture in the load to be dried Some items hold more moisture than others (cottons more than polyester). They take longer to dry.
If You Need Assistance Or Service 1. Before calling for assistance El!! Is the power cord plugged Is lint screen clogged ... in? with lint? q Is exhaust duct or outside exhaus: Have you blown a fuse or tripped hood clogged with lint? :he circuit breaker? If you need more help, check the 1:hat-t below.
2. If you need assistance* ... Call Whlrlpool Consumer Asslstance Center telephone number. Dial toll-free from anywhere In the U.S.A.: l-800-253-1 301 and talk with one of our trained consultants. The consultant can instruct you in how to obtain satisfactory operation from your appliance or, if service is necessary, recommend a qualified service company in your area. If you prefer, write to: Mr.
ESTATE” Dryer Warranty LENGTH OF WARRANTY 1 WHIRLPOOL WILL PP Y FOR FULL ONE-YEAR WARRANTY FSPQ replacement parts and repair labor to correct defects in materials or workmansh p. Service must be provided by an authorized WhirlpoolSM z ervice company. From Date of Purchase WHIRLPOOL WILL NOT PAY FOR A. Service calls to: 1. Correct the installation of your dryer. 2. Instruct you how to use your dryer. 3. Replace house fuses or correct house wiring or [ lumbing. 4. Replace owner accessible light bulbs. B.