ELECTRIC RANGE Use & Care Guide For questions about features, operation/performance, parts, accessories or service, call: 1-800-253-1301. or visit our website at... www.estateappliances.com Table of Contents ................................................. 2 To the installer: Please leave this instruction book with the unit. To the consumer: Please read and keep this book for future reference.
TABLE OF CONTENTS RANGE SAFETY .............................................................................3 The Anti-Tip Bracket ....................................................................3 PARTS AND FEATURES................................................................5 COOKTOP USE ..............................................................................6 Cooktop Controls.........................................................................6 Ceramic Glass (on some models)..............
RANGE SAFETY Your safety and the safety of others are very important. We have provided many important safety messages in this manual and on your appliance. Always read and obey all safety messages. This is the safety alert symbol. This symbol alerts you to potential hazards that can kill or hurt you and others. All safety messages will follow the safety alert symbol and either the word “DANGER” or “WARNING.
IMPORTANT SAFETY INSTRUCTIONS WARNING: To reduce the risk of fire, electrical shock, injury to persons, or damage when using the range, follow basic precautions, including the following: ■ WARNING: TO REDUCE THE RISK OF TIPPING OF THE RANGE, THE RANGE MUST BE SECURED BY PROPERLY INSTALLED ANTI-TIP DEVICES. TO CHECK IF THE DEVICES ARE INSTALLED PROPERLY, SLIDE RANGE FORWARD, LOOK FOR ANTI-TIP BRACKET SECURELY ATTACHED TO FLOOR, AND SLIDE RANGE BACK SO REAR RANGE FOOT IS UNDER ANTI-TIP BRACKET.
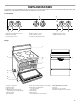
PARTS AND FEATURES This manual covers several different models. The range you have purchased may have some or all of the items listed. The locations and appearances of the features shown here may not match those of your model. Control Panels A C D B E A. Manual oven temperature control B. Oven indicator light C. Surface burner locator F D. Left front burner control E. Left rear burner control F. Surface heating indicator light G H G. Right rear burner control H.
COOKTOP USE ■ Do not leave a hot lid on the cooktop. As the cooktop cools, air can become trapped between the lid and the cooktop, and the ceramic glass could break when the lid is removed. ■ For foods containing sugar in any form, clean up all spills and soils as soon as possible. Allow the cooktop to cool down slightly. Then, while wearing oven mitts, remove the spills while the surface is still warm.
Cookware should not extend more than ½" (1.3 cm) over the coil element. If cookware is uneven or too large, it can produce excess heat, causing the burner bowl to change color. For more information, see the “General Cleaning” section. NOTE: Before removing or replacing coil elements and burner bowls, make sure they are cool and the control knobs are in the Off position. To Remove: 1. Push in the edge of coil element toward the receptacle. Then lift it enough to clear the burner bowl. 2.
COOKWARE CHARACTERISTICS Porcelain enamel-onsteel or cast iron ■ Stainless steel ■ Heats quickly, but unevenly. ■ A core or base of aluminum or copper on stainless steel provides even heating. See stainless steel or cast iron. BAKEWARE Hot air must be able to circulate around food to cook evenly, so allow 2" (5 cm) of space around bakeware and oven walls. Use the following chart as a guide. NUMBER OF PAN(S) POSITION ON RACK 1 Center of rack. 2 Side by side or slightly staggered.
To Adjust Oven Temperature Calibration: Meat Thermometer On models without a temperature probe, use a meat thermometer to determine doneness of meat, poultry and fish. The internal temperature, not appearance, should be used to determine doneness. A meat thermometer is not supplied with this appliance. ■ Insert the thermometer into the center of the thickest portion of the meat or inner thigh or breast of poultry. The tip of the thermometer should not touch fat, bone or gristle.
To Broil: Baking and Roasting Before baking and roasting, position the racks according to the “Positioning Racks and Bakeware” section. When roasting, it is not necessary to wait for the oven to preheat before putting food in, unless recommended in the recipe. To Bake or Roast: 1. Push in and turn the oven control knob to the desired temperature setting. The OVEN ON and OVEN HEATING lights will turn on, and the set temperature will appear in the display for 5 seconds.
RANGE CARE How the Cycle Works Self-Cleaning Cycle (on some models) WARNING Burn Hazard Do not touch the oven during the Self-Cleaning cycle. Keep children away from oven during Self-Cleaning cycle. IMPORTANT: The heating and cooling of porcelain on steel in the oven may result in discoloring, loss of gloss, hairline cracks and popping sounds. The Self-Cleaning cycle uses very high temperatures, burning soil to a powdery ash.
STAINLESS STEEL (on some models) Cleaning Method: Rub in direction of grain to avoid damaging. ■ Stainless Steel Cleaner & Polish Part Number 31464 (not included): See “Assistance or Service” section to order. ■ Liquid detergent or all-purpose cleaner: Rinse with clean water and dry with soft, lint-free cloth.
OVEN DOOR EXTERIOR Cleaning Method: ■ Glass cleaner and a soft cloth or sponge: Apply glass cleaner to soft cloth or sponge, not directly on panel. ■ All-Purpose Appliance Cleaner Part Number 31662 (not included): See “Assistance or Service” section to order. OVEN CAVITY Food spills should be cleaned when oven cools. At high temperatures, foods react with porcelain and staining, etching, pitting or faint white spots can result. Cleaning Method: ■ Self-Cleaning cycle: See “Self-Cleaning Cycle” first.
To Replace: 1. Insert both hanger arms into the door. TROUBLESHOOTING Try the solutions suggested here first in order to avoid the cost of an unnecessary service call. Nothing will operate ■ Is the power supply cord unplugged? Plug into a grounded outlet. ■ Has a household fuse blown, or has a circuit breaker tripped? Replace the fuse or reset the circuit breaker. If the problem continues, call an electrician. 2. Open the oven door. You should hear a “click” as the door is set into place. 3.
■ Is there proper air circulation around bakeware? See “Positioning Racks and Bakeware” section. ■ Is the batter evenly distributed in the pan? Check that batter is level in the pan. ■ Is the proper length of time being used? Adjust cooking time. ■ Has the oven door been opened while cooking? Oven peeking releases oven heat and can result in longer cooking times. Oven cooking results not what expected ■ Is the appliance level? Level the appliance. See the Installation Instructions.
WHIRLPOOL CORPORATION MAJOR APPLIANCE WARRANTY ONE YEAR LIMITED WARRANTY For one year from the date of purchase, when this major appliance is operated and maintained according to instructions attached to or furnished with the product, Whirlpool Corporation or Whirlpool Canada LP (hereafter “Whirlpool”) will pay for FSP® replacement parts and repair labor to correct defects in materials or workmanship. Service must be provided by a Whirlpool designated service company. ITEMS WHIRLPOOL WILL NOT PAY FOR 1.