
Installation guide


INSTALLATION REQUIREMENTS
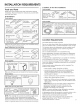
Tools and Parts
Gather the recommended tools and parts before starting
installation. Read and follow the instructions provided with
any tools listed here.
All installations
Tools needed:
I Flat-blode
Fliers I screwdriver
5/16" and 1/4" _ UL listed or CSA _ n
nut drivers or _7" approved twist-on U U
hex sockets _,_" wire connectors*
ii -
10 adjustable wrench 5 8" o_en end
/ F -
that opens to wrench _
1-1.8" (2.9 cm) U =' _ ,
*Must be the proper size to connect your household wiring
to 16-gauge wiring in dishwasher
Other useful items you may need:
4 ?
Fos,oht othtowo
Parts supplied:
12 !Drain hOseclamp__ Drai_ [ 2 _#10xli2.
PhillipsLhead
(!,a,_,,d l_a 1) screws
Silver Green [
Make sure all these parts are included in the literature package.
Parts needed:
90tiEIb0w fitting with Teflon® tape or pipe joint
3/8 N:P.T. external threads compound
(the 0the[ end mus t fit you i
water suDulv line) ( _ _. "_
j
Other parts you may also need:
I s,0o,,t ctto e
(38:1-5 0 cm) I for solid surface I du
screw4ype c0untertops @
camps{3max) J PartNo.8212560
NOTE: Parts available for purchase in plumbing supply stores.
Check local codes. Check existing electrical supply. See
"Electrical Requirements" section. It is recommended that
electrical connections be made by a licensed electrical installer.
® Teflon is a registered trademark of E.I. Du Pont de Nemours and Company.
In addition, for first time installations
Tools needed:
Parts needed:
,u
Copper tubing (3/8"
O.D, suggested) or
flexible braided
water Supply line
See "Electrical Requirements" section
Foi Direct Wire: For P0we i Supply
use UL listed or I Cord: use UL
CSA approved I l!sted power
condu t sUpp!y cord kit
c°nnect°r t0 I marked fo r use
fit 7/8(2:2 Cm) with d!shwashe r
hoe
..................................................................................................................................................................................................................................................................iiiiiiiii;i;il,i,,,i,i,i,,,,,i_iil,iii¸;ii,lii¸;ii,lii¸;ii,lii¸;ii,lii¸;ii,lii¸;ii,lii¸;ii,lii¸;ii,lii¸;il,i,i_;ii;ii¸;i;ii¸;i;ii¸;i;ii¸;i;ii¸;i;ii¸;i;ii¸;i;ii¸;i;ii¸;i;ii¸;i;ii¸;i;ii¸;i;ii¸;i;ii¸;i;ii¸;i;ii¸;i;ii¸;i;ii¸;i;ii¸;i;ii¸;i;ii¸;i;ii¸;i;ii¸;i;ii¸;i;ii¸;i;ii¸;i;ii¸;i;ii¸;i;ii¸;i;ii¸;i;i
Location Requirements
Grounded electrical supply required.
Do not run drain lines, water lines or electrical wiring where
they can interfere with or contact dishwasher motor or legs.
The location where the dishwasher will be installed must
provide clearance between motor and flooring. Motor
should not touch the floor.
Do not install dishwasher over carpeted flooring.
Protect dishwasher and water lines leading to dishwasher
against freezing. Damage from freezing is not covered by
the warranty.
A side panel kit is available from your dealer for installing
your dishwasher at the end of your cabinetry.
A moisture barrier accessory (Part No. 4396277) is available
from your dealer for installing underneath the countertop,
but is not required.
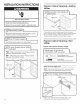
Check location where dishwasher will be installed. The
location must provide:
, easy access to water, electricity and drain.
, convenient access for loading and unloading dishes.
Corner locations require a 2" (5.1 cm) minimum
clearance between the side of the dishwasher door
and the wall or cabinet.
, square opening for proper operation and appearance.
, cabinet front perpendicular to floor.
, level floor. (If floor at front of opening is not level with
floor at rear of opening, shims may be needed to level
dishwasher.)
Helpful Tip: Be sure to accurately measure dimensions
and ensure dishwasher is level if the floor in the
dishwasher opening is uneven (example: flooring
extends only partway into opening).
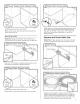
NOTE: To prevent shifting during dishwasher operation,
shims must be securely attached to the floor.
If dishwasher will be left unused for a period of time or in a
location where it may be subject to freezing, have it
winterized by authorized service personnel.
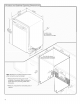
Make sure pipes, wires and drain hose are within the
shaded area shown in the "Product and Cabinet
Opening Dimensions" section. 3